Physical Modeling with Live's A.A.S. Devices
Lesson 6 from: Synthesis and Sound Design 101James Patrick
Physical Modeling with Live's A.A.S. Devices
Lesson 6 from: Synthesis and Sound Design 101James Patrick
Lesson Info
6. Physical Modeling with Live's A.A.S. Devices
Lessons
Intro to Synthesis and the Nature of Sound
26:12 2Subtractive Synthesis with the Ableton Analog
20:33 3FM Synthesis with Native Instrument's FM8 and the Ableton Operator
20:28 4Wavetable Synthesis with Native Instruments Massive
23:50 5Custom Wavetable Designs with U-He Zebra2
19:35 6Physical Modeling with Live's A.A.S. Devices
13:28 7The Dimensions of Audio Signal Processing
13:43 8Series and Parallel Processing with Effect Racks
14:35Lesson Info
Physical Modeling with Live's A.A.S. Devices
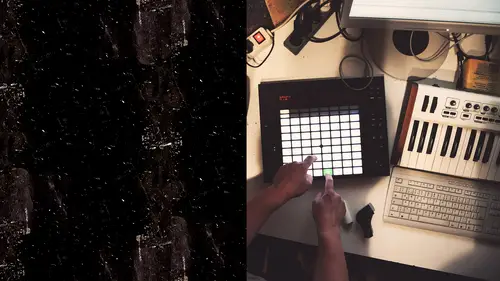
everyone, Welcome back. This is James Patrick. This is less than three of class to doing some advanced synthesis techniques. Previous lessons have been the wave table synthesis for the final lesson here, we're going to cover another kind of advanced again, dynamically calculated format for creating sound. This instead of wave tables where we're focusing on calculating the wave forms themselves out of the oscillator section. This is physical modelling. Physical modelling is the art, if you will, of quantifying physical phenomenon into algorithms. Basically mathematics, sizing or quantifying phenomenon that happens in the real world. Generally sound phenomena into ah keyboard controllable device able to live the sweet in partners with applied acoustic systems. Down here, these guys are, ah, world leading physical modelling software company. They make the plug ins the sweet devices in particular the collision, which is a mallets instrument. The corpus, which is just the resonant filter se...
ction as an audio effect from the collision, and then for the other instruments. There is the electric, which is a physically modeled roads and Wurlitzer. There is the tension, which is a physically modeled string instrument, and then last but not least, there's the analog, which is a kind of reverse engineer to physically modeled analog subtracted synthesizer. We covered that one in less and one So now that we're kind of on the other end of the scope where we went from, simple devices like oscillators, filters and amplifiers were moving outward now into kind of the future where we're kind of getting away from that language. We still have filters, and we still have envelopes. But the sound generation portion of the instrument is no longer an US later at all. It's simply something you're holding in your hand and that you're striking against something else. This instrument we have pulled up right here is the collision, and there's two different excite. A tres excited er is a general word and physical modelling where what we're doing is we're vibrating. Something physical modelling pivots around the kind of the idea of remaking or creating convolution, uh, creating convolutions out of impulse responses. What that means is, the impulse response is basically the resignation that happens around a sound. So if you could imagine, like clapping your hands in the middle of a room and getting rid of the clap sound, but only capturing the coloration that the room itself provides. That's an impulse response. We're stimulating an impulse buy holding a melon or just by vibrating our materials here with noise. So we have two different Excite ater options, and they then vibrate the material. And this is where the remaking thing comes into play. If you can imagine, well, what remaking what it is. It's a kind of an age old rock n roll thing, our early recording engineering studio production technique, where they didn't have fancy plug ins. Back in the day, all they really had was speakers and microphones and amplifiers. So what they would do is they would take that guitar track. Maybe that Jimmy Page Led Zeppelin guitar track that was maybe dry at one point, and they would run it through a microphone on. I'm sorry they would run through a speaker, maybe, like put that speaker diamond the end of the hallway, and then in the hallway they would like, hang things like carpets for diffusion. Or maybe not. Maybe they'd use a really big, long hallway that was all concrete to really adds hype to the guitar tone. And then, at the end of the hallway, that re record the signal with another microphone. This is kind of the original way to do signal processing in the acoustic realm. Run the sound through a speaker and re record it after ambience has been added. So with physical modeling, what we're doing is we're starting out with an exciter, which is going to generate vibration, but we're not actually listening to the Excite ater. What we're listening Teoh is the resonance that the excitation is stimulating. So, for instance, if I turn on some noise like watch if I just have noise on, make sure my track his arms to record. So I turned one of these resonate er's on. You get an idea of. This is just the pluck and we're hitting a beam. Watch one I had. Maybe you turned this into a bow. So essentially what I'm doing there is on Boeing of Iemma, and I can change the material into a variety of different options. Let's bow a tube, so that's pretty slick, too. So we have this ability, not even while it's playing to change the radius of the tube, to change the material of the membrane or to change the material of the string material of the beam. Each of these algorithms are gonna have slightly different math. And where this gets really amazing is that since all of this is attempting to quantify a real world phenomena, velocity is a critical thing to take into consideration. So let's go ahead and pluck around on our patch. We've got this clip from previous lessons is a little dumb little percussion loop. It's about 1/2 of our line. I'm gonna go more percussive. So see how that DK is really long. Let's make velocity tracker DK, but also have velocity affect the opening of the pipe and then maybe also have velocity effect the volume of our noise. Or how about the filter position of our noise? These are all good targets for velocity. So, for instance, what's something you could hit a membrane. What has a membrane? It's like a drum had like a tom drum. But we can couple that memory into other materials. Couple ing is gonna happen when one vibration, maybe the membrane vibrates and on its way down through the membrane, the vibration from the excitation then stimulates something else. How about a tube? This. It's gonna be in Siris now because they're coupled, or we can have them in an additive sense where they're both just in parallel, both being independently vibrated by the Excite ater. Let's start with them in Siris and see what it sounds like. Get rid of this velocity to cut off mail is a particular model. It's probably actually like a sample that's stimulating vibration school about this. Now, as you can link these together and adjust parameters that are gonna be globally, process herbal across both resonate er's or grab. One of the other was pitch one up pipe and tube kicked down the base ranges stimulates some wonderful tension. Let's go ahead and add some noise to the exciter way. So this is the collision. There's four different, physically modeled instruments and live the ones I listed earlier. The Collusion to me is the one that's Tambor wise. Most dynamic and most powerful attention is really, really unique and great for the synthesizing of hellos and other string type sounds. It's also great for big, droning textures. I'm also just a big fan of yours in collisions with drowning textures, but I'd give it more of like a bow type material. So this is basically just like Boeing physical things or plucking them or whatever. So you get a lot of Tambor control here. Physical modelling is generally is designed for exploration, um, and creating sounds that are physically impossible. A really common thing to think when you first learned about physical modelling is that you can just, um, you know, use it to create the perfect acoustic guitar sound, and if you're really, really good at it, you might come close. But the reality is, and this is advice I got from one of my mentors is that if you really want the perfect acoustic guitar sound, pick up an acoustic guitar. If you want to make sounds that no one has ever imagined or heard before, the physical modeling thing is gonna be a lot more interesting. For instance, being able Teoh play a tube that's done vibrating a string have been with tons of decay, and I mean there's a lot of different opportunities here to make some really cool stuff happen. Let's go ahead and plunk around here and see if we can't make something more interesting happen out of this really common thing to do with an instrument like this is once you get something really cool sounding re sample it printed toe audio. He's gonna have a baby loaded up into a sampler to re contextualize it into something new. That's gonna be stuff we're gonna be talking about, kind of right at the very end of the next class. So stay tuned. Hold tight on. Hopefully this physical modelling lesson has been into resting for you. And if nothing else, definitely reached with a collision. Give it some swing, add some velocity sensitivity to some of those parameters and realize some new dynamics dimensions in your percussion instruments. It's really, really amazing for that humanized element or that kind of alive texture component that is not predictable and is not something that anyone else has ever previously imagined. So enjoy physical modelling. So you guys up next
Ratings and Reviews
user-6180b9
This is a great, fast-paced introduction to producing sound using various popular software choices. James Patrick is super knowledgeable and presents the material in a patient (but fast), systematic way. This course is meant to be a high-level preview of a full-blown 6-month course at Slam Academy (taken online or in Minneapolis) so the pace of the material presented here is quite fast. In other words the tone is to show you what you'll learn if you take the full course. James suggests taking this course over 3 weeks to let things sink in. A dedicated student can follow along and review the material and then practice on their own software although it takes some focus! And while much of the course is incredibly well explained, there are also some sections where James works the controls without much narrative but making cool sounds. I ended up hitting pause every 30 seconds or so during some of the key sections so I could watch what he was doing and play around with the same controls. Ultimately the way to learn the software is by getting hands-on, so when I followed along this way, I learned a ton. Great course, be aware that it is a super high level survey of a longer course but this is still absolutely packed with information
a Creativelive Student
love this course, and i like it for my liking.
Jose Freitas MElo jUnior
AMAZING COURSE!
Student Work
Related Classes
Ableton Live