Lessons
Course Introduction
04:57 2The FM Concept
09:50 3Operator Fundamentals
10:16 4FM Pro Tips
11:14 5Classic Subtractive Techniques
08:15 6FM Monophonic Bass
11:32 7FM Polyphonic Leads
18:49 8Drum and Percussion Overview
11:26Lesson Info
The FM Concept
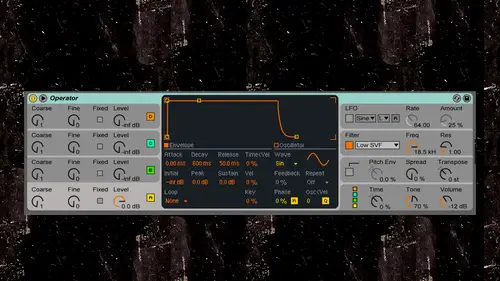
low. So before we get started, I want to take a moment to address something really important. I want to talk about the concept of FM synthesis before we start making kick drums and bass lines and wobbles. I want to make sure we've got a really nice solid foundation to kind of back up the creative decisions we're making through. Looking at the wave form through in a Silla scope as well as a spectral analyzer. This is on Acela scope from Max for live dot com. And what I've done here is just loaded it onto a track and phase locked it. That will keep the wave form steady in one position, as we will watch it. In this view, time is from left to right up here we have the stock able to in spectrum device, which I can expand by hitting this disclosure triangle. And this shows the frequency spectrum where bases on the left and high frequency sounds on the right, so frequency is from left to right in the top of the screen. If I look inside of the able 10 operator, I notice I have four identical o...
scillators. Each of these oscillators have their own discreet controls, which will get into soon. But what I'm gonna first do is point out the wave form selection and note how right now I have a standard sine wave. Let's listen to what a sine wave sounds like and watch what it looks like. This is, Ah, middle C sine wave. It's helping about 132 hurts, and you can see it's a pure curving wave with no jagged corners. If I were to introduce corners or any sort of shape aside from just steady curves to the sun wave, I would be evoking more overtones. I can visualize that by changing the wave form here through a bunch of different variations, primarily on sign saw square triangle. We also have a white noise generator here, which is going to be great for adding texture. And, you know, also agreed for drum sound snares and hi hats, things like that. First of all, let's move on to the most rich wave form of all of them as faras complex with overtones. Let's go to the digital saw wave. I'm gonna pluck the same middle C note, and you'll even watch that shadow from my old sine wave way saw the wave form down here. Sharp corners, those sharp corners that would evoke these overtones saw Wave introduces integer order to harmonics. What that means is that if this is the fundamental pitch at 132 hurts, this is 132 times two times three times four times five. So if I even went up to the 10th would be 1320 hertz and so on, I can always watch down here in the lower left of my spectral view toe, see what frequency I'm actually hovering over. Here's the 10th harmonic at 132 hertz, or 1.32 K In this case, Pardon me. So the saw way of introduces integer ordered harmonics, meaning a peek at every single multitude or multiplication of the fundamental pitch at a descending rate of one decibel per peak. So once I get to the 10th 1 it's 10 db quieter than the main peak, and each of these variations has a subtle change to the overtone content, which really effects what the sound sounds like when you hear a trumpet playing middle C in the new year of violin playing Middle C. They're both playing the same fundamental pitch, but it's the Tambor that is different. Tambor is another word for the overtone combination, and which overtones are there, how loud they are, how they surround that fundamental pitch to add its coloration. So back to the sine wave, you have a pure sign with little coloration. In fact, none in the digital case and in the case of subtracted synthesis, which is the kind of most popular and classic of all forms of synthesis, the way that you employ the way that you create your sounds as you grab a wave form that's rich with harmonics. And then you filter it. So I'll do that real quick by turning on a side wave, turning on a filter most classically in low pass mode, allowing the lows to pass. And then I turn down the frequency. Ah, so this is now like a sub tract of synthesis patch. If I turn this up, you can even look and see. I pretty much have a sine wave here. Doesn't get really cool until I start adding envelope modulation. So this is like a classic and simple subtracted patch with FM synthesis, I recommend you to start with just a sine wave the envelope. Make sure the sustains fully up. Let's try combining this sine wave with another sine wave that is in Siris. Thus evoking FM. You see how it's moving. Look at that motion that's all being evoked because I'm d tuned a little bit watch when I tuned it straight up static that d tuning. I keep in my default preset just a little bit, just to make sure it has motion right out of the box. I don't like keeping these olive zero unless it's a really specific kind of calculator kind of sound I'm making when each of these sine waves Aiken blend with each other in parallel or Siri's through. Using this algorithm selector algorithm is another fancy word for basically routing choice, and you can see if you look closely. Each of these has a different combination of connections between each other. This is the pure FM algorithm where you have one carrier that's carrying the audio signal and it's being modulated by an oscillator which is being modulated by another oscillator, which is being modulated by another oscillator and in this context, textbook wise, they're not even called oscillators. They're actually called operators more on that soon enough. But when you're talking about an FM synthesizer, you can call the oscillator an operator because primarily it could be routed into other oscillators and just used as a modulator something that creates motion without being audible. If I go all the way to the end here to our last algorithm, notice all my patch cables air coming out on their own, and let's just take a minute to listen to that, that's gonna be two different pitches now going to choose my course tuning to another peak. I'm gonna go to the fourth peak. Let's fill one up at the third peak to E consent. Their level essentially now I'm sculpting the tambor of the sound go with 1/10 peak. In other words, 1.32 que no gotta have my sustained level up thing is additive synthesis, uh, kind of almost like auto automatic cords. I could make chords and harmonies here, especially when I play chords on the keyboard. It can get really thick and really beautiful. This kind of a combination and FM sense is going to be pretty bright. It's gonna be very rich with lots of complex overtones. It's not gonna have a lot of soul, though that's going to my job is to teach you how to use this thing and make it feel soulful. We're back to a sign so we're doing with FM synthesis. Is were combining wave forms in Siris to create more complex overtones than were capable of with just choosing individual simple wave forms with sharp corners. So that's kind of the concept of FM synthesis. There's a lot of tips I'm gonna be mentioning as we go throughout this course, but I want us to all just be able to quickly see how a sine wave relates to a saw wave and any other wave form based on, instead of running it straight out to the amplifier, combining it with other modulators to create more complex wave shapes. And remember, once you had some D tuning, things get really lush. Try and mess with are already starting to sound a lot more rich notice. I'm going with really subtle deaths, sticking with just sine waves. Looking around my tuning. That's a little bit of an introduction to the concept of how we can create mawr interesting sounds with an FM synthesizer than we could with just saw wave with a low pass filter. So there's a little bit about the concept we're gonna be digging into more about what operators are really all about and what makes this instrument special in upcoming videos. But hold tight for that. Let's dig in.
Ratings and Reviews
a Creativelive Student
People complain about Abletons "uninspiring" synth presets, and Operators businesslike interface doesn't scream "fun". It is however, an insanely fun and powerful instrument once you get your head around it. This class is perfectly formulated to turn anyone into an FM super-ninja in no time. It starts with the basics - perfectly explained, and delves deeper at a nice pace. I've been using Operator for years but still picked up a few tips in the later lessons. Taking this class will empower you to stop worrying about having the latest, greatest third party VST. Operator is a beastly synth. I rarely use any other synth because of the sheer sonic capability, and tight integration with Live.