Lessons
Lesson Info
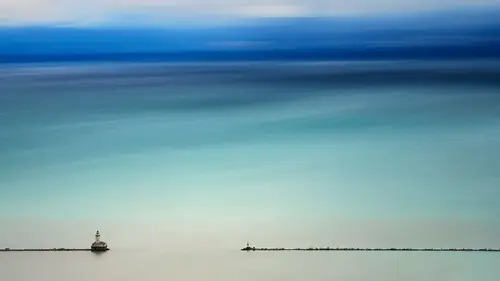
Blend If for Sky Replacements
Here is a photo that I took in, I'm gonna butcher this, but it's (mumbling), France. And this is actually a structure that Eiffel did, aside from the Eiffel Tower. So one of my buddies took me here to one of his favorite places to shoot and we went out and it was raining, slight drizzle, and I really wanted to shoot it, so I did. But I know enough about Photoshop and I know enough about my workflow that I can fake it 'til I make it. So all I need is data. The data that you're looking at here you'd probably say, I would never use that in my workflow or my portfolio, because it just doesn't look that great, Blake. And I agree with you. But let's go ahead and open up this sky right here. So sky replacements are always something that I think are morally okay. So let's just talk about that real quick. Some of you might be like, oh, it's not morally correct to replace the sky. Well, guess what, I'm an artist, so I don't care. I do what I need to do, because I'm an artist. I'm a creative prob...
lem solver. And I know, I know for a fact that clouds passed by this object. (audience laughing) At some point in time these clouds could have, hypothetically speaking, existed behind this object. So I have my Photoshop set up in a way that makes it really easy for compositing. If yours isn't set up this way go to Edit, go to Preferences, and then under Workspace I believe, don't prove me wrong, yep. It's right here, they usually have by default this checked saying Open Documents as Tabs, but when you do that all of your images open up along the top and I think it's a nightmare. Especially because that's something relatively new for Photoshop. I go way back in the day, I started Photoshopping in 1998. So I turn that off, because it makes it really easy for me to move in between images and you just have to think in terms of layers and thinking in terms of layers, and if you're thinking in terms of layers it doesn't matter, right? So this image right here, I'm just gonna press V for the Move Tool, I'm gonna click on it, I'm gonna press and hold Shift as I move it over. And when I do that it makes sure that I don't just move it and it just gets somewhere random on the image. So then if I press and hold Shift as I move it up it's also gonna make sure that it doesn't go off of the sides. So I'll move this right to about here. And this is where I'm gonna get really excited. So now I need all of that underlying layer's stuff to be protected from these clouds. And you're thinking, well, why don't you just use a mask? Use your Quick Selection Tool and make a mask. Have you seen a Quick Selection tool that could do something around these trees in any way that would be really easy? No, you'd be here all day, click, click, and then Refine Edge, Refine Mask. And it's not gonna work, it's not gonna be very good. So if I turn this layer back on I'll double-click it, and I'm gonna start using Blend If. I wanna protect the underlying layers, well, everything at this point, except for the highlights, because there's a big highlight in the background. So if I move this over, oh, look at that. Look at that. Oohs and ahs. All right, I should have saved this for the end, 'cause this is where people would wake up. So as I move this over though look what happens back here. Eh, it looks like that witch hair stuff that gets on the trees from Olympic National Park. But that's where we press Alt or Option, we start to split and feather this over. And we have some other tools here too that we can use along the way. So I'm not trying to make it perfect, I'm just trying to get it good enough. And if we wanna see any of the areas that we would have to mask out what do we do? We put our magical Color Overlay on there. Boom. So this tells me, okay, I've got this layer set up, I've got the trees in an ideal position, so now if I put a mask on this layer, press B for my Brush Tool, make my brush a little bit larger by pressing right bracket key, and then just start painting I can start painting over that magenta. I'm not painting over the magenta, the magenta's just a visual for me to see exactly where that's affecting. Ah, man, this is something I wish I would've been taught ages ago. So if you're getting this, you're like, what? I hope you are, 'cause man, I get so excited every time I do this. Some times I'll do it in my office just to get happy. Some people drink coffee, Blend If, give it to me. Ah, I'm good, I'm good. So I'll get it just ideally where I want to get it and then if I turn that Color Overlay off it looks all right, but the thing is the lighting doesn't match. And this would never look like this. This looks like really bad HDR. So what we need to do is we have other tools for us. We can take the Opacity, we can start dropping that Opacity to get some of that underlying layer's whites to show back through. Drop that Opacity a little bit more. That looks pretty realistic, right? But if I look at that Color Overlay there's all kinds of other things that are still happening here. Now the Color Overlay is not gonna be solid magenta anymore and that's because we dropped the Opacity down to about 50%. So what I'm gonna do to make this a little more realistic is this idea behind masking, is like masking doesn't have to be, you don't have to make these perfect intricate little, perfect little masks. You just have to make it good enough to be, let's say, believable. So I'm just making my brush really large, really, really large, and then just click right around the areas that it would be trouble areas. And because this is a large brush with the Hardness down to zero it's a very soft edged brush, so it's allowing things to just kind of very nicely transition into the image. The really cool thing about this is that now we've got a really great sky replacement. I mean, I think so. I think it's pretty darn believable, right? If I were to go into Bridge and open up another photo and be really daring, press and hold V or press the V key and press and hold Shift, move this to the top of this image. Then if I press and hold Shift and move it up, I'm even leaving the car there, I don't even care, that's how daring I am. (audience laughing) So I'll put that right about there. If I press Alt or Option I can steal all of the settings that are happening underneath this layer. That's the cool thing about this. Alt or Option, click inside of here, and now I've got a whole different image inside there. That's with these clouds and that's with these clouds. It steals all the properties. It's called a clipping mask. You can put a clipping mask anywhere. Where maybe you're working with text and you want the image to go inside the text, well, if you want the image to go inside the text you can put whatever image you want above the text, press Alt or Option, and it will know the bounds of the layer that's underneath it and automatically fill itself in with that stuff. Now if at any time you press Alt or Option underneath there or if something changes a slight bit it's gonna go back to looking like this, 'cause it doesn't have any of those properties. So what else can we do? Well, we can physically steal the mask. I can press Alt or Option, click on this mask, and bring it up to here. That physically steals that mask. Now we need to physically steal the other properties from it. So if I click on this layer, right-click, right here it says Copy Layer Styles. Any of those Layer Styles that are in this layer I can copy them and paste them onto this Layer 2, which is our other set of clouds. So then if I turn this layer off and I want that Opacity to come back, because I want more of that, there we go, see that. But when I get over here at this point you're gonna start to see some weirdness in the trees again. So maybe this mask is not the perfect mask for that sky, but I could just go to that mask, press B for the Brush Tool, and then just kind of do something like that. Make it really realistic. And then I would continue that workflow. So what would I do at this point? Well, above this I could put things like the Curves adjustment layer or the Hue Saturation or anything that I would do in my workflow. Would I consider this a done image? Not by any stretch of the imagination, not with my workflow. By my workflow this is a preliminary step. Replacing the sky is a step that I would take to build this image up and then from there I could then maybe pop a Curves adjustment layer on top and maybe just start doing something like this to bring out the color in the image and also darken down those tones and brighten up those highlights. But again, I'm not just stuck with that Curve, right? I've got Opacity, I've got the blend mode of that Curve, and I've got Blend If within that Curve. It's doing a little too much to those shadowy areas, but I really like the way this works if I double-click right here I can protect those shadow areas from the Curve. See, it's never ending. You can do this on every layer. So here's my challenge to you, the next time you work in Photoshop, do this with every layer. Turn that Color Overlay on, go up to that Blending Options, and be like, I'm gonna use Blend If on everything. I'm gonna use Blend If in my Cheerios. (audience laughing) Yeah, there we go.
Ratings and Reviews
Teresa Trimm
Wow! Great course!! Lots of good information about using Blend if. Blake has a great sense of humor and he makes the course fun and interesting while making sure that you learn something that you can use. The course was created in 2018. In 2021, this information is still very valid and helpful and I definitely recommend it.
Robert Staser
Super helpful! Another powerful technique made easy. Blake is super laid back and throws wonderful bits of comedy in with the class!
David Rachlin
Photoshop has so many features, it's hard to wrap your head around it. But Blake Rudis explains things so well, and with such a delightful sense of humor, one cannot help but learn something terrific. The "Blend If" function is powerful and useful for so many photographs. I will most likely watch the lessons over and over again as I experiment with my own work.