Lessons
Class Introduction
12:46 2The Early Years
24:31 3Entrepreneurial Spirit: Risk & Reward
08:11 4Developing Your Style
12:57 5Creating Your Brand
11:03 6Confidence
11:20 7Personal Work
08:21 8Marketing
12:14Location Lighting Set Ups: Image Review
05:38 10Side Lighting
08:30 11Hollywood Lighting
10:27 12Dancer Lighting
08:50 13Editorial Lighting
09:06 14Tunnel of Light
12:24 15Back Light
06:09 16Image Review
06:03 17Creating a Series: Setting Intention
07:19 18Connection
09:31 19Provoking Reaction
11:11 20Physical Contact with Your Model
15:16 21Raw Series - Image Review
08:57 22Image Critique
1:01:29Lesson Info
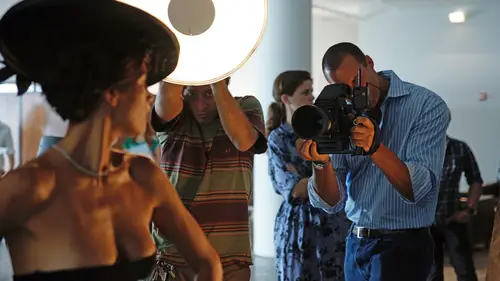
Editorial Lighting
I'm looking at my lights. Again, I'm getting in my own light. Feeling it, seeing where everything is. And, there's no modeling light on here can we turn that one on for a second? Okay that's so, if this was for me this would probably be not in the perfect position. But it's not me, right, it's Rhonda. Right, so, I'm coming down, I'm looking. Before you take a picture, 'cause I look ridiculous I know, I see you laughing at me squatting in the picture. But you gotta do this, you gotta get in there. Feel the light. Look where it all is, look at the angles of where it's gonna be hitting her. I mean you can put her in here and place it around her, but you're still getting yourself in there. And I try to minimize all of that for my subject. I, ya know, I still gonna have to do that. But if I can do it a little bit myself and again, remember what I said. Looking at what I'm seeing, looking where that light's gonna be. How does that look from her perspective. And this, um, light setup is a pre...
tty dramatic one as well. Backlight's in a way, they're either gonna they're more powerful than our frontlight. This is about, I think about two stops under? At two stops under our backlights. Creating a nice sort of rim around here. And just a little bit of a catch kick in the front. And, I remember when I first started doing this. I would only have two lights. I would just do them on the side and I was working with, sort of a lot of musicians and artists. And I'd have to, it was always very hard trying to get that catch light in the front. And, just putting a light in, it doesn't have to have a beauty dish on it either, just having a head super low. Just to give that, as you mentioned catch light. The catch light is really important. If the light, eyes are dead. In the, you kind of lose your picture. So, I'm always, you've always gotta just think of what are the eyes saying? Even when they're closed. Alrighty. (host mumbles) Oh yes, genius! Cut that one, no. Rhonda, let's get you in. We'll get you on your spot there. And again, normally what we do is actually mark the ground. So if I was, when I stood in there and did that and I found my place, we would T it off. And put a little mark there, a little mark there, and a T at the top. Some people do X marks the spot, but you've always got to get rid of it after the fact. So I don't do it. Makes sense, right? Okay. Perfect. Beautiful. Just right there. (camera clicks) and voila, you see what I'm talking about. Really beautiful light around the side. It's about two stops under here. You got great catch there. It really helps define, um, her face. She's got this gorgeous high cheekbones. And, ya know, certain lighting in certain people you look at them like okay. Ya know, this is gonna be really complimentary for them. Harsh lighting isn't easy for everyone. And when I look at someone like Rhonda, I might I'm looking at her face and the contours and the features and I, well this is gonna be gorgeous as the light ripples around the edge of her cheekbones and brings them out. And it just catching on the sides of her lips. It really really, ya know, for me, this is the sort of very pretty, and there's already drama here. There's already sort of a story. This is, and again I'm not directing her. We're gonna do that later. In another class, be more direction driven. But what I'm really showing you here is how the lighting itself, very simple lighting, very quickly as you've seen, can affect the mood and help tell the story. Now let's do one more. (camera clicks) And just for fun. Scream at me. (Rhonda screams) (audience laughs) Come on, you can do better than that. (Rhonda screams) (audience laughs) Because I can't resist, that's why, go to the one before. And it is, right? It's simple, it's so good, and ya know there's a real sense of joy. And people do it and then they're like, why did I just do that? Sometimes it's the raw, and she's got a beautiful raw. But other times it's not the raw. It's right after the raw. And we're gonna get to it, um, after that. I just can't help myself, cause I see something I like and I'm like ugh, let's make this picture come to life shall we? Thanks love. Okay, let's change this up. My question is about finding your style. I'm totally all over the place and I feel like every shoot I edit completely differently based on, ya know, the look of the shoot and what the client wants. So how do I distinguish what my actual style is, so that when somebody looks at something that I've done they're oh that's a, that's a Diana Sheel. Ya know, it is, it's absolutely fine to have multiple styles. And, okay, you may think or say that goes against what you previously said. What I mean is, is that a lot of it is how you present them. Okay so, I have multiple portfolios. And, I also develop certain lighting scenarios and setups and ideas for specific clients. And it's a thing that I've just shot for them, 'cause it's an idea I want to pitch to them. Right. It's completely normal to love to shoot different things. I like shooting dramatic stuff with lighting. I also like really simple stuff, I, ya know, against white walls. I showed you pictures of me on vacation on location shooting and I've developed that into work. Completely different. Another genre, another world. What I don't do, is show someone a portfolio with the opening picture of Tyra Banks. The next picture is, ya know, my daughter. The next one is my dog, and then the next one is a shot of Thailand, right? They're all, could be some of my favorite pictures I've ever taken. But, that would, people would be looking at me What is this? Ya know, this is like a history of your work. It's a sort of a, you need to present a look and a feel. So go through your work, and kind of divide it up. And think of like, what works together, what's a certain style set and looks and feel, right? These pictures go together, it's this look, it's this type of thing. These pictures go together, it's this thing, it's that. And sometimes you can mix and match. If that's a part of the story. Ya know. But then they have to also, present it in that manner. When you're talking to the client, or showing it to someone, sometimes, ya know, it's a part of the you may have to tell them. Hopefully they don't need to be told. Because a picture, a good picture, speaks for itself. And a good series and a good presentation speaks for itself. Website, where I don't know who's gonna be looking at it, so I've just got kind of everything there. Same way, on a good website, and I don't know your website, the way it's laid out. But you can have portfolios within a website. And you can present, like one series. Ya know, when they open it up? And then there's another portfolio and you open that up. And it you call it personal, you call it editorial one, two, three, four, five, or ya know, you really have to label it and list it. Or, you don't put everything on your website. You decide to do one thing only on your website. And you see if it works. Ya know, there's that risk aspect of like okay, but what happens if no one likes this? That's the whole point, you've gotta take those risks. And I know that it's, you may think oh but you can't be everything to everybody. You have to be somewhat polarizing. And, actually, ya know, it's fine for people to love your work and hate your work. Sounds crazy, but we go on Instagram, we're so consumed with everyone liking everything. Sometimes I wish there was a hate button. (audience laughs) Just because it's like, ya know, but it's also that whole thing where like I like it when I take a picture and it just creates that reaction. Ya know, so. I guess my point here is, is that, ya know, present what you like. Make stories that make sense. And present them neatly and tidily. I would go on your website and really try and be very consistent in the way your work looks. And there should be some sort of theme. Most photographers have concepts or series or ideas that they're into for a whole period of time. Of their career. So, ya know, I can sit and look at my career and be like I was really into this type of thing then. Then I was kind of moved and changed with the times. And then I moved again and changed with the times. And now I'm into this type of thing. And I, ya know, what I do with my old stuff is I actually label it as such. Like, archival, or, ya know, pictures of ya know there's a title in there with a date and a time and it shows what it is. And then it's current work, and here's where I am now. And this is what I'm doing.
Class Materials
Bonus Materials with Purchase
Ratings and Reviews
Michael Spatola
This is one of my favorite Creative Live classes so far. The storytelling and human interaction parts were my favorites! The ability for Nigel to get such amazing expressions in such a brief time shooting was amazing. Everything he demonstrated seemed almost effortless, and all without a shred of ego. Great class!
Margaret Lovell
Nigel is a wonderfully engaging instructor. I like that he walks his students through his photoshoots. The set ups. How to interact with the models. Even though there are a couple of genres I'm most active in, I appreciate that Nigel says that you can have different photographic interests, so long as you brand yourself properly. I like taking photos of lots of things, although my outdoor photos generate the most interest. I highly recommend all of Nigel's classes.
a Creativelive Student
Passion, personal, inspiring! Nigel, thanks for amazing class and a lot of great advices.