Two-Light High Key Headshot with Female Model
Lesson 16 from: The Business of Professional HeadshotsGary Hughes
Two-Light High Key Headshot with Female Model
Lesson 16 from: The Business of Professional HeadshotsGary Hughes
Lesson Info
16. Two-Light High Key Headshot with Female Model
Lessons
Class Overview
13:07 2Getting Headshot Clients
27:23 3Headshot Pricing Models for Individuals
24:47 4Headshot Pricing Models for Groups and Companies
13:05 5Payment and Delivery for Groups
20:49 6Six Styles of Business Headshots
38:31 7Headshot Lighting Gear
11:31 8Posing Basics for Headshots
08:03Basic Standing Pose for Headshots
05:10 10Basic Seated Pose for Headshots
03:22 11Head Position for Headshots
04:25 12Expression Sells the Image
06:45 13One-Light High Key Headshot with Male Model
35:42 14One-Light High Key Headshot with Female Model
09:01 15Two-Light High Key Headshot with Male Model
10:08 16Two-Light High Key Headshot with Female Model
04:58 17Two-Light Standing Pose Headshot with Male Model
19:17 18Two-Light Standing Pose Headshot with Female Model
13:47 19One Light Low Key Headshot with Male Model
16:18 20Two Light Low Key Headshot with Female Model
14:55 21General Q&A
11:03 22Constant Light: Low Key Classic Headshot with Male Model
31:47 23Constant Light: Low Key Classic Headshot with Female Model
21:56 24Constant Light: Standing Pose Headshot with Male Model
17:22 25Constant Light: Standing Pose Headshot with Female Model
10:45 26Setting up the Background for Extraction Shoot
10:49 27Shooting for Extraction Headshot with Male Model
12:06 28Shooting for Extraction Headshot with Female Model
13:53 29Shooting Low Key Modern Headshots for Extraction
12:28 30Basic Headshot Facial Retouching Techniques
23:48 31Basic Headshot Eye Retouching Techniques
12:14 32Basic Headshot Retouching Techniques: Dodge and Burn
07:40 33Basic Headshot Retouching Q&A
11:18 34Extracting a Single Subject
20:01 35Creating a Headshot Composite
15:07 36F-Type Headshot Lighting: Equipment and Principle
10:36 37F-Type Headshot Lighting: Execution
21:29 38Shooting Headshots in Volume
18:49Lesson Info
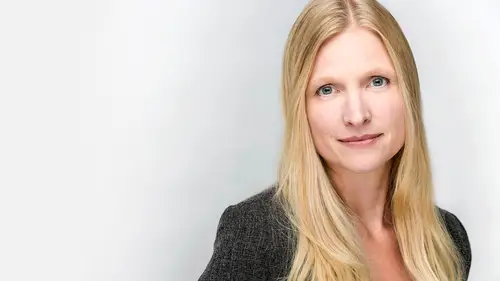
Two-Light High Key Headshot with Female Model
Okay, so we're gonna go straight on. What I want you to do, is I want you to shift the weight onto this foot. Yeah, perfect just so. I want you to just relax your arms at your sides. Now tilt your head a little bit. Drop your chin. Okay, cool. That's perfect. Okay, I'm just gonna come and fix your hair, if that's alright. We've got a few flyaways. Take an extra second. Oscar, are you jealous that I didn't fluff your hair. Yes! Sorry, dude, you just got a lot less of it. Okay. Alright, we're gonna go with it. Perfect. And what's cool about horizontal or landscape format for these types of shots is that when you have both shoulders and the whole head in, these crop really good square for social media. So keep that in mind, too, when you're shooting. Alright, I want you to lean towards me a little bit, like so, drop that chin a touch. Here we go. (shutter clicks) Perfect, yeah. That is gonna be pretty great. I want you to relax that jaw. Let your lips part just a little bit. A little ...
breathe, (inhales) let it go. (exhales) Alright. Now give me a little intensity in the eyes there. There you go. Drop the chin a little bit more. Tilt your head this way. Yeah, right there. Perfect, good. Now, if we're starting a law firm of, like, angry people, this would be really, really good. TheAngryLawyers.com You see how that creates a more modern look? And you could do the same thing. To do the high-key classic in the same way, all you have to do is take this setup and put the lights like this, and it's the exact same thing. You have the signal light in the high-key setup, or no? A signal light? Yeah, with one? Oh, um, no, I don't. This is what I have. (laughs) And then, I was wondering, since we are, people aren't in the room here with us, if you could, Gary, go through... I know we have that gear list that's available for people. But just kind of point out which is which of what we're seeing here. This is gonna be the SweetLight three by four stand up reflector. And I have two of those. I have a large SweetLight four by six stand up reflector. This is the SweetLight 20 by 20 soft box. What's really cool about this is that you buy one piece of equipment and this will either work with a speed light or a studio strobe. It has the backplate to mount either one of those things, so you kinda get two light modifiers for one. And then we got my pop-up five by seven background, and I don't, man, you can get those all over the place. You can get them pretty much, B&H, Autorama, all those places. And they're not that expensive. I think I paid like about 125 bucks for those. I hope that you will take better care of yours than I have of mine. And I bought them probably like eight years ago for a corporate event, and I got two sets. I use them all the time. They're really useful for shooting on location. I don't really use them in the studio. I have seamless paper for that. But when I go on location, it's so much easier than taking a nine-foot roll of paper all the time. Especially when you're only shooting head shots. Great, and then in terms of the distance, can we talk again about the distance from your camera to where our subject was standing and then again to the background? I wanna throw enough distance between the subject and the background to where the background, you're not gonna be able to see the wrinkles. But I kind of want the background to be out of focus. And I want there to be enough distance between the subject and that backlight, 'cause if you put too much light on that background, what's gonna happen is on your subject, you're gonna get a white halo, kind of, all the way around the edges. And especially if you shoot for extraction, you're gonna have a really hard time cutting someone out of the background, when there's just that sort of blurred white between them and the background. So leave enough distance. Think of it almost like a green screen. When you shoot for a green screen, if you don't get them far enough away, they're all green around the edges. So it's gonna be the same way. We want enough distance to where the light that's hitting that background is not bouncing onto the back of the subject. Yeah, go ahead, Cliff. Cliff? Speaking on this, what was the power that you start with on that typically? Yeah, um, typically, I'm gonna find, that's a great question and I meant to say it out loud. Typically, I'm gonna find that in this setup, that I'm gonna have this light is gonna be half the power of that light. So it doesn't matter what they're set at, but I find that if that's at half power, which it is right now, this will be at quarter power, which it is now. If this is at eighth power, that would be at quarter power. In order to do this distance with this particular setup, I find that that is almost always a great way to start. But choose your settings on your camera, your aperture, your shutter speed, based on what you want the image to look like, before you start worrying about anything else. Knowing your equipment is the most important way to do the job properly. If you get a new piece of equipment, please, dear god, don't test it on the client. Test it on other people. If you got kids, or a spouse, or a partner, or a pet, or something, just don't test it on your client, because you're gonna find you're gonna run into frustrating problems all the time. So do practice. It's very, very important.
Class Materials
Bonus Materials with Purchase
Ratings and Reviews
Melville McLean
Gary Hughes is possibly the best teacher I have seen here and that is a very high compliment. His business analysis is simple and to the point. His set ups and techniques are simple and straight forward, no easy task in itself. His interactions with his models/clients are finely developed and reduced into the fewest but most important key exchanges. He teaches by example how to interact and direct. If you are a high volume photography with brief time per sitter, you might especially appreciate his tips. It is extraordinarily difficult to keep a tight, well structured class going live for so long at a time. His intelligence, wit and personality are all in his favor but it is the content itself that is most impressive. I am not a portrait photographer but I have 30 years of commercial studio experience. He knows what is most important, leaves out the rest and has organized the material in anticipation of most difficulties that arise so that it rests in a seamless, smooth, coherent learning experience. All of his practical advice is excellent. Just understand that his work is about doing a relatively large number of shots in the most efficient way rather than a lot of time spent on a few clients for a completely different format [presentation like very large prints. In fact he is especially pragmatic. He emphasizes that you do not have to own the most expensive equipment but you absolutely do have to know how to use the equipment that you already have. And I am telling you this as someone he makes fun of in his course with fancy cameras and Profoto lighting gear. He is an advocate of all thought out approaches as well as relying on skills and knowledge. You will understand how and why to make all of his key, conventional light and posing set ups. He makes everything sound simple and doable -- and with his help -- it is. What you have to appreciate is that it is up to each individual to acquire the specialized skills to make our work compelling enough to be competitive. The unspoken truth that we all face is that talent plays a key role as well and that it takes time to become every accomplished. But I have also seen concentration, commitment and hard work result in developing innate talents that blossom in very successful careers. Mr Hughes reduces every step into the clearest, most essential components. He is self effacing both as a photographer and post process retoucher but he is very good indeed and does not waste time overdoing images that cannot benefit from a larger format presentation. Everything is appropriate and practical. He has already removed everything that does not matter for his purposes for us that would only interfere with the concise, clarity of his presentation.
Roan
I am so glad that I had the opportunity to watch this course. It has not only provided valuable lighting set-ups, but also great basics for posing.!. The Photoshop extraction technique Gary demonstrated was icing on the cake. Gary did a great job teaching and I greatly admired the technique in which he taught. Thanks for a great class!
aodeal
This was an excellent class! The class covered so much information and great tips and ideas. Gary is funny and has an easy going approach, which makes the class that much more enjoyable. As a struggling pet photographer, I have been trying to find something to supplement my business with that does not involve children/babies, or shooting weddings again and headshots seemed to be a great option. After watching this class, I feel confident building up a headshot component to my business. Definitely recommend this class!
Student Work
Related Classes
Portrait Photography