Two-Light Standing Pose Headshot with Female Model
Lesson 18 from: The Business of Professional HeadshotsGary Hughes
Two-Light Standing Pose Headshot with Female Model
Lesson 18 from: The Business of Professional HeadshotsGary Hughes
Lesson Info
18. Two-Light Standing Pose Headshot with Female Model
Lessons
Class Overview
13:07 2Getting Headshot Clients
27:23 3Headshot Pricing Models for Individuals
24:47 4Headshot Pricing Models for Groups and Companies
13:05 5Payment and Delivery for Groups
20:49 6Six Styles of Business Headshots
38:31 7Headshot Lighting Gear
11:31 8Posing Basics for Headshots
08:03Basic Standing Pose for Headshots
05:10 10Basic Seated Pose for Headshots
03:22 11Head Position for Headshots
04:25 12Expression Sells the Image
06:45 13One-Light High Key Headshot with Male Model
35:42 14One-Light High Key Headshot with Female Model
09:01 15Two-Light High Key Headshot with Male Model
10:08 16Two-Light High Key Headshot with Female Model
04:58 17Two-Light Standing Pose Headshot with Male Model
19:17 18Two-Light Standing Pose Headshot with Female Model
13:47 19One Light Low Key Headshot with Male Model
16:18 20Two Light Low Key Headshot with Female Model
14:55 21General Q&A
11:03 22Constant Light: Low Key Classic Headshot with Male Model
31:47 23Constant Light: Low Key Classic Headshot with Female Model
21:56 24Constant Light: Standing Pose Headshot with Male Model
17:22 25Constant Light: Standing Pose Headshot with Female Model
10:45 26Setting up the Background for Extraction Shoot
10:49 27Shooting for Extraction Headshot with Male Model
12:06 28Shooting for Extraction Headshot with Female Model
13:53 29Shooting Low Key Modern Headshots for Extraction
12:28 30Basic Headshot Facial Retouching Techniques
23:48 31Basic Headshot Eye Retouching Techniques
12:14 32Basic Headshot Retouching Techniques: Dodge and Burn
07:40 33Basic Headshot Retouching Q&A
11:18 34Extracting a Single Subject
20:01 35Creating a Headshot Composite
15:07 36F-Type Headshot Lighting: Equipment and Principle
10:36 37F-Type Headshot Lighting: Execution
21:29 38Shooting Headshots in Volume
18:49Lesson Info
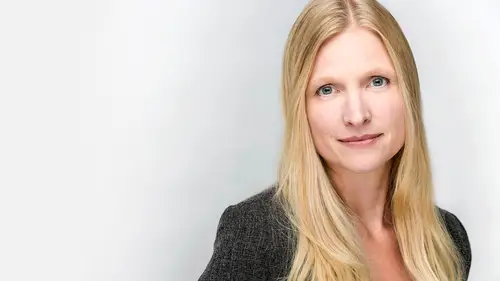
Two-Light Standing Pose Headshot with Female Model
Now, I don't mind even bringing the reflector a little closer to her. For women it is a little more acceptable the way it looks to do that. I do have a number of questions coming in. Starting with, this is from Jenna MacWhirter who says, Do you find there are different considerations with regards to the subject's facial expressions with low-key shoots versus high-key shoots, for instance, do you worry about them appearing sinister? So, are-- Yeah, that's a great question. Are the style or the backdrop that you use, are you going for a different look within those? You can definitely like this, I would say is something that I would use. Let's say you're gonna photograph some trial attorneys, and they want to put off a vibe that they're aggressive, like we're gonna get your money, or we're gonna get you justice and that stuff, that guy right there, Oscar is gonna get you some MFing justice. (audience laughing) You know what I mean? Would I use this on somebody who sells cottages o...
n a lake? Probably not. Would you buy a cottage from that guy? He'd probably stab you and bury you under the cottage. No, No. But yeah, absolutely. Sinister can be your intent. Not all head shots have to be light and airy. Do you understand what I mean about the magic wand? There's no one way, there's no one fix. Cause every shoot should be a different opportunity to create something really cool and to show something about that client. What does a really good head shot do? It says something about the person. It says something about what they're trying to say about themselves. And if Oscar is gonna beat up your attorney with a baseball bat, this would be a great head shot for him, so yeah, absolutely, sinister can work, absolutely. It depends on the intent of the image. And I think the idea there is to be intentional. And that's why we're learning all the different styles and possibilities. Yes, don't do this for your local Fannie Mae, whatever, or what was it, the Tupperware people, all that stuff, don't do that. What's the make-up one? Avon? Yeah. Mary Kay, that's the one. Man, that joke would've landed so much better if I knew what I was talking about. Yeah, this is not a good Mary Kay head shot. It'd be like, (growls) (low grumbly voice) Are you running low on foundation? Call Oscar. All right, cool. So, we can kinda do the same thing here. Let me just do a quick test. (camera clicks) Bam! Okay, good. Man, that's kinda a cool look, I really dig that. I'm getting a little bit too much detail in the background. Is it all right if I back up a little bit y'all? So, I'm gonna get a little bit further away. There we go, all right. Come up to the reflector for me. Awesome. Okay. I think there should be some music or something going on while you do this. All right. (humming) I'll hum instead. Okay, you ready? So let's do a couple of different female standing poses. So I want you to kinda turn this way for me. Cool. Point your right toe right at me. Left toe, left toe, your left toe, I'm sorry. See, they mirror. If you mirror it, even if you say the wrong toe, they'll still do the right thing. Okay, cool. All right. So, nice hands relaxed at your side, okay. And I want you to slide your arms up just a little bit so that your elbows are separated from your body a touch. Turn your head this way, and you're gonna tilt. Yeah, that's it. Exactly right. Exactly. There. Okay, lower the chin, tilt this way. We go for a little intensity. Relax that jaw. Let a little air through. Cool. And what I want you to do. This is a trick I use to get a really fresh expression every time. This works a lot. Without moving your head, lower your eyes to the reflector in front of you, and when I tell you to, I just want you to bring just your eyes up to me, okay? Lower your chin a little bit. Relax that jaw. Okay, and when I tell you to. Ready? Right to the lens. (click) Good. Perfect. Yeah, that is a really, really fierce kind of a look, and we're gonna do that one more time. Yeah, Boom! All right. Now what I want you to do is do the same thing but when you bring your eyes up, I want you to pretend you're sitting at a coffee shop and your best friend who you haven't seen in 20 years just walked in to give you a big bag of money, okay? That's your motivation. Are you ready? Here we go. One and (click), oops, that was a misfire. Sorry, that has not happened to me before. Ready? Now! Heyyyyyy! A little too much. Put too much stank on it. That's all right, all right. Okay. Perfect. Are you ready? And, okay, maybe not your best friend, okay? Eyes up. (click) There you go, perfect. I love that. And do that one more time. Show me a little bit of teeth. (click) There you go. And one more (click). Now we're gonna lift your chin a little. There we go. Tilt your head this way just a touch. Yeah, right there. Perfect. And (click), Oh man, I keep misfiring. I'm sorry. Eyes to me. It's okay to be approachable, and to be a goofball. All right. I'm gonna lower this a little bit for her. Cause we're getting a little hooding, because I moved some stuff, so let me do a quick test for me Charny. There it is, okay, perfect. That is what I'm talking about. Okay, I want you to tilt your head this way a little bit. Good. All right guys, when I move around the subject, I'll put their head this way, that way, and I'll move their body both ways, especially when it comes to ladies, I will always shoot people from both sides. This is an incredibly economical way to get a lot of different looks, especially if you only have a few minutes with somebody and the next person is waiting, so we'll go through that real quick. I'll show you exactly how I do it. So right now she's facing this way, her head's tilted to the camera shoulder or the far shoulder. Okay, ready. And so just give me a small nice relaxed smile that touches the corners of your mouth. Here we go. One, (click), perfect. I want you to tilt your head this way. Perfect. Thank you very much. Good smiling. Two (click), good. And now I want you to turn this way for me. Good. And point your right foot at the camera. There you go. All right. And tilt back this way for me. Turn your head just a touch. Absolutely awesome. And two (click), good. And now go for full power on that smile. I really wanna see it. Yeah, that's beautiful. You know what you're doing. Remember the bag of money. Monies a really good word to get people to smile. Sometimes we have to do the corny stuff, occasionally, in the quick stuff. When I'm shooting for volume, I can't always take five minutes and get to know 'em. Sometimes I just have to get 'em to smile and that's actually a really good one, okay. And now I want you to tilt your head this way a little bit. Turn your head just so. Perfect. Boom, and focusing, and nice and relaxed. Let your lips part just a little for me Charny. Good. Okay. Awesome. Watch, as it works every time. Money (laughs). There you go. Okay. Cool. So could we put those last few back up just so you can see how you can get both sides and both angles on somebody really, really quickly. And that is exactly what I would do and then I'd say, Okay, thanks. You're all set. And I would usher somebody... Yeah, go ahead. You're all set. That would be how long I would spend with somebody in a volume photography situation, just that. Okay, so let's just get those last five or six up there if we can, for how ever many will fit on there, and then you can see the economy of it, and it's really not that difficult. It's not like I've met her before, you know. I'm still able to meet somebody, look at them, I know that her... Obviously she's what we call a softball, which means it's an easy one. So whenever Julie is scheduling my sessions for the day, I tell her to put the prettiest people first. Whoever is, because it's easy for me. If I'm tired in the morning, it's really easy to shoot a pretty person. Okay, perfect. Okay, where we at? So we've got the head tilt and now we also have both sides. So, it's really easy this way to that way. Do you see how the emotion, the mood of the shot changes really easily. By the way, anybody still excited that we're just using speed lights for this? All right. Look at the images that you're getting. We're just using flashes. Like this is easily something that would be... Nobody would say, Hey, they just used speed lights to do it. Not a super expensive set up and most of us already have these. Now can we put the other side up too for me for the next one. All right. So they come up, both sides is a really, really, really good rule. Always shoot both sides. I always do that. Okay, any questions before I change to the next set-up? We do have questions and so as we're pulling those up, can you explain what hooding is for people, when you mentioned that you were getting hooding-- Yeah, let's keep that up. And then you were adjusting? Exactly like it is. Let's look at that. This is called hooding. Basically what it means is when your light source, it's casting the shadow of the brow or the eyelids into the eyes and you're not getting the eyes lit up enough. We had that, well it's not there now. None of those are hooded. But that's how I knew I needed to lower my light. Cause I knew with this set-up, the eyes should be going bam, bam, bam. Is it possible to just pull one of those up so you can see? It's all right to make adjustments as you're going. Like I'll take three, four, five images and every once in a while I'll take a peek, especially if I move something, but you don't wanna keep looking at the back of the camera after every shot, but I am cause I'm more concerned about working with the client and making sure that I'm getting a good expression, but I could get all the great expressions in the world but if the light sucks, I'm not gonna be happy with it. So, oh yeah, that's a good one. How about that? Now that might actually be a pretty good Mary Kay shot, I don't know. It could be okay. All right. Any other questions on this setup or any of the stuff we've done up to this point? We do have more questions, but I think, unless you guys have any in here? Right here. Go for it. Yeah. So, when you're shooting out from behind the camera a little bit, is it okay, like I find sometimes clients will look you in the eye instead of looking in the lense. Are you okay with that, or? I immediately yell at them. No. It is important to communicate. Obviously Charny and Oscar are professionals, so they know to be on the lens unless they're pretty much told otherwise. Is that pretty accurate you guys? So they know that they're gonna be on the lens. If you see somebody look at you, you just say, okay, eyes into the camera and that's it. Just say, eyes on the lens. You don't even have to make a big deal out of it. Okay, eyes on the lens please and then they'll do that, that's it. But yeah, it does happen. Absolutely. Great question. I just wanted to double check on the high key. You had that reflector in play but I don't think it was, it was just coincidentally there, is that correct? I had one and one. No, that was cause and fill. I had two reflectors. The other one might have just been... I have three. Yeah. So I had one, two, the third one was just pushed against the wall, I wasn't using it. Okay, just wanted to double check. You could use it to create an edge light. You could add that if you wanted... Oh, I was thinking... No, for the high key stuff, yeah, it was just the one reflector. Those guys I wasn't really using those at all. They're just up here. We have a limited space. But in this case, I am. You can see what's really cool, is you can actually see, on the edges, you could see all in her dark, dark hair, you can see it's defined from the background really easily, and there's detail there. It's really, really important to have detail. In digital photography, darkening an image is a lot easier than bringing out shadow details sometimes because they start to block up in a low key image. At the same time, if you're shooting a high key image, the first thing to go is gonna be those white pixels, cause white represents binary in digital, white represents zero, no information, so once those whites are gone, gone, they're not coming back. They can come back a little bit if you shoot in camera raw but really once it's blown out, it's blown out. It's not as bad on the shadow side but you will really find that especially when you don't know necessarily what the final medium is, it's better to have the latitude to have definition in those shadows which is why I'm kicking those reflectors from the side. They're not causing hot highlights but they are giving me good separation. Cool? All right. Let's do it. So let's do a little more traditional. Actually, do we have that posing table? I wanna roll that over here. Lacey, can you grab that? Go ahead. As you're doing that, what are the different advantages of posing people standing or sitting? How do you decide when you're doing which? That's a really good question. I find that if I'm shooting on location a lot, like out of doors, it's a lot easier to stand. If I'm shooting in volume, people are sitting, because the one thing you can't do is get caught up adjusting the height of your lights for every single person, so you're gonna get somebody who is five foot two and somebody whose six foot five, one right after the other, and if they are seated, the only thing you have to do to make that correction, is adjust the stool. It's really, really easy to do. It's a huge mistake to make is to go into a volume situation without seating. And we've all had school pictures done before right? You've ever done a school picture standing up? No, you walk right in and you sit down because they don't want to mess with the lights. The lights are locked in so, I totally would recommend doing that. A lot of times, if a guy comes into my studio and he's really tall, rather than standing on a box the whole time, I'll do a lot of seated poses, you know. Or I'll be up on a hill if I'm shooting outside or something like that, but yeah, that's a good question.
Class Materials
Bonus Materials with Purchase
Ratings and Reviews
Melville McLean
Gary Hughes is possibly the best teacher I have seen here and that is a very high compliment. His business analysis is simple and to the point. His set ups and techniques are simple and straight forward, no easy task in itself. His interactions with his models/clients are finely developed and reduced into the fewest but most important key exchanges. He teaches by example how to interact and direct. If you are a high volume photography with brief time per sitter, you might especially appreciate his tips. It is extraordinarily difficult to keep a tight, well structured class going live for so long at a time. His intelligence, wit and personality are all in his favor but it is the content itself that is most impressive. I am not a portrait photographer but I have 30 years of commercial studio experience. He knows what is most important, leaves out the rest and has organized the material in anticipation of most difficulties that arise so that it rests in a seamless, smooth, coherent learning experience. All of his practical advice is excellent. Just understand that his work is about doing a relatively large number of shots in the most efficient way rather than a lot of time spent on a few clients for a completely different format [presentation like very large prints. In fact he is especially pragmatic. He emphasizes that you do not have to own the most expensive equipment but you absolutely do have to know how to use the equipment that you already have. And I am telling you this as someone he makes fun of in his course with fancy cameras and Profoto lighting gear. He is an advocate of all thought out approaches as well as relying on skills and knowledge. You will understand how and why to make all of his key, conventional light and posing set ups. He makes everything sound simple and doable -- and with his help -- it is. What you have to appreciate is that it is up to each individual to acquire the specialized skills to make our work compelling enough to be competitive. The unspoken truth that we all face is that talent plays a key role as well and that it takes time to become every accomplished. But I have also seen concentration, commitment and hard work result in developing innate talents that blossom in very successful careers. Mr Hughes reduces every step into the clearest, most essential components. He is self effacing both as a photographer and post process retoucher but he is very good indeed and does not waste time overdoing images that cannot benefit from a larger format presentation. Everything is appropriate and practical. He has already removed everything that does not matter for his purposes for us that would only interfere with the concise, clarity of his presentation.
Roan
I am so glad that I had the opportunity to watch this course. It has not only provided valuable lighting set-ups, but also great basics for posing.!. The Photoshop extraction technique Gary demonstrated was icing on the cake. Gary did a great job teaching and I greatly admired the technique in which he taught. Thanks for a great class!
aodeal
This was an excellent class! The class covered so much information and great tips and ideas. Gary is funny and has an easy going approach, which makes the class that much more enjoyable. As a struggling pet photographer, I have been trying to find something to supplement my business with that does not involve children/babies, or shooting weddings again and headshots seemed to be a great option. After watching this class, I feel confident building up a headshot component to my business. Definitely recommend this class!
Student Work
Related Classes
Portrait Photography