Pattern Envelope Overview
Lesson 2 from: How to Sew Your First Skirt and Understand PatternsShaerie Mead
Pattern Envelope Overview
Lesson 2 from: How to Sew Your First Skirt and Understand PatternsShaerie Mead
Lesson Info
2. Pattern Envelope Overview
Lessons
Introduction & Overview of Skillset
01:00 2Pattern Envelope Overview
06:12 3Measuring Your Body
02:13 4Cutting out the Pattern
03:44 5Understanding Fabric Anatomy
02:02 6Cutting out the Fabric
08:25 7Cutting the Notches & Second Pieces
03:57 8Gathering Skirt to Yoke
11:18Lesson Info
Pattern Envelope Overview
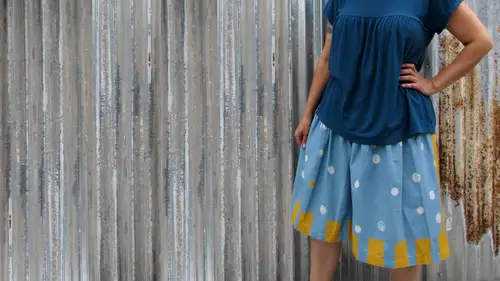
I'm going to start out talking a little bit about the pattern envelope on the front we have a picture of the project we're going to make and with this picture we can tell that there are two separate views view is the shorter skirt view b is the longer skirt both of these skirts are identical to so other than the length and I'll talk about how to pick your length in a little bit on the top here is really the only other information on the front that we need this tells us that this pattern included sizes extra small through extra large so that's a nice thing because you don't have to whip out your tape measure in the shop that's pretty much it for the front of the patterns most of the information is on the back of the pattern so at the top there's a little description and this description says that this pattern is designed for beginners who are learning how to sew it assumes you can set up your sewing machine and that you know how to sew a standard straight stitch which doesn't necessaril...
y have to be super straight you'll get there with some practice and his exact stitch the skirt is gathered onto a yoke which has elastic in a casing at the waist and the lower edge is finished with a double fold him you can choose to make your skirt eighteen inches long or twenty two inches long easy to follow sewing instructions, a fabric anatomy guide and a glossary of sewing terms are included, so that gives you a little bit of information about the project that we're going to be making today underneath that there's a list of recommended fabrics. This is really important to pay attention to the pattern designer designed this specific project when these types of fabrics in mind and if this is the first time you're making this pattern it's best to stick with these fabrics for better results? Usually this list goes in order of easier fabric toe harder fabric so this says right here this is recommended for medium weight woven fabrics, quilt wait cotton sham bray cotton and and sheeting linen or lightweight wool, so these fabrics are listed from easiest to most difficult to work with. So today as beginners, we're going to be working with him. Quote, wait cotton, the fabric requirement is listed underneath and it's determined by your size, I'm going to talk about measurements in just a minute so you can have the correct size but here it says that the top fabric requirement allows for nap one way design and some shrinkage now nap to mean one of two things it actually means fabric with a pile like velvet or terry cloth or corduroy where the fabric feels smooth and one direction and rough in the other direction when you so with these fabrics, you have to make sure that that nap is running in the same direction on both the front and the back of your garment. Otherwise they might look like they're two different colors nap can also refer to a design on the fabric that's in one direction, so if you have fabric with little kitty cats on it, you want to make sure that the kitty cats are all right side up when you're finished with your government, a one way design that's the same thing and some shrinkage, so usually you want to pre wash your fabric, so you get this amount of fabric that it's telling you for your size, you take it home, you wash it, it might shrink just a little bit that's, ok, because I have a little bit of extra room built into this pattern. It says extra fabric may be needed to match a design or for lengthening, so if you decide that you want to make this skirt into a maxi, you're going to need to add on a little bit of fabric to the fabric requirement here to make it as long as you like. After our fabric requirement here, it has a back view, so here's view a back and view be back and you can see that the only difference here is really the length and that the front of the skirt looks very similar to the back of the skirt as you get more and more involved with sewing, the back view is going to become very important. Sometimes things look completely different on the back as they do on the front, and this one is pretty easy, like I said, it's going to have the gathering at the waist there and the gathering at the yolk, but sometimes skirts have zippers or buttons in the back, and you kind of need to know that that's what's going to happen before you get started. So here I have the body measurement chart to size herself for this certain you're going to need to measure your waist and your hip, so I'm going to go over that in just a moment underneath that there's the fabric requirement we can see here how there's two sets of measurements on my chart first is for fabric that's fifty four to fifty eight inches wide, then there's fabric that's forty two to forty four inches wide. If you have wider fabric, you're going to need a little bit less of it. If you have a little skinnier fabric, you'll need a little bit more and the same thing is true depending on which view you choose, so for view a versus view be you weighs a little shorter, you're going to need a little less fabric a few beers a little longer you'll need a little more fabric underneath that it says three quarter inch wide elastic for both views it's the same because it's the same measurement around the waist in yards you're going to need between three quarters of a yard two one in a quarter yards underneath the body measurements and fabric requirement chart there's a little list of notions, notions or whatever else you're going to need besides the pattern and the fabric to make this project so this says matching thread a c engage a bodkin and your basic sewing kit your basic sewing kit should include good shears glass had pins a tape measure, some water soluble chock a seam ripper and a two by eighteen inch clear ruler you'll also need an iron and an ironing board and the last little bit of information that we have in the back of our pattern envelope are the finished measurements when you so especially with woven fabric this fabric doesn't stretch so you need to have a little bit of extra room between your body and the fabric to make it comfortable and for you to be able to move this tells us what the garment measures when we're finished sewing so you can check it on your own body to see if you'll feel comfortable when you're finished this tells us the waist measurement and the hip measurement so you can check it with your tape measure the waste is also adjustable because it has elastic in it. So when we make this, you can pull your elastic a little tighter to make it fit your waist. Or let it out a little bit to fit your waist. Whatever is comfortable for you.
Class Materials
Bonus with Purchase
Ratings and Reviews
Diane
The course was as clean and precise as her sewing. I haven't sewn for some time, but the techniques Shaerie taught will serve me well. Thanks~
Jude
Shaerie is an exceptionally clear and focused teacher. She points out essential steps for beginner sewers and doesn't get caught up with extraneous details.
Melissa Fritzsche
Wondering if there's any way to still get this pattern. Thanks!