Lessons
Lesson Info
Brush Presets
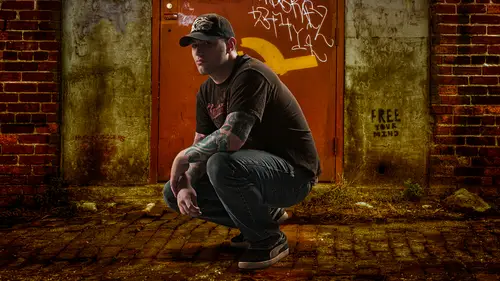
the brush. This is where it starts to get Pretty fun. I think the brush is one of the most underutilized tools in our editing arsenal. I mentioned it before, but if I look at if I look at changes to my photos, some of the biggest changes come from the brush. Um, so if you look up here, you click on your your adjustment brush tool. You activate it. If you look next to effect, you will see there's a whole bunch of presets inside of here. Okay? The ones that have numbers on them are from my brush preset pack, which, by the way, matt k dot com slash presets. 70% off. Um, so the ones with the numbers on them these air my brushes that I made. But if you look down here, burn Dodge Iris, enhance softened skin, teeth whitening. Those all came with, like room. Okay, So, like room, the brush does support presets. Onley trick is it does not go through the regular place where we put presets before. It's not over on the left side of the develop module. So how it works is you go in here and you make ...
your settings the way that you want. And then let's say I go and I want, you know, increase the exposure and DJs I go to this preset menu, go down to the bottom and I can save current settings as a new preset. I'll put a one on the front of it. That way it goes to the top. You guys didn't know that they're sorted alphabetically. All your presets and all your folders are all sorted alphabetically. So if you ever want one to show up at the top, you can always put and it doesn't make sense to have it start within a. You know, you just put a number in front of it. So I create and you'll see. There we go. So there is the precept that I just created. So again, the numbers stuff is the ones I created. But the other ones are are all inside of here. So let's go ahead and take a look at some places where we'd use it. I think hes removal is a big one. So for me, for me, the D Hey, slider is almost always too much. The D. A slider is awesome, except it boost your colors. So if you look worth my my problem is back here. But I think it does great back there. It's just the rest of the photo gets radioactive, right? So rather than do that, I make a brush. I actually made a brush called Hayes Killer, and it does. It's kind of meant to do just that. So when you look inside of here, um, you can see contrast. Boosts the highlights. Shadows, clarity, sharpness. You can even add some D. Hayes to it. So what I would do instead is rather than use the D A slider, which I almost never use, I just go appear and I painted onto the photo. Okay, you can turn on the auto mask, and that will help keep your brush from spilling over into the sky as long as they keep that little plus. And that's the way I'll usually do. It is all usually outline using outline the edge and then I'll turn it off little back out, and then I'll just take a big brush and just kind of paint over. We can even pull it down. There's nothing wrong with still kind of hazy back here in the trees. We can pull it down into there as well, but mawr again, just refining the things that we do rather than crank up the d A slider and get the whole photo with it. Go into the brush and do it again. And the D. Hayes is good. But when you can add a little bit of a little bit of highlights in there, it will make everything a little brighter, a little bit of contrast to so definitely some things you can do there. Hes reduction. Let's see here. Another one would be portrait's. So you saw some of the defaults in there. Iris Enhance. Really zoom in. And what does it do? A little bit of exposure, A little bit of saturation. So these air built into light room. You're not stuck with it. It's too little, Too much. Back off. Ah, let's see Here. So Iris enhance teeth whitening teeth whitening is there, and I'm showing you these because I think you're gonna probably want to make your own like once you realize what they're doing. Little bit of exposure reduces saturation. Once you realize that going here and you can whiten teeth and this one. I think it looks like he's got great teeth now. So we went from yellowish to gray, so I probably pull back a little bit on that. You keep a little bit of color crest whitening strips area that's nice and natural looking good. So we could go in there and we can whiten and again look at what late room created and then maybe make a couple of your own versions if if it doesn't work quite right. All right, let's see here another one that I use when I start to paint a little bit of light, a little bit of sun onto the photo. If we were, if I were to process this one first Shadows, whites or blacks, I always hold down my option or all key whites. Blacks, so option are all turns everything black, and I'll move it to get a white point. Turns everything white, and I'll move it to get a little bit of a black point. Maybe warm this up a little bit, throw on a vignette or use my vignette presets that I created earlier in this class and then go over here, grab my brush, increase the exposure increased the warm. I'll go in here, I'll get a really large brush and I can paint a little bit of light on there so you can paint a little bit of sunlight in something so, you know, if I don't want you through it Like I said, guys, I I'm happy when you purchase process, but I'll show you what's inside of him. Um, I gotta sunshine one, which just adds warmth. Sunshine Strong, which has a little bit of exposure and warm, um, blue sky sun glow. Sun Glo adds exposure. Negative, Clary member. Negative clarity gives things a glow. So as you're making your presets, these air, all these are all great things to turn into little brush presets.
Class Materials
Bonus Materials with Purchase
Ratings and Reviews
Beatriz Stollnitz
This class covers everything you need to know about Lightroom presets, from using someone else's to creating your own. Matt is a great instructor and explains each topic at a pace that ensures everyone can follow along.
Jeri
I really got a lot from this course and highly recommend it! Easy to understand!