Lesson Info
7. Limit Brightening Range
Lessons
Lesson Info
Limit Brightening Range
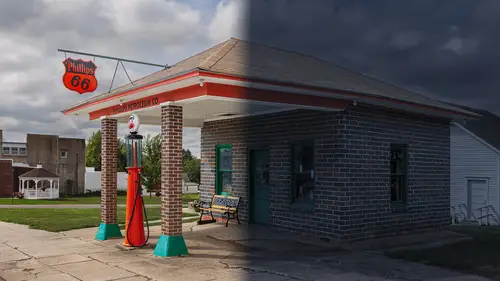
Then let's finish this off with something a little bit unusual. What it is, is I don't like that the light is affecting the inside so much. I wish the dark areas of the inside would not be brightened up so much. So I'm gonna click on the original picture and I'm gonna make a duplicate of it. I can do that by typing command J, control J in windows, that means jump to a new layer. I'm gonna put that duplicate on top of everything, all the way up here. Then I'm gonna tell it to only have this show up where it's dark, To do so, I can come down here to the letters FX and choose blending options. We got these blending sliders and I'm gonna say let's take this layer and let's make the bright parts disappear by pulling this over. And eventually you'll start seeing the nighttime version come through and eventually some of that lighting. And I'll have to move this quite a ways to the left. And all I'm gonna do is keep moving it until I see too much of the dark stuff disappearing. Do you see on t...
he inside right now where the paneling is? I'm starting to get the yellow, the lighting come back. I'm gonna back off on that until there's not much in that area. Let's say about here is when I can start seeing the paneling relatively nicely. But right now we're getting an abrupt transition. I want a soft one. So I'm gonna hold down the option key, alt in windows, and I'm gonna grab the left edge of this slider and just slide it all the way over here which means give me a soft transition. I can fine tune the right side if I want, but I think we're relatively good there. And I'll click okay. Now that's allowing the dark portions of the original picture to show through, I just think it's showing through too much. Well, we have an opacity control. Let's click on it up here, drag it all the way to zero so we can see the light as it looked earlier. And then I'll slowly drag this to the right to see if we can let some of that dark underlying image show through so it doesn't look like the light is quite hitting and interrupting so much of the interior. I'm thinking somewhere right around there, around 20%. I'll turn this off to show you what it looks like without it and turn it back on to show you what it looks like with it. And we can still fine tune anything we'd like. We could come in here and adjust the opacity of our little light beam that's here. We could duplicate it and scale that one to make it brighter in the middle like we have on one of the previous images. We could adjust our blending mode here to see if we prefer one of the other modes. And we could adjust the color of this as long as I click on the left side of it. I could then come over here to image, adjustments, and choose hue and saturation. And in hue and saturation, hue means basic color so we can fine tune exactly what color is being used. Saturation is only gonna do a little bit. And lightness is gonna bring us closer to white light or back to where we were. And as a final touch, I think I will transform this one last time and put our little cross hair right where I need to keep it consistently placed and maybe extend this downward, holding option and shift so you can get that color. Go down a little farther and see if we'd like it to be a little wider or skinnier, maybe just near the door or going out. So here is daytime and here is simulated nighttime. So there you have it. Simulated nighttime, kind of movie style. And now when you start seeing TV shows and movies that show you night scenes, notice how much detail there is and compare it to what you get when you shoot at night. Also keep an eye on the sky. Notice that there's usually a lot more contrast in the skies than when you truly get at night. And if you see any shadows, they'll be relatively harsh because the vast majority of those scenes, they shoot during the daytime. And if you wanna simulate nighttime, this is one way to do it.