Rendering Exposed Light Sources
Lesson 6 from: Transforming Day Into Night in PhotoshopBen Willmore
Rendering Exposed Light Sources
Lesson 6 from: Transforming Day Into Night in PhotoshopBen Willmore
Lesson Info
6. Rendering Exposed Light Sources
Lessons
Lesson Info
Rendering Exposed Light Sources
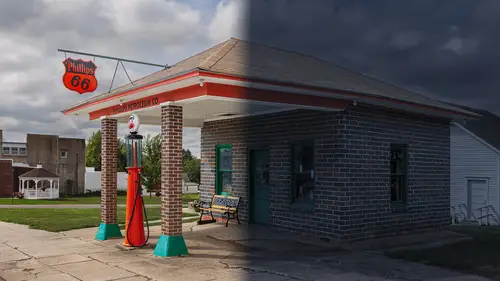
Now let's apply a similar idea to an image that has exposed light sources and therefore you need to adjust the light source itself. Here is the other image I'd like to work with. I'm gonna start by doing a color lookup and let's choose maybe that one that's called "Night from day". And then let's add our lighting on top, here you can see the exposed light source. I don't wanna do everything from scratch though so let's go back to this image and let's just choose one of our layers that we've already made. I'm gonna take the layer and I'm just going to use my move tool. I'm gonna click within this image, I'm gonna drag to the other tab and then I'm gonna drag down into this picture and let go. There you can see our little light beam. We have a layer mask though, and I can see that that layer mask has some information in it. Let's fill the layer mask with white. Many different ways of doing that. Let's just go up here and choose fill and tell it to fill with white as one of our options. A...
nd then let's work not on the layer mask but on the image itself. And let's move this and tell it to the top of where that light source would be. And this light needs to extend way down to here. So let's type Command T. That means free transform, Control T in Windows. And let's take this little cross hair and put it where we need to keep the position consistent. Right about there, and I'm gonna pull this side right here. In order to keep that consistent, I need to be holding Option, that's Alt in Windows and then I can pull this out. It's changing both the width and height. Remember that if you add Shift, then you'll change that. It all depends on if this little link symbol is on or not but I can come over here now and pull this down. If I want the light to extend further, I'm gonna get it to come way down to here and then I can do the sides and pull it out however wide I'd like it to be. If you need the top edge to be smaller 'cause you have a smaller light source that's in here then you can right click while you're in here and choose Perspective. And if you choose Perspective, you can grab these and pull it in or pull it out to widen it or to make it skinnier at the top. Let's say I need it right about there. I'll press Return or Enter and then we'll use our Move tool and I'll use the arrow keys on my keyboard to just nudge that so it is centered on where that light source is. I think I'd like the light to extend further to the bottom so I'm gonna transform it once again with Command T and I'm gonna grab this bottom. I hold, well I put the little cross hair where it should remain consistent. Then I hold Option, that's Alt in Windows, to say go from the cross hair and I'm gonna hold Shift in my case to say only do the height and I'll just look at where that light is hitting here at the bottom. Good, so we have a good amount of light and I might make the width a little wider as well. Remember though, when you do the width, it's doing both top and bottom. So I might want to choose Undo and if I want only the bottom to get wider, that's when you right click and choose Perspective. And I would have to grab this bottom choice right here. Then I could spread that out as far as I'd like. Press Return or Enter when you're done. And in this case, I think I just need to move it down a little bit, get it centered on that light. Now I'd like this area though to look like the light source is in there and right now it doesn't feel like it does. So I'm gonna hide the two layers that are below so I can see my original picture and I'm gonna zoom up and make a selection of this area. I'll do so using the Lasso tool. I'm gonna go here to the corner, click and then if I wanna create straight lines, you can hold the Option key. I have it held down right now, that's Alt in Windows and I'm gonna keep that key held down the entire time until I finish going around this particular glass panel. I'm just clicking on each corner of the glass panel and when I get back to where I started then I can let go of that Option key, Alt in Windows. I want to add this piece as well, but if I were to click right now, this section would go away. So I'll hold Shift, Shift means add. I'll click right where the corner is of the glass right there. And then the moment I've clicked, I can let go of Shift and now I can think completely differently and say, "Hey I want to go back to making those straight lines." So I hold Option, Alt in Windows, let go and I keep that Option key held down the entire time until I get all of these corners on the glass defined. And only then do I let go. Let's turn on our other layer at least the one that's making it black and white. And at this point let's get this to look like it's lit up. Well, the first thing I wanna do is get rid of the nighttime feeling from that area. So here we have our color lookup layer and right there is a mask that determines where it can show up. If we have a selection like this, then we have the mask active. We could just come over here and say, "Let's fill the area and let's fill it with black." Black means don't apply and therefore this black and white look will no longer affect the area that's selected, that brings back the original color. Then let's add a curves adjustment layer on top of that. And in curves we have a few options. First, if I want to make the color different, I can go over here and work on red, green, and blue. I can make things more red, more green or more blue but I want it more yellow. Well, there's an opposite of each one of these. The opposites are cyan, magenta, and yellow. So I'm gonna choose blue because less blue means more yellow. I can grab this little hand tool. If I click on the image, I can just click where I want pull down and I should be making things more yellow. If you ever find you can't go any further, you've moved it down as far as you can and it just can't go any further, then there is a trick and that is to move these other two in the same spot straight up. But I'm not gonna do that right now. What I'd like here though is a little bit more of a magenta ish yellow. So if I increase red that should do it. I'll just choose red. And with that hand active, I'll click here and just pull up a little bit. Just add a little bit, a little more of a that tungsten kind of look. Then we can further adjust this by going back to the RGB, that controls the brightness. And let's see, I'm gonna grab the hand again, come on top of my image. I'm gonna click right where the light bulb is and let's just pull it up to try to brighten it up. And then we can also control the brightest and darkest areas. They don't get adjusted automatically. They're on the ends of the curve. This is the darkest, I could pull it up to decide how light would I like the absolute darkest area to be within there. And I think maybe it's somewhere around there. And then once I've done that, I think I might be able to go back to the where the bulb wedge, which is this one and move it even higher, somewhere around there. Make it feel like there's a lot of light moving around in there. But I want the bulb itself to feel like it is lit up. To do so, I'm gonna create a brand new layer and I'm gonna make a selection with the elliptical marquee tool and I'm gonna make it the same size as our bulb. So I'm gonna act as if the bulb was in a rectangular box and go to the lower left of that box which would be right about here. Then I'm gonna drag to where the upper right of a box would be that would contain it. That box would be known as the bounding box. If you don't get the position just right, don't let go of your mouse yet and press the space bar because while the space bar is being held, you can reposition this. And so I might at the bottom and left and right just the littlest bit more precise. Let go of the space bar and you're still resizing it. There we go. Now with that selection active, I wanna light up our bulb but I don't want to get any light on this little vertical bar that's here. Well, we've already had that isolated in the past and I believe we used that in order to use and create a mask that's right here. Well let's get that mask to remove from this selection. We can do that by putting our mouse on top of the mask and we hold down the Command key, if I'm on a Mac, that means load this as a selection. That would be the Control key in Windows. And we also in here say we wanna get only the areas where this selection overlaps what's in that mask. So to do so, we're gonna also add Shift and Option. That's Shift and Alt if you're in Windows. So I have three keys held down on a Mac at Shift, Option, Command on Windows, that's Shift, Alt, Control. And I click, and you see what it just did? It just removed that area because we had isolated the glass earlier. Now let's start building our bulb. I'm gonna start with white. So I'm changing my foreground color to white because the absolute brightest part of that ball, I want to have white in it. So I'm gonna get the softest brush I can in a relatively small brush. I'm gonna put my opacity at and I'm gonna click right where I think the middle of that ball would be. Right about here, click. You can hardly tell anything happened. I'm gonna make my brush a little bit bigger and click again. You can start seeing a little bit of a glow that's in there. Then I'm gonna get my brush to be bigger again and I'm going to lower my opacity. In this case, I'm gonna bring my opacity to maybe 50%. I'm gonna change the color I'm painting with to the most vivid yellow I can find. Then I'm gonna click right on the center of that bulb to add just that hint of yellow. I think it's a little too much. So I'll choose Undo and I'm gonna bring my opacity down to 40. There we go. Then I'm gonna get my brush bigger. Once again, I'm gonna lower my opacity once again maybe to 20 this time and fill it in even more. I just clicked one more time on it. Then I'll get rid of my selection. You can see a little bit more of a glowing bulb in there but I want a little bit of a glow illuminating around this. So I'm gonna now get a much larger brush. It's still got a really soft edge. I'm still painting with yellow and I have my opacity at 20. And what I might wanna do is make the color just a littlest bit warmer. I'm gonna make it a little bit more orange-ish but not by much. Whoops, somehow clicked a little too high there. Just a hint of orange. And now I'm gonna click just a little bit right there. I might also get my brush a little smaller and just get a little bit on that Moiré or whatever this is to make it feel like there's a little more of a glow there. If I choose Undo, I might need to just go vertical like that. So we're feeling like we're lit up a little bit. Let's turn our light back on and then we just need to fine tune things. In this case I'm thinking I just need to move my light source. So I'll use my Move tool and let's just move this downward a little bit maybe about there so it's not coming up anybody above the shade that is there. If the top is just a little too wide, I could do the transformation but I think it's actually not bad. I mainly need to decide how far down should it go and how wide should it be and should I end up lowering the opacity or not?