Lessons
Class Introduction
03:18 2Isolate Channels For Color Correction
07:50 3How to Do High Contrast Black & White
09:18 4Save Selections as Channels
02:18 5How to Create Hard & Soft Selections With Channels
09:59 6Select Hair From Background With Channels
16:10 7How To Pick-Up Textures From Channels
19:22 8Add Spot Colors to a Channel
06:43Lesson Info
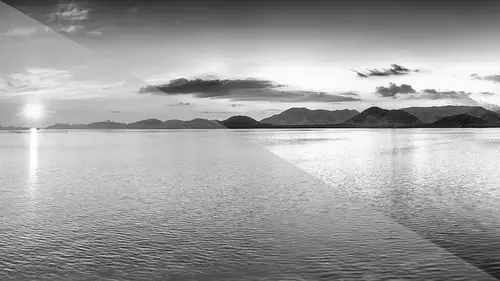
How to Do High Contrast Black & White
the great thing with channels is there not just for color images. So what I have here is I have a beautiful sunset, Nice adobe stock photo. And so we got this beautiful sunset that's been composited and looks great. But what I'd like to do is I'd like to convert this to black and white. So one of the things that you never, ever, ever dio is go under your image mode and just converted to grayscale, and any photographer out there will just, like, start doing nails on a chalkboard. So what I've done here is I've done an adjustment layer, and it's a black and white adjustment layer. And if you're familiar with those, great if not definitely something that I would look into because it allows you to go in, and it allows you to adjust your image into black and white mode by targeting all the colors in your image. So that should get better contrast. But one of the things I found is that I can't really get beautiful, deep, gorgeous contrast images with this. I haven't been able to do that, you ...
know, I could be doing it wrong. What do I know? But anyway, it's a good start to be able to go in and do this. And then once you go in and do your black and white adjustment layer, what I'm going to do is then I'm going to convert this image to gray scale because I've gotten my tonal range where I'd like them to be. I'm going to convert this to gray scale and flatten the image so that it bakes it altogether. Now I've got my image. And because this is a grayscale image, I have one channel and so I don't have the advantage of going in and adjusting my red in my green in my blue to get everything where we want it to be. So if I were to go in and use the levels or curves adjustment layer on here, I've got one channel. So I'm really stuck with being able to get the most diverse adjustment out of this. So I'm gonna do something completely different here, and I'm gonna mix this up in a way that we haven't seen this before. So I'm going Teoh, go back. Teoh by basic layer with no layer adjustment, jumped in my channels here. I'm gonna click on my channel and this is just my continuous gray. So I've got my highlights, my shadows, everything else. Now I'm gonna do something that you probably have never seen before. Okay, I'm gonna go. I'm gonna hold down my command key and I'm going to command click on my channel. And what I've done is I have created a selection inside my channel. Now, here's the interesting thing about this. And this is where channels get really weird for people. When you go in and you select a channel, anything that is white on a channel, actually in a selection is totally clear. So if we go in and we actually physically draw a selection on our document here and I go and I put a selection here, those pixels that Aaron there are actually white pixels when we're in our image. And then we have varying shades of gray all around. When we get into a channel, this is completely different. When I command click on a channel here. What I've done is I've gone in and I have selected all of the pixels that are going to be from the midpoint and lighter. What? I've done here is I haven't just gone in and physically selected the pixels. When you go to the channel on you select the pixels, you are actually selecting the intensity of those pixels. So what I've done here by command, clicking on the channel is I've actually gone in and I've selected the opacity of these pixels, which is completely bizarre, completely different. But I'm going to show you later in this video how awesome that is to pick up texture. So this is really cool. So spare bear with me on this. So command clicking on this I've just now selected everything from my Midtown and brighter. So there is my selection with that selection active, I'm gonna jump over to my layers panel here, and I'm going to create a layer adjustment on just my mid tones and lighter. So even though I only helped one channel to adjust, I'm actually gonna do two different adjustments here, one from a midtown's and higher, and then another adjustments for my mid tones and darker. I know that's what we do. So, with my adjustment here or my selection active, I'm going to go into my curves adjustment. I'm gonna choose a curves adjustment layer, and it has now given me a mask. And if you know anything about masks, black conceals and white reveals Well, what we see here is we see an entire selection of the whole image with its varying intensity. Now is my mask. And now you'll notice that I have all I have half of my image here in the adjustment because when I command click on the layer, I get everything from the Midtown's all the way up to my highlights. Okay, so now I have the ability to isolate just my Midtown's to my highlights completely separately, rather than adjusting the image overall. So if I go in and they begin to adjust, you can see I can adjust the highlights here, and then I can go. We in and I can adjust my curves anyway, that I want Teoh keeping in mind that it's not affecting anything from the midpoint and darker. You're going to see why this is so much more awesome so I can go in and I can adjust this to get a whole lot more contrast and you can see my hissed. A gram is completely cut off because it waas from the midpoint in higher is not selected. So I just go on and have been able to get my mid tones and higher adjusted with more contrast, and it already looks a whole lot better. So now I'm going to go back to my original image here and one of the things, too. When you go win and you select channels, you have to be on the actual pixel based image layer in order for your channels toe work. If I select my color adjustment channel here and I go in, you'll see I'll get this weird thing that says Curves mask on. It's like, What is this? Well, in order to be on your pixel based layer to select the pixels, you must select your image in that layer to make sure your channels air representing correctly. And you'll also see more of that, too, when we get into more advanced things. If this and it isn't advanced enough so back to my channels here, I'm gonna command click on my channels again. But now what I'm going to do is I want to inverse my selection, so I want to select the inverse so I get everything for my mid tones and darker. So if you know the keyboard shortcut, select inverse shift command. I I select everything from the mid tones and dark er's. Okay, there it is. I'm gonna do this exact same process that I did with the adjustment layer going to use my layer adjustment with curves. It's gonna target the mid tones in the darker is here and now I can go, we in and I can adjust my shadow slider in, and I can adjust my darkness overall, and I can adjust that. However, I'd like to get lots of contrast if I'd like to really ramp that up. And I can really play with my curves here without having to worry about anything in my highlight area. There's nothing here to adjust, so it doesn't matter what's happening here in the part of the Curves ramp. I've basically given myself a whole lot more adjustment than they would normally have. It's only a grayscale. I've only got one thing to adjust, and that's shades of gray. But this way I was able to break this out into two separate channels. Now I've got one that's going to go ahead and do just the highlights. And I've got ones that are gonna do just the shadows. The benefit of this is is that now I can go in and I have two different adjustments to work with. I can click on either layer and I can adjust the opacity of either layer to basically go back in and dial. I can dial it back in and dial it out with my capacity to see where the right amount of adjustment exists on each individual layer. Dial that in, Dial that out. If I want to get even more particular, I could go in and I could see Okay, there's my shadow. There is my highlight. If I wanted to knock back a little bit of my highlights, I could go back onto my mask right here and with my brush and painting in black here I could go in with a large brush, very soft edge with a very low opacity. If I didn't want any of my highlights here, I could go into my highlight adjustment and I could just hit any of my highlight areas and knock those back ever so slightly by painting black on my mask. So I've taken a color image. I've converted it using my black and white layer adjustment, which, of course, is going to be right here when it's in color theirs my black and white layer adjustment. I then went in, and I targeted my channels by command, clicking on the channels, and from that I was able to get two sets of adjustment out of here. So now I have that much more range to be able to deal with, and I've never seen anybody do this before, but I found this to be super handy when it comes to going in and working with black and white images.