Extend Sky in Image Using Photoshop
Lesson 2 from: Using Photoshop to Extend ImagesSimon Peter Raible
Extend Sky in Image Using Photoshop
Lesson 2 from: Using Photoshop to Extend ImagesSimon Peter Raible
Lessons
Lesson Info
Extend Sky in Image Using Photoshop
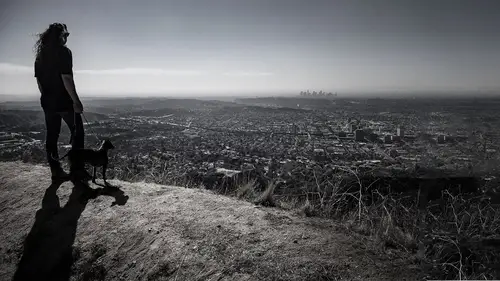
Here's our first. This is what I'm gonna be doing. So we have a picture, we're gonna extend the canvas, we're gonna fill in the canvas. And these are some I practiced on, I have extra lil' side stuff I can give ya but it's gonna be get the big stuff handled first big moves first just get rid of all that empty space all the scariness, all that screaming get it outta there, just conquer that quick as possible. Then instead of just the little dinky stuff from the get-go, do the big stuff, then do the little dinky stuff so step one, step two, step three. Just did a whole book for a friend of mine. Julian David Stone. So he snuck in a camera, took a bunch of backstage pictures during the '80s and he did, like, Prince, U2, The Police, the Ramones, he did a big coffeebook he had one slide of the Grateful Dead, Mr. Weir here and he was like, "Can you extend the sky and keep the edge work for the film strip?" So this was a job I was just asked to do not two weeks ago so it's a valid ask, it's a...
valid request, it's a valid piece of skillset to learn. Here's what we're startin' with. And we'll end there. Start and finish. We're gonna get rid of all the big, empty space and we're gonna find out what's goofy about it, address those, fix 'em one by one, and then the last little finessing bits gonna lead us to that. So we have our original here. I am going to extend the canvas. Quick way to do it, hold down control key, lower left of your keyboard, touch at the title bar hold down the canvas size. Over here, it'll tell you where your file is. You don't want that, you want anything that doesn't have words. Canvas size. I'm gonna make this 52, 50 pixels, Tab + 3000. That's how much extension we wanna do. So first step, let's get rid of that. I gotta take the original, I gotta float it by going Command + J and then I hit command + T and just stretch it until it fits. So not almost to the edge, not to the edge, definitely over the edge and just leave no arguments you're never gonna get caught if you go all the way up to and past it, that just kinda covers your bases. I'm gonna do the top and bottom as well. Hit return, that's good. Now. I'm gonna mask it out. Lemme do that again. So I'm look at the whole thing and then I'm gonna hold option and then click this little mask key down here. It's gonna mask out the whole thing. Then I'm gonna grab an airbrush. B for brush. Make it a bit smaller and just come around. I know I'm gonna want extensions here at the edge of my original. Do this side. Do the bottom. Do this side. This is what the mask is gonna look like. So everywhere it's white, that's our extension coming in. So we definitely wanna fill that and we definitely wanna fill the outside of that. So I'm gonna grab a lasso tool with L, hold down option. Spin around here, Command + Shift + I for 'inverse that' Option, delete, I'm gonna fill from the foreground color white so there goes all that big, hairy, crazy space. That's handled. Now the next thing to do is look and see what goofy parts aren't gonna pass muster. So I'm gonna make a new layers, call it notes, grab a brush, and I'm lookin' at this part ain't cool. That's no good. This, we're gonna address. Some of this is lookin' a little iffy. So these are the things. Everything else, look how fast we filled in all that space, so the stretch doesn't kinda it doesn't seem like it would work, yeah. But most of it works. 85% of it already works. There's just the little transition spots that we gotta keep an eye on so let's take care of that. I'm gonna make a new layer, fill it full of everything I see right from here, I'm gonna hit command + option + shift + E it's gonna merge to one whole layer everything we see and then I'm gonna go through and fix those. First thing I wanna do is a content aware, which is Shift + Delete. But let's do it in an action. Build an action, and that way, it's just set up for us. So we do it once, record it once, and then boom, boom, boom, we're just hammering them. So I hit L for lasso. I know I wanna fix this. I'm gonna hit action here, call this 'content aware fill'. I want this as a function key, F1. Color it whatever you want. Blue for sky. Record and then Shift + Delete brings up 'content aware' we want, color adaptation, this works, leave this one on, hit OK. And it's gonna fill that in. That's our action. Hit stop, and that's the action we wanna record. So now, every time we go through here, hit circle, and hit this, it's gonna fill in from your content aware. One button, just one-stop shoppin', so circle, F1 key is gonna fill, all these little transitions, just gonna go and say anything that's buggin' ya, circle and then see if content aware is gonna dig ya outta that hole. F1. Not too far off, huh? All right, step one. So, that took... we're five minutes into it. Boom, boom, boom. Now, next thing here, let's go ahead and make another little notes. N-O-T-E-S. What else doesn't look killer? It looks...B...like down here is a little undefined. This looks a little flat up here. I'm startin' to see a little step and repeat here. Step and repeat here. So let's do some things that kinda hide that, kinda push that back. Real simple is a darkening curve and I think I'm gonna do an action for it as well. Pull this over to button mode, say, 'gimme a new action', call it 'darkening curves'. This is my action. I'm gonna do a new curves... ...darkening...we're gonna color it purple. My curves are going to be super dark and then I'm gonna mask it out and bring it only where I want it. So that's nice and dark. And I'm gonna invert this so you can't see the adjustment. Command + I. That's the end of my action. Quit recording here. So now we've got two actions already. If we want another darkening curve, it's just whack. There ya go. It's just that quick. So if I do it once, I was like, 'Ugh, that was a good move'. If I do it twice, I was like, 'I already did that...' If I do it the third time, I'm like, 'I should record it, I already did it twice, so [Mumbles] doing it over and over and over. So from here, I can grab a 'B' for 'brush'. I'm just gonna grab my regular old Photoshop brush, and just paint in white where I want some darkening to happen and I'm gonna hit four and four, bring in 40% and we're just darkening bits as we see fit. So this looks like a weird transition here so I'm just gonna scooch you in there. Now, once we have the darkening done, the other thing we can do is lightening. We'll make an action for it as well. And we'll throw that down. So I'm seein' right down here, it's still a little flat so I'm gonna do one cut-and-paste move. So I'm gonna do Command + Option + Shift + E for everything and I'm gonna move with a move tool, 'V'. I'm gonna take all this hyper stuff and just move it down there and see if there's a little extra information we can just smooth on in there and kinda take out the blahs. So this'll be our cut/paste layer here. Cut and paste. Option + Mask, mask out the whole thing. I'm gonna grab one big brush. Here's another little spot, if I hit Control + Option, and touch on the artwork, it'll allow me to make the brush bigger or smaller right here, and if you go up or down, it makes it harder or softer. So I'm gonna go super soft and then bigger. I'm gonna go three and three and just start tapping in some of that information from the upper right corner, so here's what we're gonna be bringing in and we're just doing it through the mask and just bringing in some stuff that kinda works. Whoo. There ya go. Let's see that again in slow motion one more time, Command + Shift + E...D...V...there's that. Next thing I wanna do...ooh! I wanna save this. Save and save often, so on my desktop, I'm gonna add at the end of this an underscore, work in progress, number one, alpha. That's good. So where we did the darkening stuff, where we wanna just add shadows and stuff, we wanna add highlights as well. So I'm gonna throw down another curve and lighten everything. Mask it out, and then just paint in the lightening where we want it. So as opposed to painting, if you're just painting down, it's gonna get kinda mushy, it's gonna get apacities and stuff but if you do it in the curves, you're just taking what's there and darkening it down already, taking what's there and lightening it up. It comes out a little more realistic so let's do another action here, button mode. Do another, call this 'lightening curves'. Copy, set one, function color, green...curves...color green, and then we're gonna lighten everything, flip the mask so it hides it all, and stop the recording here. Back to button mode. If you want another lightening, there's another lightening. There's a darkening, They're free. Once you just get on one button, you'll use them more often, you'll save yourself time. It's good practice so the quicker you get over that scary moment with actual recording, please do that and then it's just so much more successful and available to you so instead of you going, 'Ah, it's gonna take me a minute, two minutes to set up that curve,' you'll just be like 'poof' and then start working real quick so let's get a brush, bring in some highlights here. This one, I'm gonna use this little hairbrush I have. It's just a stippling brush I use to draw hairs with, but for this, once you get bigger, and then drop the apacity down, you can get some pretty nice little effects and it just kinda brings in... Yeah. Let it out if you dig it, tell me. There's no clapping, there's no tip jar, nothing, man. Just say 'Wow, man, that's kinda cool, dude. Where'd you learn that?' We can just keep on tickling this until we like darkenings on here. Okay, one other thing I'm seeing is that you've got some hyper blues and you've got some nice, quarter-tone blues and then you kinda have these gray parts, right there, which...not tasty. So I'll show you a slick way of handling that. It's a saturation tool, but it's a vibrance piece. So it's a vibrance and adjustment layer and what vibrance does as opposed to saturation, with hue saturation and hue saturation will take everything and make it more saturated. Vibrance takes the stuff that isn't saturated and tries to make it more saturated to catch up with the things that are saturated. So instead of pushing everything and everything getting super hyper crunchy and you having to deal with that, don't do that; do vibrance, it's gonna take the lower saturated stuff and just leave the higher stuff alone and bring up what you're after in the first place. So let the machine do the work for ya. So this one, gonna hit Option, down to my Adjustments, take it down to 'vibrance', call it 'saturating vibrance'. Sat-ur-at-ing vibrance. Okay. So the whole thing goes saturated here, but if you do the front vibrance, it's gonna take the unsaturated stuff and try to play catch-up down here. So now we flip that. With the brush, we can just dance in here and bring the dull spots up to party time. [Singing] All right. Killer. Anyone want anything else done? Does it look good? You like it? I like it. All right. From here, let's do... there's one last, little move. Alien Skin make a killer filter for this. It's called 'Exposure X-3" so the last little bit I'm going to is Command + Option + Shift + E, gonna merge everything up to its own layer, and I'm going to make this layer into a smart object and the reason I do this, this filter, where it's running on a regular old layer, once it's applied, you're done. So you'd either have to pitch it and start over or scrub the apacity to bring it in, but if I put it on a smart object, then it's a smart filter so every time I double tap it, it'll just open up the filter and reapply it to the artwork so it's like the artwork's over here, but then you're kinda working on the filters over top of it, and you can adjust and mix and match as you like so it leaves yourself a lot more accessibility, leverages, a couple different back doors, a way out. So once this is on there, I can go under my filter, data alien skin, exposure X-3, and there's all kinds of fun stuff in here. So you can do all kinds of vignettes. It's set up to do a lot of pack mule ideas. You can do vignettes on it. It can color correct. There's a bunch of batch processes in here, but for right now, we're just gonna take the lovely stuff and just say, for funsies so the one I like is this overlays and it gives you three different ones. There's a bunch of borders, so you can just go through and real quick, you can see previews of it so let's have that. And then in these apacities, you can make it darken only, you can make it screen overlay. That's cool. They got some lighting effects here, so you can put little starbursts and such in, all of youse real quick, also you can run plenty of options down here, you can run apacities here, and then once the thing comes down over your whole piece, you can mix and match there as well. So let's grab masks of that. Oh? Yeah. And then there's texture for greens and such. [Mumbles] All right, hit a plot. So once this is done, you still have a lot of ways you can affect it, so you can turn it off and on, you can adjust all this stuff here, you can adjust it here. So there's a bunch of different ways to adjust the blending tones of the smart filter. So it just gives you a whole bunch of options. Really awesome. And you can also double click, and go back into it because you made it into a smart object Undo, reapply, pick something different. Boom. You're okay. So that's skies.
Class Materials
Bonus Materials with Purchase
Ratings and Reviews
ValeriaArdiyants
I LOVE this class! Let me preface this by saying that it's not for beginners. IMO you should be at least intermediate-advanced to keep up with the fact that the instructor assumes you understand how layers, channels and shortcuts work. Having said that, he's a fantastic educator. As someone else mentioned, it's refreshing to see someone who is teaching exactly what the course name promises, he doesn't hold back and he doesn't try to sell 3rd party products. It was interesting to learn how he goes about his edits considering there's 1000 ways to do one thing in Photoshop. I would love for Creative Live to give Simon a full course on advanced Photoshop techniques since he's funny and clearly knows his craft. For the price of this course, I highly recommend it!
Zolti
Dude, I really like this instructor's style! He is funny, he explains what he does, doesn't spends time selling his own business, like many instructors do here on Creative Live. The class itself is right on point, explaining how to use the various tools to create way bigger scenes from scenes you already got, but maybe they are not big enough to fulfill your needs. The use I saw in this class is, for example, when you do a big panorama, and somehow part of it is missing, then you can complete it with examples presented here. Also, recommended for making posters, or big wallpapers. If I understood correctly, the attached files contains step by step instructions how to achieve exactly what he does, which are handy for practicing. He is definitely one of my favorite instructors from Photoshop 2018.
Paul Vincent Farrell
After the incredible value of his Business of Professional Photo Retouching class, I was itching to gain some hands-on Photoshop instruction from Simon Peter Raible in this class. I honestly don't think I've ever had more "wow!" moments or learned more immediately useful techniques in my many years of watching CreativeLive courses than in this class. I've immediately been able to do things I'd never known in 15 years of using Photoshop. Simon is also such a laid-back, relaxed instructor it's a pleasure to learn from him. An absolutely must-watch course.