Flash for Indoor Photography
Lesson 15 from: Wedding Photography: Capturing the StoryRocco Ancora, Ryan Schembri
Flash for Indoor Photography
Lesson 15 from: Wedding Photography: Capturing the StoryRocco Ancora, Ryan Schembri
Lesson Info
15. Flash for Indoor Photography
Lessons
Class Introduction
04:18 2Define the Goals of Wedding Photographers
15:04 3The Importance of Wedding Photographers
11:42 4Shooting Philosophy
09:22 5How to Build a Shot List - Bride, Groom & Formals
22:42 6Tye the Wedding Story Together
07:19 7Capture Stories in Wedding Pictures
05:53 8Get the Right Exposure
16:20The Theory Behind Lighting
10:19 10The Power of Short Lighting & Backlight
30:08 11Shoot with Low Ambient Light Indoors
05:25 12Seven Fundamentals of Pose
13:56 13Continuous Light Sources for Indoor Photography
25:36 14Use Available Light for Indoor Photography
35:06 15Flash for Indoor Photography
18:59 16Outdoor Photographing with Available Light
20:27 17Group Posing & Lighting Techniques
12:22 18Groom and Groomsmen Posing & Lighting Techniques
11:43 19Couple Together Posing & Lighting Techniques
16:21 20Creating a Memorable Client Experience
12:40 21The Power of a Same Day Slideshow
12:07 22What do Couples Look For in Wedding Photographers?
05:51 23How to Successfully Interview a Couple
05:11 24The Importance of Wedding Photography
09:07 25Example Couple Interview
22:49 26A Workflow That Works in Lightroom
09:34 27Workflow Overview in Lightroom
19:28 28Manage Wedding Images in Lightroom
21:30 29Export Pictures to Animoto
04:28 30Color Correcting Images in Lightroom
14:09 31Optimize Images Through Lightroom
13:35 32Color Management in Photoshop
03:04 33Rocco's Skin Retouching Technique
33:27 34Image Toning to Create Distinct Looks in Photoshop
24:27 35The Value of a Wedding Album
05:27 36Traditional Design Elements in a Wedding Album
19:05 37Magazine Design Elements in a Wedding Album
20:04 38What Makes a Good Wedding Album?
07:47 39How to Sell the Wedding Album to Your Clients
10:37 40Wedding Album Workflow
08:13Lesson Info
Flash for Indoor Photography
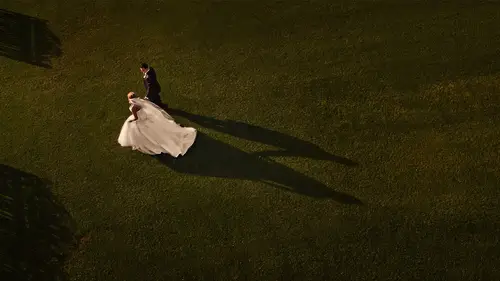
Are we bringing in the flash? Let's bring in some flash. Nice. So, what we're going to do now is, I am going to shoot with this background, that's going to be my background there. As I said the lighting is quite uninteresting and quite flat purely because we have the light coming in this direction. So, the idea behind this shot is to basically underexpose that, bring the couple into here, and using the vivid light of a speed light okay? It's just a simple speed light through one of my Elinchrom boxes, nothing major, okay? Now the idea is to diffuse the light, but one other thing to note is that I'm going to be using just the edge of the actual soft box to light the subject. The idea behind that is that light essentially travels in a straight line, so light's coming up in this direction, but also on the edges because of the reflecting nature of the soft box on the inside. Light is also traveling from the outer rim out, so we're getting that nice, beautiful, reflected, vivid light ...
which is going to be quite soft and quite beautiful. Okay so, we're not going to blast them with flash right in the middle, we're just going to feather it off and we'll see how we go. So the first thing that I'm going to do is I'm going to position my bride. I'm going to shoot the back of the dress into this, use that as a bit of the background, we're going to shoot it with a nice wide angled lens, and we'll take it from there. So, maybe just, just bring this cable back. So Laura come back towards me a little bit more and just face that way, fantastic. So I'm just going to fix the dress up here, okay. Come to, one step to the right, that's a little bit more. Right, and go forward just a fraction. Awesome. And just turn your body slightly to the left, that's great. Now darling, what I want you to do is just pick up the dress slightly from either side, that's it. Fantastic. Now, turn your upper body to your left hand side, That's a little bit, just turn your body as well. Beautiful, and chin up a little bit more, great. Now the idea is, watching your background. Here, what we can see is, we've got sharp lines, and we don't want these sort of things cutting into the middle of the head, because they're really not going to add anything compositionally. Okay so, we want to basically place their head in between here when we shoot from that direction there, so that it's nice and clean. So let's have a look. So let's do a shot first without the flash. So just metering off the dress, roughly. Yeah this time, I'm gonna meter off the dress, but I'm gonna render the dress mid tone, so the ambient level is quite, quite low. Let's have a look at how that looks. (camera shutter clicks) Yeah, I'm happy with that. Okay so, essentially what we're doing is, we're underexposing the ambient light, and now we're gonna bring the light through in with the flash. So, maybe if we could just get that camera moved. We'll just run a test to see how that looks. Beautiful. (camera shutter clicks) That's good, that's fine I'm just looking at composition first. Okay now, let's see what we have. Chin up darling, a little bit more. (camera shutter clicks) Yeah, that's good. We're just gonna increase it just a little bit more. So, just a bit more ambient, so I'm just gonna go down to one twenty-fifth, and then it's fine from there. Yeah yeah, just feather it out a little bit more. Okay. So, we'll just get a little bit more ambient into the shot. Chin up a little bit, and just turn that soft box slightly. Yeah, not too much, that's great. Good. Chin up again, gorgeous. (camera shutter clicks) That's beautiful. And now, let's do a vertical wide angle of this. (camera shutter clicks) Gorgeous, chin up just a fraction more, and eyes down, that's beautiful. Good, good, good. (camera shutter clicks) Gorgeous. And you can see now, in the shot, as it hopefully comes up on the screen, we have light direction, but we also have a pretty good looking histogram in the sense that it's being pushed away from the left hand side, so we're not blocking off shadows, so but that spike is from all the dark tones that are present, present in the image, and then of course, mid tones, and then a few of the highlights tipping out. So, the histogram essentially is your tones from shadows to highlights, and that indicates how much of each tone we have in a particular area. So, the darker tones in this image are present, there's more of them present than mid tones through to highlights, so it's really cool. So let's introduce the groom into this as well. So. I'm just going to get you right into here like that direction there. That is awesome. Just come out to the side a little bit. Now, what I'm going to get you to do Laura, is just bring your hands just up to his cheek. That's it, just one, just one, and the other hand just around the waist. That's it, now turn towards the light, now get in close Chris, close, close. Beautiful, beautiful. Get in close, gorgeous. Not so close, nah just kidding. (laughing) Just moving the cable out of the way, okay. We'll go for a different crop than what we had earlier on this. Okay. That's beautiful. (camera shutter clicks) That's gorgeous. Yup. Beautiful, we got beautiful sidelight, light direction, and all that, okay. And now we'll do, a full length of that as well. Chris just turn your head towards me, just a little, good perfect, now chin up darling, chin up, good. (camera shutter clicks) That's great, and one more time. Good. (camera shutter clicks) That's fantastic. That's nice. Gorgeous, beautiful. So now we have, we have like I said direction as opposed to just the other flat lighting. And we could do a shot with just the ambient light here, so I'm gonna get you just to go right off to that sideboard. Maybe just yourself, Laura in the shot. Okay, and I just want you to lean back on it, hands on either side. Okay, and just turn your body slightly, hands out, hands out a little bit, just soft hands, beautiful, and just turn your head towards the light. A little bit more, and down, a little bit, that's it. Ryan, could I just get you to, just fix that dress for me? Yes. (coughing) Excuse me. And just relax the arms a little bit. That's it. What I need you to do, Laura, just bend that knee in a little bit, yeah that's great. And with your, with your left hand, just bring it up on your dress as opposed to just, that's it, good. And just gently, gently, holding the dress. Good, beautiful, that's nice. Good, yeah, awesome, and just, eyes to me in this one so then once again we're going to meter off that dress, no flash. Turn your flash off. Beautiful. (camera shutter clicks) Yeah, gorgeous, one more time. (camera shutter clicks) What we have here, because of the light coming in through the window, we do have a bit of light direction which is really awesome. Yeah. Ryan, over to you. Yeah, well I've just got, I've got one more shot in here that I would love to do. I'm again, being seduced by light, and being seduced from what's around as I see, there's very strong light direction coming because as we see down here on the floor, we have a bride highlight and a shadow that we can easily tell what's going on with the light, it's coming through that window, it's coming through as a shaft, I'm actually going to intensify that light by adding a bit of back light to this with flash, because I want to kill some of the ambience in this room, because it's all not, it's not all amazing. I want to just kill a little bit of it so that I can concentrate just on the parts that really mean something to the shot, or add something to the shot. So, I'm going to have Roc place that light behind them in a sec, and we'll just link this up. Excellent. I'm going to go wide angle on this as well, so I'm just going to change lenses for a sec. So we do carry quite a few different lenses with us on a wedding day. We pretty well brought the standard kit with us over here. I wanna have you guys do, if you can go up this little ramp towards that camera, but you're going to have to come down darling. (laughing) So, we'll do that first, we'll get that camera out of the way, but you can see, just even if we have a look at the shadows here that are coming off the ballister, we can see that there's definitely that light direction and we can tell what type of shot we're going to get out of this anyway. So. And then in a second guys, I'm going to get both of you up there. So, we've got a bit of a, bit of a walking shot maybe, like you could be hand in hand, walking up that ramp. Don't know where you're walking to, don't really care. It looks good, so. So head up that way, about half way would be great first guys. So just go half way. And that is perfect there. So, we can see that naturally that light is there, and we can tell what's happening. Actually guys, can you just go over to the railing just a fraction more for me, and go up maybe one more step. That's good. By adding the flash, all we're doing is we're, we're adding more light to this, and we're just, giving it a bit more power. So, let's get a reading, we'll do our ambient reading first. And remember, I'm wanting to underexpose (camera shutter clicks) most of that ambient light. So we get an ambient reading of five point six two-hundredth of a second at three point two. Put the flash on now. It's eight eighty on the flash. I always tend to push my flash by the stop, so I've got, it's set up to be pushed by a stop at the moment, I may need a little bit more out of it but I will find out soon. Guys, if you look towards each other, so just so I get your profiles, perfect. And actually mate, do me a favor, take one more step and stop on the step. That's it. Actually, just cross that leg over a bit more as you walk, so you're crossing over yourself. Yeah, there you go. Yup, that's good there. Hold it there for me. I'm just going to crop that lead out. Beautiful (camera shutter clicks). So all looking good, apart from that frame back there. Okay, here we go. So eyes to each other guys. Gorgeous. (camera shutter clicks) Beautiful. Okay, and Roc, it's just, it's coming a little bit on to that wall for me, so I need you to push it away from that left hand wall. Yup. Yup. Good. I'm going to just try and crop that out, yeah might as well. Yeah, perfect. (camera shutter clicks) Gorgeous. Beautiful, so what you should start to see in a second is that having that flash behind them has added more light, has added more dimension, or more drama to the shot, than just leaving the natural available light. Underexposing that background, so I didn't need all the detail in the background, the background's not so important as are more the architectural features of the background: the windows, the chandelier, I left all that in but underexposed, let the flash do its job, and had some really beautiful backlight, so. But Christy, I think we're almost done in this area, so. Yeah, I think we're getting really close, we have a few questions if you Yes, absolutely want to take that. So it looks like people are commenting on how a lot of your photos you've been doing so far are with the couple looking away, not necessarily looking at the camera, how do you approach eye contact with the camera and what's your balance of photos you do? I would say it's probably about 80% away and 20% to. Okay. Yeah, so there's a lot of looking away from the camera and not at the camera. There's a reason behind that as well, is that if you, to be engaged in a picture, to be a viewer engaged in a picture, having someone look at you, look back at you in that picture immediately makes people feel a little bit uncomfortable, and so that's why a lot of our stuff is either interacting together to get that energy, and if you're a viewer looking at the energy, looking at the connection, the love, that's what we're there to capture. We do a couple of portraits where it comes back to the camera, but once we've done a couple, we're done, thanks very much, move on, and we really wanna capture the rest of the story, so, yup. And when you have a couple who love to, looks at you no matter what, and is always sort of ready for you, and has their eyes on you, how do you guide them and direct them to not? Literally tell them, I'll have their eyes closed, or eyes down to over their shoulder, or into each other, Into each other I think, is very important. Yeah. Because we really try to capture the energy between the couple, and make it look as natural as possible. Even though we set up the shot, it's about bringing reality into what we do. That beautiful connection that we do, whether it's sniffing the cheek, or whatever else, it just brings that level of realism so that the image does look natural, like they've actually done that, as opposed of images where the bride and groom are very much camera aware and not really giving much more into the shot, so. We do portraits obviously, of people looking into the camera, we want to be able to bring something more to the table with different energy I guess. Yeah. I always look at it as, if I was a viewer of these images in 20 or 30 years time, how would I connect with them? How would I connect with them? And having someone look straight back at you in a photograph is just sometimes, it feels like a very odd stumbling block in a way. Yeah, I guess it depends on the image, but yeah, there are shots where we do engage the subject into the lens, and there are times where we just don't. Absolutely. Okay. We have some questions actually from our studio audience in the other room. They're wondering about the soft box settings, how strong generally for a situation like this, what would your settings be to get it to balance out? On the speed light there was one-eighth power, so not a lot of light okay? So, and it's just, like I said my SB that's being pushed through the soft box. All we're essentially doing when we're using a soft box is making the light source bigger, and the bigger the light source, the softer the light, so we're making the light quite soft. The trick with soft boxes though, is to be able to use the fitted edge of the soft box, because soft boxes can be quite harsh as well. They can become almost a point light source, if you put them far away and then try and light an area, that soft box becomes smaller and smaller as it moves away from the camera, so becoming almost a point light source. We have photographers saying oh I use a soft box and my lighting is quite harsh, well, how far is your soft box? Oh, 30 feet away, well yeah, it's gonna be quite harsh because it's a point light source. So, bring it close, use the fitted edge and you get some really beautiful, incredible results. For a group photo, we have some questions about would you use a soft box for shooting a group, a family photo? Yes, absolutely. If you're indoors in a place like this and you want to pump a little bit more light and just reduce the ambient levels just a little bit more so you have control, soft box to the side, just using it as a nice, beautiful feathered light to light the group so you're getting a nice even spread of light across the group is awesome. It's really, really cool. Yeah. So, yeah. Sometimes two, you might have two, cross lighting depending on the size of the group. Okay. Yeah. And when you're shooting these, are you using an auto white balance, or are you setting that yourself in the camera? Usually daylight white balance we use. Sometimes auto, but what happens with auto is that it's only as good as the colors that are present in the scene. So if you get like a lot of reds in the scene, what happens is that the camera corrects them and neutralizes them. The same thing when we're shooting with the Tungsten lit environment, we want that nice, beautiful warmth, but we don't want the camera really to claim that, so we want to be able to just set the white balance to either a manual Kelvin setting, or perhaps, just a daylight setting to make things nice and easy. We can fix all these of course, in post production, but you want to make, reduce the steps in what we do. Yeah, okay.
Class Materials
Bonus Materials with Purchase
Ratings and Reviews
Jerry Willis
Ryan & Rocco, in my very humble opinion, are THE best wedding photography instructors in the entire industry! I've been watching their work for years now, which just so happens to win a most grand-scaled competitions, and they somehow continue to keep getting better! I first drilled Ryan at WPPI inquiring about what made his workshop different from all the others. His response, me paraphrasing, "If you're looking for tools to learn, come to my workshop. If you're looking for inspiration and smoke blowing, don't come." That's exactly what I needed to hear. Straight tools, no fluff. THE BEST photography workshop I've EVER taken, by far. You want the best photography education, learn from the best. This CreativeLive workshop is the PERFECT complimentary refresher and companion to what I learned! Thank you so much for having them! It's not the same as the workshop, which it shouldn't be, but they ARE reinforcing many things that have slipped my memory! I'm for sure buying this! :-)
Neeraj Arora
WOW!!! I have started a few CL courses but not finished as I got distracted by "life" and it took me a while to get back and finish them. But these guys!! They were simply superb. I finished this course really fast. Amazing artists, they explain things so well, Ryan is such a charmer and engaging teacher, Rocco is a fountain of knowledge. I am an enthusiastic photographer with aspirations to start my own business soon. I learn't so much from this class that will help improve my photography even if I don't become a professional wedding photographer. Great job guys, keep it up. I will need to come back to the lessons and I very much appreciate the key note pdf. All CL courses should include the slides like they did here. Thanks CL.
user-3a41db
I am a newborn photographer by trade, but I really want to venture out and photograph more weddings so I decided to purchase a wedding class on creative live. Of course when I typed in wedding, quite a few classes came up. But when I saw the image and title "capture the story" I was definitely intrigued. I've always been touched by the photographs that have emotion and that's what I'm passionate to photograph! Always a little nervous when you purchase a class because you don't want to feel like it was a waste of money, but this knocked it out of the park for me! Thank you to Ryan and Rocco for explaining so much, showing the pull backs, and moving your subject and explaining why! This has opened my eyes so much to how beautiful photographing a wedding can be and not so terrifying as I've been making it out to be. I'm really so thankful to hopefully being a great wedding photographer and making more income for my family, while having fun creating something beautiful
Student Work
Related Classes
Wedding Photography