Get the Right Exposure
Lesson 8 from: Wedding Photography: Capturing the StoryRocco Ancora, Ryan Schembri
Get the Right Exposure
Lesson 8 from: Wedding Photography: Capturing the StoryRocco Ancora, Ryan Schembri
Lessons
Class Introduction
04:18 2Define the Goals of Wedding Photographers
15:04 3The Importance of Wedding Photographers
11:42 4Shooting Philosophy
09:22 5How to Build a Shot List - Bride, Groom & Formals
22:42 6Tye the Wedding Story Together
07:19 7Capture Stories in Wedding Pictures
05:53 8Get the Right Exposure
16:20The Theory Behind Lighting
10:19 10The Power of Short Lighting & Backlight
30:08 11Shoot with Low Ambient Light Indoors
05:25 12Seven Fundamentals of Pose
13:56 13Continuous Light Sources for Indoor Photography
25:36 14Use Available Light for Indoor Photography
35:06 15Flash for Indoor Photography
18:59 16Outdoor Photographing with Available Light
20:27 17Group Posing & Lighting Techniques
12:22 18Groom and Groomsmen Posing & Lighting Techniques
11:43 19Couple Together Posing & Lighting Techniques
16:21 20Creating a Memorable Client Experience
12:40 21The Power of a Same Day Slideshow
12:07 22What do Couples Look For in Wedding Photographers?
05:51 23How to Successfully Interview a Couple
05:11 24The Importance of Wedding Photography
09:07 25Example Couple Interview
22:49 26A Workflow That Works in Lightroom
09:34 27Workflow Overview in Lightroom
19:28 28Manage Wedding Images in Lightroom
21:30 29Export Pictures to Animoto
04:28 30Color Correcting Images in Lightroom
14:09 31Optimize Images Through Lightroom
13:35 32Color Management in Photoshop
03:04 33Rocco's Skin Retouching Technique
33:27 34Image Toning to Create Distinct Looks in Photoshop
24:27 35The Value of a Wedding Album
05:27 36Traditional Design Elements in a Wedding Album
19:05 37Magazine Design Elements in a Wedding Album
20:04 38What Makes a Good Wedding Album?
07:47 39How to Sell the Wedding Album to Your Clients
10:37 40Wedding Album Workflow
08:13Lesson Info
Get the Right Exposure
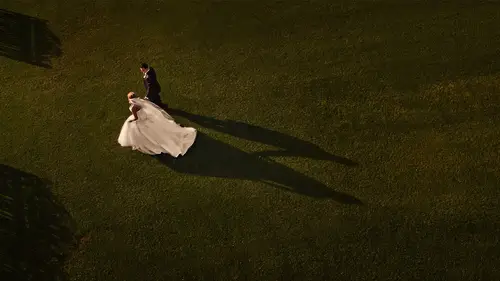
So this next, next segment is gonna be all about light, and pose, and actually, first, we're gonna, we're gonna deal with a difficult, a difficult subject in terms of exposure. So, I don't know. Do you guys have problems in exposure? No? No, you're a legend. That's, (audience laugh) that's amazing, yeah. No, I always did. I always had some problems in exposure, and from what I see at the back of my camera to then what actually comes into Lightroom being two very, very different things. And the question I often pose to people is that, do you often get images that look good on the back of your camera, look like good exposure, but then when you light, when you get them into Lightroom, they look a lot darker. Has anyone had that issue? Yeah? So, so, we're gonna deal with a couple of things around that, and how we obtain optimal exposure, and that's what we're going to, that's what we're gonna call it. Optimal exposure for what we are photographing. Yeah? And that's what we're gonna remembe...
r. We need optimal exposure for what we are actually photographing. So, the method or the methodology of how we get about that and what we set up in our cameras. We always, pretty well 99% of the time, will shoot in manual mode. Okay? So we don't shoot Yup. P for professional, (audience laugh) A for something, yeah. P for, that's what I thought it was for me. You did? P for professional. P for professional. Yeah, apparently. Right. So we shoot in manual, and that's so that we, as photographers, have creative control over that exposure. 'Cause even though our cameras are pretty smart, they are. You know, I think my Canon is incredibly smart. I refer to my Canon as a person all the time, and I think he is amazing. He's really, really smart. He or she, right? Or he or she, I mean, sometimes she's a she, yeah. But, ultimately, I think I'm a lot more clever at telling my camera what exposure I want for that particular situation. As wedding photographers, we've got a real issue when it comes to exposure, because we deal with two ends of the histogram, don't we? We deal with a, predominately a groom in let's say, a black suit, and a bride in a white dress. That means our histograms look something like, black, a bit of nothing, and then white, yeah? That's how most of ours look. We're not landscape photographers. We don't have these like, peaks, and curves, and beautiful valleys. Lots of green. Just very wavy. Yeah, lots of green. So, the way we get there, what we set up your cameras, we always spot meter. We use the spot meter function in our cameras. And we particularly have that linked to our AF point. Now, there are some cameras that do that. There are some that do not do that, okay? So, I know that for instance, my 1DX and my 1DX Mark II that I have with me, they both, I can link that spot meter function to my AF point. So wherever I push my AF point within my viewfinder, within the 61 points, will give me the spot reading to that point. And the same thing with the Nikon system, or the Nikon system. It's linking that spot meter to the focus point. So on the D4S, and indeed on the D5, you can certainly do that. Yeah. The other thing we do is we shoot with highlight alert on. Now, if you're not sure what highlight alert on is, it's the blinking, flashing thing on the back of the camera that blinks at you if you're overexposed. That's highlight alert, and we turn it on, so that we know when it gets to a point where it's unrecoverable. Okay? So we know when the highlight gets to a point where it's unrecoverable. Now, your camera tricks you a little bit as well, because if you haven't noticed, that little blinking light can come on all at once, and have a lot of blinking stuff happening, and when you do load that into Lightroom, it actually isn't as much as what the back of the camera is telling you. Okay? So, why we have that on is because we wanna get to the brighter end of our histogram. We wanna get to that brighter end of our histogram without losing too much of the highlight detail. Okay? So we can put up with a little blinking, can't we, Ron? Yeah, absolutely. Yeah, a little blinking's good, but we don't want a lot. We don't want the whole thing going, wah-oh-wah-oh-whee-ooh. It makes that noise. Yeah. Sometimes it does. Apparently, yes, it does. Now, there's all sorts of, I guess, theories, as to why going to that brighter end of the histogram is. We're not going to get into that so much today. We're gonna explain to you why it works for us, and how we get there, but if you wanna know more about that there, just google out there, in terms of histograms, and values, and what your sensor does to light, and all the rest of it. We're not gonna go into that so much. We're just gonna tell you how we get that optimal exposure. In a nutshell, respect your highlights. Yeah. Really, because the most important highlight in a wedding shot is the bride's dress. We ruin that, and then we ruin her reputation real quick. Okay? So we need to render that beautiful dress white, and not any other color. White, with detail. That's very, very important. The thing we don't wanna do is we don't wanna render that dress gray. Because if you expose to a dress, if you put your spot meter on a bride's dress and had plenty of light on it, and it looked white, your camera would constantly wanna turn that white dress gray. Okay? Because that's just how it's built. It renders everything gray. 50% gray. 50% gray. So if we go into the next one, we use the zone system, or scale of gray scale, to obtain our optimal exposure, and place our exposure to where we want it. Because again, we want to render a white dress white, and nothing else. We don't want to render it gray. So, let's have a look at this gray scale of this zone system, and how that lines up, in terms of an exposure or reading within your camera. So your exposure dialogue in your camera, and how that actually works with the gray scale. Zero, is what? It's 50% gray, zone five, as we refer to it, and if you point at that little spot meter to anything, it will wanna render everything you pointed it to to 50% gray, so even if I pointed my camera to those really dark curtains, and took a reading off those curtains, those curtains would not be as dark as what they appear. They would be lighter, because it's trying to bring up the exposure to 50% gray. The opposite end happens when I point it to the bride's dress. And when I point it to the bride's dress, it wouldn't be white. In fact, it's trying to underexpose, or bring down the exposure to 50% gray. What we wanna tell the camera is, no, camera. No. No. We want that dress white. Let's increase our exposure. So, if we pointed it there, now we know that that dress is white, but it has detail. It is white, but it has detail. To us, within a gray scale, or a zone system, that sits in around about zone seven. Would you agree, Ron? Six, seven, six and a half. That's basically where you need to place that dress, Yeah. Depending on the light you're in. Yeah. So let's look at a solution to our exposure diagram, and how we would get a reading. We would read, let's say, from the bride's dress, because we wanna respect that highlight, and make sure that there's plenty of detail in it, but we also wanna render it white. The camera will always render that to 50% gray, so we take note of what the camera says to us, and we say, thank you, camera, for your recommendation. Thank you. Very respectful to our cameras. Yes. Yes? (audience laugh) But, by using a zone system, we know that that dress is in fact, zone seven, which is two full stops above zone five. Isn't it? If I'm counting correctly. You are. Very good. Okay good. Good, good. So, using that, we place that dress in zone seven, so then, the dress is two stops over 50% gray, or look at the next one. So the dress is two stops over 50% gray, or we're saying it's in zone seven. So the solution to that problem is to take the reading, say, thanks camera, for your reading, but I'm going to increase my exposure. I'm going to increase my exposure by two stops on that first reading, to render that white, with detail. Is this making sense to everyone? Now, we assume now that you've taken your reading of that white dress in a highlight, not the white dress in shadow. Correct. Because if you then render your shadows at, you know, increase your exposure by two stops in your shadows, then your highlights are way over, then your highlights, you know, are gonna be three, four stops over, and they're definitely not recoverable. So you're metering the highlight of the white dress, while the bride is part of where the white dress sits, that you really wanna render details in. Sometimes an easier solution, again, to that, is to actually render the skin tone, so the highlight of where the skin tone sits, and if you've got your lighting right and correct, you'll have a brighter spot on, let's say, the forehead, and to take a reading from that forehead, depending on skin tone. Most of our brides are Caucasian brides. They would sit in, let's say, the lower end of zone six, because their skin is not 50% gray. It's in fact a touch brighter than that. So, what we wanna do is increase the reading that we get from that skin, in that highlight, by one stop. Yup. Okay? So that might be an easier solution if you can't always read from the dress. Read from the skin tone. So there's a couple of different ways to go about it. I mean, you could, you could read a dark black suit, but what would you be doing to a dark black suit, is you'll be decreasing your exposure, because the black suit sits in zone three, let's say, which is two stops under what the camera's trying to tell you. Yeah, so, two stops less exposure than what, Yeah. What the recommended exposure by our cameras is. Yeah. So let's look at this in a real life scenario, that, here's a shot I took of a bride, and you'd say that's probably, it's okay in terms of exposure, but we are losing some detail, and especially if we render this white dress as gray, what happens to our shadows? Everything get's pushed down, doesn't it? Yup. Everything gets compacted in that lower end of our histogram. And if you've ever tried to bring up blacks or shadows in Lightroom, or Camera Raw, or whatever it may be, you'll find that that does increase what is commonly known as noise, isn't it? It increases the noise. So we don't really wanna do that. We want detail there, but we don't wanna increase noise, we don't wanna introduce noise. So let's say this reading was 100 ISO, F4, at one, at 1/200 of a second. Okay? In fact, I wanna render this out now to white. So I need to increase this exposure by two stops. So when I increase it, I get to there, and I have ISO 400, F4, at 1/200 of a second. I've increased that exposure by two full stops. Is that making sense to everyone? I hope it's making sense out there in internet land. If you did have any questions, you know, we'll get back to them at the end of this six. At the, absolutely. But, to put it in a real life scenario, we might actually do just a bit of a test here as well, just to prove to you that this theory does work. So, I'm gonna use, let's say, this window over here, because we have white, and we have a black. And, what I'm gonna do is, we all know, we can all see where that highlight is in that white curtain, let's say, over there. If I took what the camera told me, the camera would read that white, and render it to gray, wouldn't it? Yeah? So let's test what it actually says to me. Okay. So, the camera's saying to me that this should be shot at 1/320 of a second, 5.6, at 640 ISO. Okay, and if I take that image, (camera clicks) we can see, and hopefully, we can see it in there, that that white has actually gone mid-gray. Let's bring the histogram, right, as well. Yeah. So, 'cause that's important. 'Cause the histogram, you see that spike that's almost in the middle tone, which is where that would sit. So there is no highlights here, at the moment. We've just got mid-tones and dark tones, Yup. Nothing else. Okay, so, let's take the theory. Is that, the theory is, is that we want that white. We're gonna increase the exposure by two stops, yeah? Okay, so, let's go again. Let's go 1/160 at F4, 640 ISO. (camera clicks) And what that will do. There's that beautiful spike. There's a highlight, and it's still got detail in it, so if you zoom into that, we have detail, which is beautiful. Probably won't be able to see it on that, but it's... It is there. You can render. So, the texture's there, which is essentially what we wanna do. Yeah. The histogram should prove it to you, better than what the actual Yeah. Back of the camera should as well. Yeah? So, that's another thing. We don't trust that picture so much on the back of the camera. We relate to our histograms a lot. And yes, the histogram is just a reading or a histogram from the JPEG, but it does give us some sense of the idea of the image, okay? The opposite end is to read now into that black curtain. So if I read into that black curtain up there, it would tell me that I'm completely underexposed here, so I need to in fact, increase my ISO first. And get somewhere around there. Let's see if I can focus out. (camera clicks) Okay, so let's see what happens to... Let me get out of that one. We see what's happened to that black curtain. Can everyone see, that's gone a little gray, and muddy, hasn't it? So it hasn't actually rendered to what we want it rendered to. Yeah? So if we wanted that, again, in zone three, what we do, is in fact underexpose this image by two stops, okay? TO underexpose the image by two stops, and that would render-- We're just decreasing our exposure, or-- Yeah, decreasing it. Yeah. So, let's just do. (camera clicks) And now, we have something more resembling what we're after, compared to there. Yeah. Okay? Cool. Great. So, it deals with the exposure, to somewhat. We're gonna practice this throughout the whole shooting segment of this afternoon, basically, so we can put it into real life and put it into practice, but now we know something about exposure. We should deal with the first thing that we look for when it comes to a great photograph, and really, it's our mantra to always be looking for light, before anything else. Another really cool exercise to understand this better is to get yourself a gray card and photograph it, and then get yourself a white card and photograph that, and keeping the exposure the same as what the camera tells you to, and then getting a black card and photographing it, and you will find that you have three shots that are identical. So, the black will be rendered gray, the gray is rendered gray, and the highlight is rendered gray as well. Then using this principle, open up one and a half to maybe two stops, to render the white card white, and do the opposite, to render the black card black. Okay? It's a really, really cool exercise.
Class Materials
Bonus Materials with Purchase
Ratings and Reviews
Student Work
Related Classes
Wedding Photography