Lesson Info
28. 1:00 pm - Editing The Album Photos Part II
Lessons
Day 1
1Pre-Show
13:51 21:00 pm - Bride and Groom Getting Ready
46:59 31:45 pm - Gift Exchange
25:16 42:15 pm - The First Look
15:32 52:30 pm - Bridal Party Portraits
19:03 63:15 pm - Family Portraits
15:04 74:00 pm - The Ceremony
17:575:15 pm - Interviews: Craig Swanson, Father of the Groom
17:38 95:45 pm - Traditional Cambodian Dance
11:03 106:00 pm - Interviews: Wedding Planner, Bride and Groom
15:39 117:00 pm - First Dance, Toasts and Cake Cutting
31:29 128:15 pm - Bouquet/Garter Toss and Fireworks
15:22Day 2
13Day 2 Pre-Show
06:57 149:00 am - Getting Footage Ready
1:24:17 1510:45 am - Portraits Coverage
16:51 1611:15 am - Ceremony Coverage
36:48 1711:45 am - Reception Coverage
25:43 18Day 2 Wrap-Up
03:29Day 3
19Day 3 Pre-Show
00:51 209:00 am - Joe's Gear Bag
18:57 219:15 am - Rich's Gear Bag
10:05 229:30 am - The First Edit Part I
20:49 2310:00 am - The First Edit Part II
26:00 2410:45 pm - Proofing Part I
25:29 2511:15 am - Proofing Part II
21:23 2611:30 am - Proofing Part III
20:16 2712:45 pm - Editing The Album Photos Part I
15:51 281:00 pm - Editing The Album Photos Part II
19:46 291:30 pm - Editing The Album Photos Part III
11:33 301:45 pm - Editing Questions and Answers
32:42 31Thanks + Credits
06:38 322:45 pm - Interview with Shalia and Teurth Part I
30:30 333:15 pm - Interview with Shalia and Teurth Part II
15:25 34Day 3 Wrap-Up
04:04Lesson Info
1:00 pm - Editing The Album Photos Part II
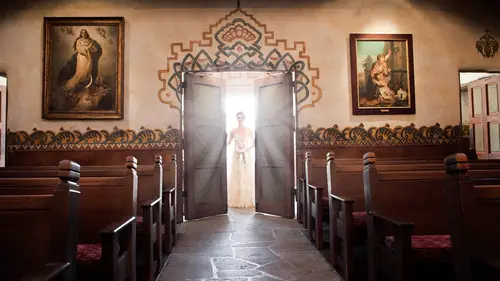
I am going to show you what action I have for kind of sprucing these up in photo shop. It's called Dream. I didn't name it, and I'm not sure where it came from, but we could take a look at what it does. Um, first, I'll just play it and then we'll see how it goes. I think there is a bit of a Gaussian blur that's gonna happen, and I always have it set. So that right after the action, the very last step of the action is it brings up my eraser tool. Okay, so we've got it. Um, the eraser tool is here somewhere. Uh, well, I don't know. It is here. Says it's selected it. I don't see it, but that's all right. Let's just go ahead and start racing. So what is cool is I can now a race away a minute, you know, it created the layer. So it's created this layer and obviously is all softy soft and kind of like goofy looking and a little bit to contrast E. So I'm just gonna go ahead. And ideally, if this eraser tool is doing what it's supposed to, a race around her face. Yes, it's working. It takes a s...
econd to adjust, but yeah, we're gonna erase around here cause I don't want it to be so contrast and dark in her face and around her hair. I'm gonna go get rid of that. You can see on this layer you can see where it's gotten a little bit lighter around the areas that I've erased. This this adjustment, it's still pretty intense. We can now bring it down a little bit and really, it's not that much, but it is a nice little tool. I mean, in the flowers and stuff you can see there's a little bit of, like, a kind of fluffy ghazi. You know, whatever you wanna call it, look to it. They wouldn't get in the natural shot. Obviously, the contrast goes up a little bit too. So it's a tool that I mean, it's definitely a preset or inaction rather than I really enjoy. It's not too extreme, and it just adds a little bit extra to the image. So I'm gonna go ahead and flatten that now. And, um, there really probably isn't anything else that I'm too concerned about in the shot. Um, let's see. Let's see, let's see. But again, it's not really all that important that we go crazy with this stuff. We just wanted to be a little extra so that they understand that we're taking time with their album prints and making sure that they are where they need to be before we send a client like I could probably do the lines down here, you know, and just kind of mute them a little bit. Which could you talk a little bit about your sharpening workflow? Um, the sharpening again sharpening workflow. We saw you do a little bit on the eyes, yet you might have been a tiny bit in in light. That's correct. And then will you have a final at the very end? Do anything Or is it your Once you're done, you're done. Yeah, once I'm done, I'm done. I don't typically export um, with a sharpening in there as well. You can export and have it sharpened for a screen or sharpened for a print. But no, I do most of sharpening all here, and then later I will later. I'll just leave it pretty much. Just do all the sharpening, either, mostly in light room if it's like a global thing that I can handle, or I can use the brush and light room to do a sharpening adjustment or if it's really intensive or needs, like the zoom capabilities of Photoshopped that I could do it right here and just make that happen merch when you guys were done. I mean, this is what you said Album quality. Are you guys building that album yourself within the studio, or does that go out to Yeah, we do way Have your money is our layout an album? Producer? Andi. She'll come in a couple of times a week to work with clients on their album, um, and do the layout for them and then get approval and go back and forth with the client a few times to make sure that it is where they need it to be. So you export this as a J peg or tiff for what you can export them in a J peg and the way we've been doing it. You know, there so many different ways that you can handle doing layouts. She likes to actually have prints, so we have a big printer and Aiken do like a contact sheet for her and then she'll just cut them out and she'll place them on the book and then kind of do a very rough. I wish I knew more. I actually don't know 100% how she handles it. I just take her requests whenever they come in to be like, Hey, I need this image or any of these sets of images ready for album. We typically will do what I'm doing right now. Um, I'll make will find a selection that they've made for the book. And then I will go in and do extra retouching that all of them make sure everything's exactly what needs to be. And most of them are pretty close, because again, we proved them pretty close. But then we'll send them out to the client. They can approve the files and the retouching that I've done. They can make requests as faras. Hey, can you get rid of this on my face, or can you get rid of this person in the background or something? And we typically, you know we'll do it if it's requested, Um, and if it's impossible, but a lot of things really? It's mind blowingly possible, but yeah, we'll have them approve the images, and then she'll do. I believe, the layout as she sees fit. And then the client will be able to approve and make changes. And then I think we go back and forth a few times until they're satisfied. And then yet we send it to the album companies graph e to print and bind, and then we get it in. So that's pretty much the process. She was here. She probably would answer that better, but I was going to save this. Now, um, that was pretty good for what we did. We're gonna go into another one. Um, so yeah. Okay. This one here, I mean, it's really close to where it needs to be. There are a lot of more elements in this shot that, you know, I could be extra nitpicking on. Like, for example, when he was the patch tool. I'm gonna go ahead and get rid of this bad boy. And actually, there are a couple ways to do this. I couldn't patch it out. Don't wait a minute. Joe's laptop settings are not the same as mine. How does this source. Here we go. There we go. So I can just patch this out and do it like this and follow the line of the door jam. And then obviously there's still some left over down here. Or I could I could just hit. I believe this is the new Photoshopped F six or no, I haven't. I haven't I did. I set it up. I've set it up so that F six is an action but its content aware which you can also do by just clicking. Uh, what the heck is content aware in here? Gosh darn, I forget what content where would be. It's their newest. It's one of their newest things. It's a new adjustment layer or fill their adjustment layer. I don't actually know where it is. It's Phil layers somewhere here, right here it is Phil, and then you can choose content, aware of Pastie under present and you hit OK and it does this content aware thing just kind of an algorithm that the program uses. But it works really, really well and I've set it up is an action so that I don't have to do all of that every stinking time So, for example, I can do it here on this. Oh, gosh. Sensitive mouse. We can do it here, and we'll just see what happens. Content aware. Go. God, it didn't do it grade. So we can always go in and go. Hey, never mind. Content aware. I know better. And then there is Sometimes you gotta do it yourself. All right, so then we're gonna look around here for anything else that's a little awkward or strange in the photo that, like, I don't know, like you could get really nitpicky like this little tiny little whatever and just go. Um I know, right? These It's funny. These the same things I say to myself when I'm retouching, Could get in there. There's this guy is a little funny Highlight. I don't know what the heck that came from, so why not? It's just a example of how you can get really into it as far as getting rid of distractions in the image, but it's really not super super super necessary in this shot. Let's go back to layers. We're gonna create a new layer now, and she is making a really cute face. But this down here is just a little extra money bumpy, and we're gonna go ahead and take care of her on that, and we'll see what happens. So go back to the healing brush. We're gonna find an area that has pretty decent skin quality. Like it nice in their hair and we'll go ahead. And what kind of again? You can take this and go as far as you want with it because you're always gonna bring it back. And I can start selecting from here now because I have the same skin to use right here. We're gonna get kind of blend this stuff out. And a lot of this healing brush tool just comes with using it and using it and using it because there's no way I can explain why I'm doing it exactly the way I'm doing it. It's just a feel because you never know for sure what the healing brush is gonna dio until you just get super Super Super used to it. So I'm just gonna kind of grab lips, see, like right there, see how it kind of blends her lips down. If I do it the wrong way, you got to stay out of there. So we're just gonna try and do this and you want to sleep there? Anyone sleep? You're not asleep yet? No. Okay, good. All right. So now we've got her chin looking like, totally like, I don't know, like, I don't know. I don't even know what to say. It just looks kind of funny, but we can bring it back, and we can still have it be They're just not as extreme. I mean, we'll find a spot that looks really good. And honestly, one thing you can do is you could bring it back only a little bit, and then you can go over your razor brush and depending on the size and capacity of your brush, which I cannot see here for some reason, um, you can kind of just a race around and kind of do it more custom as a post is doing a global on that with the God. What is going on here? So you know, not a huge difference, but something it gives her a little bit of extra layer of fun. We'll go ahead and do some of this. Here's another way you can do this to there is another action that were not action but set up you can use. So if I don't want to do healing brush on all these little guys or say she's got really bumpy skin. Some people, you know have little acne or what not and it's a lot, and you have to really deal with it. One way you can deal with it is just selecting the area that you want to deal with. And maybe I'll add to selection you had to add to selection would be with shift. So I'm adding this and this is really fun because it makes this whole thing looked like a really strange mask. But you can kind of added in the areas that you want you can again. First, I'm gonna make sure that I've started a new layer. I'm gonna flatten that one and do another one, just in case you can refine the edge because I don't want any of that stuff to be in there. I can even subtract where the selection is like bringing in shifting and where I could go more. If I want to bring in more. We're going to subtract a little bit of this, okay, and then we have a new layer we're gonna filter. And we're gonna do this, Ghazi, and blur right to bring this in, and you can see the difference right here so you can see how I added this kind of blurry blur. And you can make a really intense, but you don't want to go too far with it cause it's trying harder to bring down the layer if you go crazy. But we have a blur now, and all of this is super smooth. It still looks kind of funky. So we got the opacity layer and we can bring it down. And even if you can't notice it, I notice it. And I can see that this has helped us out in this area quite a little bit so and then if I want to bring back her forehead a little bit because it doesn't look supernatural, I could do that with the eraser, and it doesn't make a huge difference, but it might make enough of a difference. So you go ahead and flatten that layer. We've done her face a little bit in, and, um and that's that. Let's hit this action here. Let's let's do the dream one and see what happens. And then maybe I will expand this and we'll see what it's actually trying to dio when we hit this button. Okay, so we've gone and done that. Here it is Here. So we got duplicate layer set current layer and I don't know to I don't know, You know, I'm just gonna Hopefully someone can diagnose this and tell me what is doing. So is doing a certain kind of Gazi and blur with this setting here. Set current layer opacity. 3% A. Well, that's a big difference in 31%. Good grief. This is the action. So we're just gonna open all of these And then later, when you're watching on your computer, you can, like, pause and copy where you could figure out where I got this pretty set in the first place and just get it from them. I guess it's really long. My god. Alright. Resat arise. I like saying resat arise because that's cool. And then I added this one of the very bottom said current brush and that's the eraser brush because I want to be able to erase right away because I don't want it here on their faces. Let's make sure it's doing it. Yes, it is. Go back two layers here so we can keep an eye on our layers. And these are all condensed, like the layers and actions air next to each other here on the computer. Back home, I have a much bigger monitor, so I wouldn't I would have the layers up here and, you know, it would all be I would have to switch back and forth so much. So it's one of those top tips. Do you mind letting us know what actions you're actually using? Um, it's called Dream. You mean the one that I just used? Yeah, that's what is called. I'm not sure where I got it from, but that's why I'm tryingto kind of expand all the little settings in it. So, ideally, someone could if they wanted to take the time to recreate it, they can just go in here and just take a look at all of these settings. Good grief. You know what? You probably can't even read. So do you remember where you got those? I don't. That's the problem. It could have been because Joe gets a bunch of stuff in the studio. It could have been, um is it Ah, Coop Botha Actions, possibly. Or it could have been from I did a little Google. I found a deviant art. That sounds about right. Yeah, that sounds about right. It was just a pack of the actions that we would. He was like trying this out, and I threw it in, and this was the one that I enjoyed. And that does sound about right? Yeah. I think I used that myself. Yeah, at one point. Okay. Cool. So that's it. Deviant art is who produced this particular action? Um, I'm glad, because I unfortunately, can't honor without knowing who it came from, but, yeah, there's there, all the settings there, Hopefully they're not copyrighted or something. We're in big trouble. So there's that. Okay, so anyway, so I've gone ahead and I have erased around their faces. I'm gonna raise her a little bit here from the action so that it doesn't ruin our other kind of half subject that we have over in this quadrant and you can see it's going take. It's time to do that. But then afterwards we can kind of pop it down a little bit, and it does make a difference. It does make a nice little bit of a difference to the image, and that's something that I probably couldn't really do in photo sharing light room. There's certain, like areas of the image that is going into, especially the Gaussian Blur. I don't know if there's a way to do that in light room. So these are some things that definitely are specific to photo shopping is why I had to bring this image in. So gonna go and say that uses action like in this room scene here, several other images with No, no, not because again, this image is one that we've picked for them to see what we do. The album images. So there. If they picked three images for their album from this section than absolutely I'll try and match them all so that when they're in a spread together, they look the same. But right now, um, no, I'm not going to because their proofs or their proofs. And these are special attention images that we give for their album. And we do this on Lee for these, um, so Yeah. Um, let's see this one or this one. Although I don't think this one is the right one. Let's try this one. How about this? This one again is kind of already where it needs to be. There are a few little distracting things going on here that we could probably get rid of. So, like bird poo on the wall can go. I mean, this is again This is like if they're going to make this print really big because this kind of does lend itself to being a large print. It may be important for us now. This is a speck of water. They got on the lens, and so is this kind of blurriness here and those They're going to be a real pain in the butt to fix, but we'll try it. Let's just try and see what we can do here. I'm gonna refine the edge. Kind of just trying select just that We're gonna definitely do a layer, because I might totally screw this up. We're gonna go in and do curves, which is command em, and we're just gonna try and kind of get rid of that a little bit, bring down the highlights. It looks kind of funky, so we may end up just, like, not actually carrying so much, But we can always bring in the eraser and kind of a race around it. Uh, yeah, that's not gonna be super easy to get rid of. Maybe we could try it with the patch tool and see what it does. Well, not we're making this up as we go, folks. Hey, what's going on here? Let's just do us. Yeah, that's not gonna do it. This is gonna look really funky. All right, well, everything's a new trial and error. Gonna go ahead and get rid of this little blue speck here, cause that's actually something that's totally doable. Uh, oops. The last one didn't work. There we go. Not perfect. I don't want to rush this too much, but I also make sure we're nice and interesting for everyone to deal. Um, yeah. I think we're gonna just leave these for right now. I'm not too concerned about it. That's part of the image. And there it is. That rainbow looking awesome. I don't see any specs in there, So why don't we go ahead and we're gonna take a look at the actions that we can dio. Same idea. I'm gonna use the same one. I have one that's years called soft overlay. It's kind of similar, but it doesn't go is far and it didn't see It's a little bit of a difference, and it's similar to the dream one, but I think the dream one takes a little bit further and again, I really enjoy going a little bit too far and then bringing the layer back down. So we're gonna go in and hit this dream, and we're gonna go ahead and see what it does to the sky. A lot of the time it does something a little bit too much to the sky and it makes it too bright. And I like that. There's a lot of contrast in here, so let's see what we can dio. Actually, that's not too bad. You wanna race in here just a little bit, so that kind of stays a little bit even. Okay, lets see. Reach which version of photo shop for used? This is CS five. Yes, 51 Is that what you use on a daily basis right now? Is there a new one. It might be a couple of their company, maybe three or four. Really? Want to see what? Photo shop where we are now, Sisi? Well, talk. It was like to let the audience know which version you're using. But really, for the most part, doing this work, these tools have been around for so long, you know, Right? I mean, yeah, I can probably will talk to the studio, see if we need to get a new one. But, you know, there we even keep CS three on the computer because there are a few things that they removed from CS three that we utilize quite a lot. Like being able to make pdf's from stuff like they removed that feature. And I was like, Why would they remove something that was useful? I guess so That you would get Adobe creative suite or something. Flash. I don't know what it is. Okay, so here we go. We've done a little bit with this image in the action. Um, I'm done at 64% just cause it was already punched up a little bit. I don't want to go too much further. I kind of like it like this. So we're gonna leave it. Um, one other thing I could do if I was a little concerned about where the attention is. I could do a little selection around the writing room, kind of a messy, a messy little selection, and then refine the edge and go ahead and soften the heck out of this one. And this is a new layer. So I'm gonna go ahead and use the curves and kind of bring them up a little bit and obviously taking it too far, one add some more contrast to them. But now they pop a little bit more, and then I'm gonna bring it down just a little bit. Yeah, we don't want that much. Just a little bit so that the tension goes to them even more, and then we're good.
Class Materials
bonus material with purchase
Ratings and Reviews
Carlos Zaldivar
Joe Buissink, Thank you for share your out of this world wedding photography its be on great,I just love it. I look up to you every day I do a wedding. I have yet to meet you but some day I will. I took conclave in April 2013 and wished you would have been there. My favorite wedding photographer is Denis Reggie which has become a friend I just love his work also. Between you and him both of you I look up to and hope some day I can be as great of a photographer just like the both of you. I just love to be a wedding photographer. Thank you for share such great information and course. Carlos Zaldivar Carlos Zaldivar photographers www.carlos-zaldivar.com
Jessica Lindsay-Sonkin
This is one of the more slower-paced courses I have taken on Creative Live. I ended up watching the videos over a span of about 4 months, but enjoyed every moment of it. Watching Joe and Rich work is a beautiful dance. I love Joe's philosophy and he instills a calm spark in all that he does. The way he looks at angles, approaches situation and works with his clients is mesmerizing. I highly recommend this course if you are looking to be inspired by wonderful philosophy and to gain valuable insight through watching a master in action.
Student Work
Related Classes
Wedding Photography