Lessons
Lesson Info
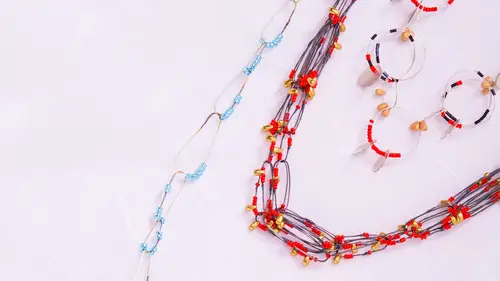
Adding Beads to the Wire
The things to consider when you're putting with the beads and your design, you don't want the beads to fill up the whole piece because, uh, you are we are going to be using the torch and we are going to be using some heat it's not doesn't transfer enough of it to the beads in in the cases that I'm going to show to make the beads cracker break or discolor, but it is a consideration, so if you packed it all the way up, you wouldn't be able to fuse the wire together without making some of those beads get too hot so there's going to be some space around them so all of these have some space, but you have some flexibility to play with and it changes like you could put one on in some links and then put six on and another link and visually shift the weight the visual weight of what you're doing tio here, right? So I'm gonna put on six beads and I hold the wire like this and just start toe pick up the beads. How delicate are the beater use riser? How delicate in what sense? I mean these are all...
glass speeds, they're not very delicate and you could drop this and it's not going to break anything if you stepped on it and really smushed you know that you could break a bead uh the he if you got it too close to the heat, it could kind of pop and break so in that sense but for your average wear and tear of wearing jewelry if the beef themselves they're not delicate thank you so threading a bunch on and then I'm folding it and this wires thin you should be able to do all this with your hands just bending it over and creating a little bit of an x and you want that to have tension you don't want there to be a space in between he wanted to be bent tiller's just the little x at the end and the last things fairly sturdy a you're not likely to break the wire a tall no you're I mean you would have to do a lot to break, but why you're more apt to melt it when we're refusing this together it can move a little bit so these links on the delicate side of these chains they are more the delicate they might get misshapen a little bit with some use and you can use your fingers and put him back to shape or what not. The thing that metal doesn't like is to be folded back and forth back and forth to many times it will snap in that spot but it's not just gonna fall apart or anything like that yeah so I'm just going tio count the beads I don't get my nails done very often doesn't last with this kind of work, so except that all right, so when you're making a chain, you're going to get half of the links already done to this stage, and we'll go fuse them together and then do the rest of the links and link them up together. So that's, the way that I like to do change the best, especially when there's bees in this pussy parts that could be it could fall off if if, like, these were all together, sometimes they come apart a little bit if you're moving it around and the beads could fall off. So but I like to do is get about half of the links that I need all ready to go, and then I will go and fuse wth, um, okay, so that my links all right? All right? And so then with these links, whatever the shape, whatever is happening, you know, take them all, going to go over to your suffering. Now I am not putting flux on these, I'm just going to melt it. Ah, little fuss, less fussy this way, I don't find if you're suffering, you need to keep that clean, this is overheating and melting the medal on purpose, so I am ok with letting that just not having any flux on it in that way I don't have to put it in the pickle right now I don't have to deal with that. So actually these these necklaces unless you're going to put a clasp on which all show they don't have any flux and suffering on them which is fun and easy and technique wise a great place to begin you need a little I'm not changing the tip on my torch well actually here I'll show you I will I'll make us I'll put on a smaller tip their size is this was a size five and you know you can get big I can get a fairly decent size flame coming out of this if I had a bigger project and then they're the in betweens here and it can get really tiny to never really tiny one they have a number, so this is a size for which is one step down this is what it looks like, you place that in and then you're tightening over and I like to have the flame reaching away from the knobs for most of what I'm doing tightening it up it was easy is that it's easy to switch a torch tip okay and it will be smaller but again they all have a range all right I like to use treas er's and prop this up now is really good to have the beads be as far away from the flame and the overlap as possible. So consider that because they are glass the can heat up, so hold it like this and it's thin wire and just melted together. Pull away right away. It can easily melt, and it can melt so much that actually the two pieces pull apart, not pull apart, but they melt away from each other, so you'll practice. Got your links.
Class Materials
bonus material with purchase