Lessons
Lesson Info
Cutting & Preparing the Discs
What we are working on right now is using some beads with metal, which is one of my favorites different kinds of ways of making texture and using color but doing the metal working as well. So it's, very simple metal working that we're doing working with chains and how to work with chains and different beads for texture and different shape linked what links that we can make as well. So I'm going to be if using all the metal links together that's going to be like melting the ends together. I showed that a little bit in some different twisted wire early well in a in a different segment that you could watch, so check that out the twisted wire and just to give you an idea, we're working on necklaces, but this can go over to bracelets or hearings or what? Not to, but we're going to be working with the chain so here's one example here's, another longing, a sample of something that will be doing this long link with the different shapes going on different patterns. So just a couple ideas out of...
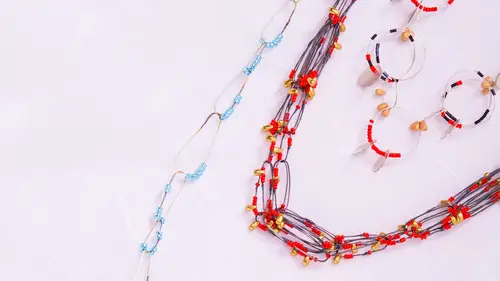
the endless ideas that you can work with the materials I'm going to be showing you today, you know, work with sterling silver wire and the's glass speeds you can use, I have a sample here this is brass wire gives you a different color and you might want that as faras texture goes a certain color that you're working with few want to work with copper brass wire it is also an option it does not melt infuse as beautifully as the silver so silver's really nice to work with and that's what I'm going to be showing for the most part here today and the wire that you use has to be able to fit through the beat hold but other than that you know you can they flexible here and you don't want something that's too tight on the whole you know going through the whole but I'm using pretty thin wire this is twenty two gauge sterling silver why're round wire and for the beats that I have here there's different hole dimensions so you could play around with that too but that's just another option that you can play with and work with so the other part with the wire that I'm going to show is using a disc cutter toe work some of sheet metal into making discs and using that as like a little charm or is a different visual aesthetic thing that you can dio so here's another part of a necklace that will be working on working with the beads and you have these disks hanging off of them so this is just one hole drilled in the disk and that's hanging off the link that you're working with this sample that I have has two holes drilled and so it gives you a different look you can put two links together to get something different happening so there's a lot of variation that you can do with just some very simple it's simple elements since just how you put them together. All right, so I'm gonna show first discussed ing and what that's like you can make sheet metal so this is just a little piece of, uh, you know, and again the thickness can very I would say I think this is this is twenty two gauge twenty two gauge is good twenty four actually twenty four gauge twenty four gauge is when I'm using here today the thinner you get it does get a little bit sharper so there's no reason to go super duper birth in like I would say work between twenty and twenty four gauge for the disc will give you something that's good for this application. Do you have the sheet? And then this is a discover over here and the punches as well, so they're different this cutters, they have different size disks that you can cut out and this again is up to you how big or how little what you're doing, how much you want, tio, what you're going to cut out? I'm going to start with half inch one here let's see so that's not which one is it? Ok, here we go so the thing to know about the discover I also like to stick a little rubber underneath it just makes it softer sound when you're hammering just a little bit doesn't have to happen the discoverer there's a sharp side, a clean cutting edge and then there's the rounded beveled edge is with hitting the blow side, so this is super important to realize this one makes it pretty obvious the different size diameters of the different edges but some of them are just straight and you really have to pay attention to that because if you hit on the cutting edge, this does not work anymore how you want it to beef? So this one I'm sticking the medal on again like I said in previous in other classes here you want to conserve the metal so you don't want to just put this in the center and get one or two discs out of this piece you want to come too close to the edge, as you can see, I'm looking down on placing the medal in as I'm looking straight down until I see that it's fully fully there there's no, you might want to get a can you come straight down and look, if you look straight down, you can tell if the metal doesn't fill up the entire as you see there, you get a little bit you can look and till goes all the way in right close to the edge and that's where you want to be and then this this discovered works by spiraling this down getting, which is nice, it actually will clamp it a little bit so you don't want to go too hard, but I'll clamp it, which is nice it stays right into place you're going tio put that that the cutting part in and then you pick a hammer and you want a hammer? That's a utility hammer could be this kind of hammer this kind of hammer they looked like different things, but the thinner the medal, the easier it is you want to get a good hold and hit right through and you've got a disk so you do as many of these as you want. I would just open this up a tiny bit, move it over and here get another one, clamp it down, right? So you just work in this piece to get a cz many disses you think you need? Obviously you can come back and do more if you want. Tio okay, way, way our untwist you're getting a swiss cheese kind of, uh, swiss cheese in your medal there, so you have your pieces, your disks sometimes most of the time the shepherd is the less of a bird that there will be but it's on the underside the one side usually the topside is pretty smooth and then the underside has a little bit of a bird that you can feel so I've gone over the burr before you just want to take file needle file can be the borat file or can be the half round and file off that burr ever so slightly to lose no bird to the touch that's how you make the disc and then you want to drill holes because at this point this isn't going to be much for you unless you drill a hole so I'm going to use the flexible shaft I have a burn here from before I take a drill and again here you want tohave the whole be a little bit just to fit the wire that you've chosen to use go through it and a little bit bigger you wouldn't give it a little bit of room to be able to move around, but I wouldn't say that you want a huge hole compared to the wire that you are using so I'm gonna pick use a sixty two millimeter size sixty drillbit place it in the end into the flexible chef now good to know you can test it first it's moving and it looks it's in there right in the center really nice and evenly if you by accident don't get this and clamp it down off center it's hard to do on purpose maybe let's see if it's off center you can see this see out wobbles and it's kind of wobbling back and forth you'll know right away that that's not gonna work so make sure it's right into the center of those three moving pieces you don't have a dream was it ok just to use a regular household drills? Absolutely it's just you know it's heavy it's heavy and hand the household drills they're different weights and stuff but certainly that works it's a similar a similar tool and the other thing about the household drill to know is that it might not be ableto close down small enough for this size drillbit so there are different drill bits that you can buy some of them like this is the same it's that one millimeter the entire length of the drill bit there are some job it's that have a wider shank and then the drill part of it is at the end and thinner. So if you're using a household drill you might need something like that so it has a bigger the bottom shank where the drills you know clutching onto is is wider because the average I mean when you go to the hardware store this mine might in some hardware stores be able to get a size sixty drillbit but they're like what are you doing? And I go down tio you know, seventy six just tiny tiny job it's for certain things that I dio so that's in the jewelry world you know that these kinds of sizes that you're working with so and it's much lighter and more comfortable to use but by all means you can use a um household drill so you want tio make a place you want to mark where you want you are drill too to go the drill the bottom of it the tip of it is appoint a gentle point and you want to tell it where to eat in on your medal otherwise it might skip around and you're not going to get the drilled hole to be where you want it to be so in this case I'm going tio I'm gonna eyeball it you can measure it and make sure it's a very specific distance from the edge you want to make sure it's far enough from the edge that when you actually drill it it doesn't cut into the edge and gives you a little bit of space so it's not too fragile too thin of ah piece of metal on the edge of the the disk to the edge I've got some samples here I would say a couple millimeters at least in this case for this bit of metal is a good solution all right so take a hammer place thing the center punch where I want to be in giving a gentle tap don't need to be aggressive here no need to have a huge tap just a gentle little tap you've got a mark on the middle and then you can go and drill you always want goggles you can have a scrap piece of wood if you don't want to go into your um your bench pin but definitely have wood underneath you're holding it down both fingers holding it down straight up and down with the drill and well uh this also creates a bird so you want to file the berghof sand you khun take this and finish it as much or as little as you want with the sandpaper or you can leave it how it is that's also preference for you for the texture that you want on these little discs and if you want to do to just tio two taps with the center punch and two holes opposite each other so here's the sample of that opposite of each other too be able to do something like this where you got multiple links right off of each end oh yeah over this way sure so this is with two and so it's more incorporated in instead of dangling off it's it's like a stopping point of visual stopping point with the solid sheet metal there all right so that's discussed ing and drilling the holes and setting up to having all the different elements that you want, then I've got different beads here, too. So be it come in different sizes, and it really does effect between the color if they're transparent, if they're opaque, if they're bugle beads and longer for the round these, if they're big or not, so you want a bunch of different dishes kind of set yourself up just goingto prepare for later. Always close your bag before you move on little dishes, and I've got thes fiery red beads that are on the smaller side. They're not tiny, but on the smaller side, these big and these ones are a blue their trans translucent, and they have a silver foil on the inside, so they sparkle a bit more than I've got some gray bugle beads, which are the long horizontal ones and these air matt. But try to pick things out here to give you, you know, an idea of all the different options you can work with different charms and things that you find just don't want to work with plastics because they will melt, obviously, and you'll find out what what works but you could you can add a lot of different things onto the pieces of metal that you're working with here onto the links. And then these have a different shape to with the whole is more on top. So it's, kind of like a little drop coming off these gold ish beads. All right? So sending those up. And then we'll get into cutting the lengths and what's happening with actual wire.
Class Materials
bonus material with purchase