Lesson Info
4. Pinecone Ornaments Part 2
Lessons
Lesson Info
Pinecone Ornaments Part 2
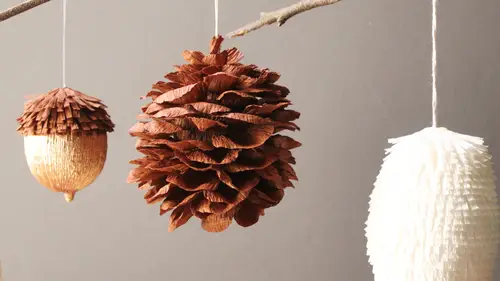
Just so I don't miss it at the end I'm going to talk about how to do the top um which is this very smallest template pedal here and we just need a few of them and they actually don't need the ridge in them like the other panelist because we're not going to be bending the bases back on the's top ones so I'm cutting and I wait to do these top ones I don't know why wait I think so everything and dry up a little bit or they can just sit there and dry at the end and not be disturbed so it's that's why I say them to the end but so they're pretty thin looking petals and I just cut the couple just a tiny bit also I'm going to be putting them in around the hanging wire right around there so I want to cut a notch or a tiny triangle in the end zzzz well and that lets meet kind of set them in I'll be setting them inside the fees of the tiny ones at the top we setting him in around the hangar they're actually not totally crucial but it kind of gives more of a taper and natural look to it are you gu...
ys putting putting them on the egg stand the whole time are you picking it up and I'm picking my now you're picking yourself okay because you mostly stick to the stand here I dio yeah but I have I think they didn't get the greatest stand either this or a little webley I was the last minute I mean I have a fancy cnn and the best way you should end up with the best fine cone if you're using that's all I know this would also be pretty as like if you did colors and this was just a flower coming out oh yeah the rights I mean and it would be less time intensive tim are you getting icy in the middle of a thing that just could be a flower absolutely and what I started doing this I actually wasn't using this paper it was a year and a half ago I think I started doing these before he discovered this paper and really got crazy about it but I would easter egg dye half of them and then just do half like the put a skirt on it with the fringe so yeah you can always leave like part of it exposed anyway and do all kinds of things you know this would be fun though because you do have a lot of a lot of students that you teach and you also do sell these this is an interesting idea to hold a contest on and get a little engagement on social media from your students go to see what they look yeah it was yeah there's comb and if anybody made anything from this class I would love yeah, that was sides are awesome crafters just yet would love it um so with the top ones I use a tool like the end of this to press it in I made a little notch in the end and I bent it and just do whatever you can to get it in there and around the hangar I'm doing this topper you don't have to come tell I'm just teaching it out it's usually something I say it till the end so it doesn't get ruined but it's thies small pieces with a tiny cup and then they almost they look better if they're kind of folded up on themselves that more like what you were talking about that looks really good maybe a little you're dipping might be going a little bit not so they're like going not so with the dipping I actually this is almost too much blood to dry maybe move that one to another place and then stick something else on that okay? And that a word that worked great. Perfect? Yeah sorry way anymore favor to salvage this one over here? No, I'm not and I usually just put two of these top pieces in but three can also look good whatever makes it look like a natural look natural and I really find it helpful to have this in front so yes, yeah but what if you've never made your first one yet and you have to look at the pictures on the promo on creative live thing is that you can use that real time co I mean that's kind of like I looked at a real point going to get started okay? And eight corns and you had all that sort of stuff. Yeah, well, acorn I had a pretty good image but pine cones they're kind of complicated yeah, complicated. Um grab this so yeah, as I was talking before if they get really really puffy and just totally out of proportion take any stiff paper and make a cone well that's not a great cone but a toilet paper roll works great make a cone glued on the end coated with the same paper and then you can make up the difference on that a fix for winning that and live see, I was telling some some of these ladies earlier the metallic paper unfortunately crushes really easily so I did make this plane got point going out of the metallic paper but it's a little delicate it is delicate. Yeah. Hey there, you guys at the point where you're doing the folded back that folded end oh yeah looking yeah are you folding your hands? I think so but like these thieves I just hear you do this part now that and it should you probably start to say going into that are, you know, going to that and then you can come back I mean, I can manipulate this enough to you know, when it's fully dry and I'm confident it's not going to fall apart, you can fold it after but it's really better because you want to give a little stretch to it too and there's all kinds of ways to stretch you could just do the tip or you do the whole thing and this one actually some some come up and some come down and I think that's actually the most natural is opposed to this really uniform one is I'll come back and we'll do it well, maybe I'll pop this one regular again and kind of makes it makes it look more natural. We've actually had some great discussions going on in the chat room here and thanks very much to simply art into michelle until what laura lien, who are all really chatting away and they're sharing different ideas of how they've approached these types of projects and different things that they've done the simply artist saying they've used a lot of glitter and things tio raking up but interesting question we shall be they all seem a bit nervous about how you pack this stuff away for the holidays now when you're done that is always very fragile oh and michelle was basically saying, you know since you're covering the air completely can you just use like a styrofoam shaped that's shaped like a night? Do you really need to use the eggshell what's your feeling on that well, you know for storage for the holidays or just I mean why used the eggshell if you can just have something that's since it's being covered completely I think this is simply egg shaped you could you could use I think you go by pre main cardboard ones yeah stars this's better for the environment though isn't it well and away come I have to waste a lot of inside of the anguish like I said, I haven't figured out what to do about my thanks I'll just come over and eat well they're all fluid like tiny tiny shell fragments that I I would have to sit out and I would try to figure it out well what do you have any thoughts or storage? I use a this this is how I get him to my place is where I sell them and stuff they said that's how I got them here show us I think well that is a whole different ball game that one only has I've only had to deliver this one local but I would make something where it would actually be really able to hang in the box or I don't I'm not even sure I think if you put enough peanuts around things like that, they don't get that damaged and I usually actually in my bigger pieces give instructions for if anything folded down a powder folded back down so I mean, a person could come and manipulate this kind of paper particularly, but the acorns fit really well in a box mina and great egg carton. What if you had a bunch of goose eggs? Those actually I have the box. Those gift e z good. Okay, so we're doing this for a long time and it takes a super long time to do that as we knows we established and then I'm gonna move over to this one and keep going and then I'll probably move on to my my largest size, uh, piece. And then, um when I talk about how I did the bottom, let me see if I can get this one off. She put some pretty clever so that I could just hold it up like this. So the bottom is really easy when you get to the bottom just makesem pedals that are slightly smaller in the ones above it stretch him the way you've stretched everything else and then put four with overlapping pieces around the end of the pedal or the piece a little bit so it looks kind of finished inorganic, not a big square chunk in the inside of the end there but you basically just finish off the bottom just like that you could and there's four yeah, I mean, it could be five it's whatever fits in there again the they could be smaller they could be whatever but it's super simple you're just going down the line and then you're finished. The only difference here is that we're not bending with the ends back. The ends are flat and we're just going to the bottom, so when you get there, you ever would that's that's how you finish the bottle so yeah, those there's there are a lot of effort, but I'll make somebody I mean, you make a few people happy with us. Yeah stuff, tiffany, when you're making the larger cone, there are actually maybe doesn't matter what size. How long does that take you from start to finish? I mean, not including the blowing out of the eggs, but from the time you start get going to making the finished ornament, that one probably took me four hours or so. It's it's. I mean, look how long it's taken us to get. I've only got this far in the forty five minutes in our class, so yeah, I don't do smart things like, don't john reset like pre putting, the sales are actually somebody else had a good suggestion that they said you can actually get paper punches in petal shape so that might be something you may be able to source at your craft store that my national time oh wow I hadn't even thought about that that would be great that would take out that handmade look though yes they're having very uniform when you but maybe you could tweak it with how you stretch it and you know and do this and that so yeah that that would be genius I'm gonna have to look I'm gonna have to step foot in a craft store because I'm gonna have to get one of those so this has been awesome well I'm glad you and I think it's super confident I'm glad you don't really good job good family videos great now I'm looking at things differently okay how they're made and I'm like oh but they folded that include their cool this is um it was there any final that's from what some of the students how they see even get their eggs on camera and take a look and how they've done they're coming along really oh yeah oh yeah well at this early stage we've sort of got brown pineapples having way are or flowers tio yeah but this has been fun for you all yeah okay all right, thank you awesome awesome well for such a tedious one of but I was going to use it all I mean, crafting takes time, it takes a patient's you have to really apply yourself it's not something you can just rush through this tiffany was saying this could take four hours to make this and we only had forty five minutes, so I think actually all of our team have done very well congratulations to all of the students. Thank you. So, tiffany, maybe you'd like to just give us some of your final thoughts and, you know, just on crafting in general how you approach this and just, you know, things you'd like to share with our audience. Um, I think the only thing I say is a long time for a long time, I was like, I used to paint and I was really into painting, but people weren't really into my paintings and for, like, ten years I I searched everywhere for what else I could do. And then, um, nothing came to me and I did a bunch of creativity exercises and the artist way and it's not nothing can t and then just like magic something can. Theresa. Sometimes you just have to wait for inspiration to come to you a really long time, but if you're waiting for it, eventually it shows up so that's my that's all I have to say, really well, it's been fantastic and I know at the start the show you said you said you were very nervous, but in fact you've been fabulous. Thank you, thank you. Well, we are going to have genevieve brass, ulta, non, and she is going to teach us how to make cocktail bitters and limoncello and has a tremendous amount of great gift ideas for packaging, so this is going to be super fun left definitely looking forward to them. Well, thank you so much as always to everybody, who's been joining us on the world wide web today. Thank you. You're the reason that we're here are creative live audience always make these shows so one before we'd be sharing your pictures on twitter. We've been sharing the more facebook on if that we've actually now got his facebook page up and running where you can go and thank tiffany, you can thank lisa you confined jeanette, and of course, he will be able to thank genevieve later on for all of their crafting expertise in the last couple of days. That's up life now to go their poster thank you any comments you like? And we'll be showing that with our wonderful instructors. Later on, but thank you for joining us. I'd also like to thank, of course, are wonderful students have done so well today. Thank you, holly. Thank you, kristen. Thank you. Have a thank you, christina. We really done a fabulous job package. Armory did a great job with your your you're tio. I did my best, didn't cut off the circulation today, anyway. But, of course, most of all, we need to give a huge global, creative, live round of applause to tiffany turner. Thanks so much.
Class Materials
bonus material with purchase
Ratings and Reviews
a Creativelive Student
Fabulous class! Tiffanie shared so many tips and has a wonderful presentation style. The results are wonderful!! The one negative is that part 3 and 4 aren't loud enough (at least for me). I wonder if that could be adjusted. Thank you so much, Tiffanie and Creative Live!
Wania Ribeiro
Please, can we have more classes with Tiffanie??
Student Work
Related Classes
Paper Craft Ideas