Lesson Info
14. Comparing Light Modifiers
Lessons
Class Overview
02:25 2Before We Begin
14:56 3Controlling Exposure – TTL vs. Manual
18:40 4On-Camera Flash
07:03 5Getting The Flash Off the Camera
10:55 6Flash Exposure Compensation
06:10 7Off-Camera Flash with One Light
14:44 8Zooming and Setting Flash Orientation
10:27Creating Portraits with Multiple Speedlights
19:29 10Understanding Sync Speed
08:47 11Shooting in Full Manual Mode Using a Light Meter
18:26 12Creating a Three Light Setup
29:35 13Bouncing Light
12:19 14Comparing Light Modifiers
27:01 15Fun with rear curtain sync (dragging the shutter)
07:49 16Class Wrap Up
02:34Lesson Info
Comparing Light Modifiers
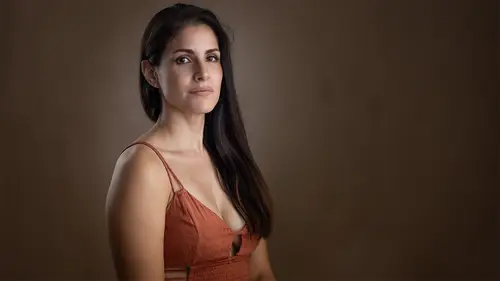
What is the difference between a soft box, umbrella, a grid, a snoot the distance of light, close far away, all that kind of stuff. Well, we are going to dig into that right now. So I have Teresa is back here? We have this soft box right there all this is going to be is we're not going to create some interesting photos. But what we are going to do is we're gonna try to keep things consistent with Teresa in the same place and I'm just gonna start swapping out different light modifiers and showing you what they look like and try to describe why you would use each one and what they're for and all that kind of stuff. So over here I actually have a table full of some very common light modifiers. There they go. So they're on this table right here. What we're bringing these out sort of one x 1. Um But other than that, we are just going to start right here with the soft box. Now, what I've done is I have my flash set in T. T. L. Mode, so we're gonna try to keep that consistent. My camera is se...
t again in the normal uh F. 200. I'm shooting at f. I mean 1 2/100 of a second. F. Eight I. S. A 100. So we're still being consistent. Manual mode. The flash is in T. T. L. Mode. And then if we need to fudge, some things with flash exposure compensation, we will. So let's start with a soft box. What is the difference between a soft box and an umbrella? Well, let me just show you, first of all for two big differences. So an umbrella, when you take a photo, the light has to be shot into the umbrella and then it has to bounce back with a soft box. The light comes from the flash through a diffusion panel. So what will happen is on a soft box you get a little bit more punch, a little bit more bang for your buck than you with an umbrella because the light isn't losing intensity by bouncing off of that thing. Both of these things are diffusing the light. In other words, the light is coming in and it's bouncing around that softens the light. But the most important thing about these two very similar modifiers is the effective size of the light. So let me describe what that is. If my light is way far away, Here's my own brother back here. So matt, don't zoom in or out. So we're gonna keep camera one set 21, there we go like that. So look at the size of this. Maybe if you're watching on your computer, put your fingers up to the screen and see the size of this umbrella. It looks small back here, A small light is going to create really hard light. Think about the sun, it's millions of miles away, it's a gigantic thing, but because it's so far away it's just a little tiny dot in the sky and on a bright day with no clouds, we get really hard shadows. So the effective size of the sun is tiny, it's way far away. We brought that son really close, it would give us a nice soft light. But of course we burn up. So think about that. Think about this umbrella back here, way far away. Put your fingers up to the screen, see how small this is. When we start bringing this closer and closer and closer. Now look now it fills up the whole screen. There we go. Now, the effective size is really big. And so if we brought to light that close to a subject, what happens is the light instead of hitting the subject straight on, it sort of goes up and it gives a big hug around your subject and so it surrounds the subject with light, it fills in the shadows. And that's how we get softer shadows because we have light coming from all different directions. And so we don't have the ability for that shadow to become hard because light is spilling in there. So these two modifiers, the soft box and the umbrella both increase the effective size of light and they soften the light by diffusing it. It's like having clouds in the sky. It makes nice soft light, but why would you use one over the other? Look at the construction of the soft box. The soft box has a black back to it and a diffusion panel on the front. Which means that when light is coming through this, you're not gonna get light spilling out to the sides. You're not gonna get light going on the floor. You're gonna have a nice directional light. It's a controlled light source with an umbrella. Well, if you're bouncing light into an umbrella, if you don't set your zoom, right, you can have light falling to the side, falling on the floor, sort of being an uncontrolled source. Plus that light is having to bounce. So you're losing a little bit of the luminosity, the amount of light that's going to be punched through. And so the umbrella is fantastic. But sometimes it can cause issues. So let's look at the differences in real life between these two. These are the two modifiers that are the most popular by far and the ones that you use most often. So let's start by looking at this soft box. We already have shot a lot with this soft box. So I think you have a pretty good idea of what this looks like. So what I'm gonna do here is I have my camera set. I've got to turn on my tethering. Hold on one second. I gotta go over here, turn on my tethering on my lightroom catalog. Let's see tethered capture. Start tethered capture and then it's asking me for my camera. Yes, I'll turn on my camera. Now that's going to go through my tether pro cable there. Boom. Now we're set up. Okay so what I'm gonna do here is let's first take a photo with this soft box and I'm gonna keep these shots sort of wide so you can see what's happening on the background. So these are exaggerated wide shots. So look right at me here Theresa I'll take a shot now look at how this light is falling from the soft box. So we see that we have light coming out of the soft box. It's nice soft light as we would expect. I guess I should have focused on Theresa before I took the shot load. They're just um we have just a really nice soft light on her chin but notice the background. Um we don't have a lot of light on the floor, we don't have a lot of light falling around so we can sort of control how this light is working. So I'm gonna leave that up. And then what I'm gonna do here is I'm gonna take this light, I'm gonna get rid of it and I'm going to bring out a second light and this is going to be my umbrella. So what I'll do is I'll get my umbrella set that up, my umbrella adapter to do. Here we go. So what we're gonna try to do is match as closely as possible. That same shot here we go, That looks good. Is that up a little bit, bring this down just a little bit more So you notice this umbrella is a larger light source than that soft box. So that should give us softer light. I'll put this about right there, that close to where it was before the other guy. Yeah, Okay. All right. So now let's take another shot. Just make sure that is firing. Is it not firing yet? Let's see why. I think I have to make sure I have turned on my link here. There we go. Okay, so that's connected. Now let's take a picture of this soft box and Powell. One thing you'll notice right off the bat in this wide shot is you can see the flash. So this flash, this is what I'm talking about where you have light that's spilling into other places. If you had an umbrella and you needed to control where the light was going, you don't want light to spill outside of the flash. Like this is doing a soft box is gonna make sure no light escapes. If we get rid of that, you can see that the light looks very similar on Teresa. You can see it's a much broader light, much softer light, we can put those together and you can see the umbrella gives us even softer light than the soft box. The problem is if you want to control the light and use different lights together, you can get some spill that's happening like we get with this second shot now. In reality if we had an umbrella and we were using it like this, what we would do is we would just zoom in, take a shot and then we'll look at that and this is more realistic what you would do. And we have really nice soft broad light. That big light is just giving a huge hug, giving a hug to Teresa, it's just surrounding her with light. So we have nice soft light, it's not as controlled, it's not quite as directional as a soft box. The soft box is going to be more specific. It's gonna help us tell a story about one certain place in our scene, whereas an umbrella is more general is giving us a nice broad soft light and so it's up to you to decide how do you want to light something you wanted to be brought in general and soft or do you want to be more specific and location like there it is right there, you can determine those two things with this umbrella. We also have something that I love and that is a shoot through umbrella. So let me show you how this works. So we have this white interior to light is bouncing off of that, but we can also take these little tabs here on the end of this umbrella and they pop off. So I'm just gonna keep popping these off here, plum plum plum and what this will do is this outside coating which is silver and black. This will come off and now you have a translucent material. And so now what we can do is we can take this and put it on our umbrella adapter like this. And now what I'm going to do, yes, I'm going to turn this around, move this down a little bit like that sort of like this oops too far. Here we go. Now I can take this guy raise it up. This is uh similar to a soft box. So you have the same feature that the light is coming through this translucent material, that diffusion panel, it's not having to bounce and so you're not gonna lose all that punch. The difference is you don't have anything controlling the light coming off the back. So if you had a white wall or something here, what could happen is this light could reflect off of other things, walls, ceilings and that could influence the shot. If you had something that was like a yellow wall or a red wall or something, this light escaping the umbrella could actually tent the photo with colors that you don't want. So the big difference here is that you can have light bouncing around in places that you don't want it to bounce to but watch what this does. I'm gonna move this really close. I love this modifier. So first I'm gonna shoot this really wide so you can see the modifier and everything all at once and I'm guessing that this is going to. Oh yeah, you can see, you can see how that flash illuminates the entire umbrella. That creates just this big soft source of light in the sky. And so Teresa is underexposed because I have included the umbrella in the shot. So the camera is trying to expose the umbrella, not Teresa. So let's make this look more realistic. I'm going to zoom way in here to Teresa. There we go. Here we go, boom. And now let me do that one more time because I still got a little bit of that in the shot. Now look at this. It's a very nice soft directional light similar to what a soft box would be. And so that's what I shoot through umbrella is I like this. I think I would move this a little bit forward, I would take this and let's do that one more time. Excellent, bam. I've got this shot. So here we go. Nice soft, beautiful light. It's not as directional as the soft box. It's not as refined. It's not as controlled, but it's really beautiful. If we then took on the other side and added a reflector, we could fill that in. We get really nice soft, beautiful light. The problem is it's to me I like more control and be more specific with where my light is. Okay, so it's up to you, you have the tools to use either umbrella shoot through umbrella. A soft box, the soft box with a grid on it. There's other things that you can use with speed lights that I really like. Um So I'm gonna show you one of my favorite tools. This is called a rogue flash bender. So the road flash benders. Um these guys are made to just pop on the bottom of a flash. So just there's a little velcro the thing here. These wrap around and then you can shoot into this and create some interesting looks. And so what I'm gonna do here is first I'm gonna show you this as it looks. Um this is sort of a soft box that goes on a flash and then I'm gonna show you what this looks like just using it without the without the diffusion on the front. So, here's what we're going to do. Could you hold that for a second? All right. Yeah, you can use these on camera or off camera. It doesn't really matter. I've done both. So what I'm gonna do is I'm gonna use this off camera to start with, I'm gonna grab that. I'll move this up here so you can see how I'm putting this on here. So what I'm going to do. So I'm gonna make the zoom about 35 mm. So we get a nice zoom out. I'm going to take this. I'm going to wrap it around my speed lights, something like this do do do to do that. There we go. It's velcroed on there to keep this nice and snug. There's this little tab here. So it actually goes underneath like that. Then you can sort of shape these these little rods in the back that let you shape it. So first we're gonna do this, we're gonna see if this will fill this entire thing. If I click this, you can see it illuminates the whole thing. So let's see how this behaves as a small soft box. So I'm gonna take this and get it as close as possible to Teresa. I will take this and bend this down. Just a hair like that. Something like that. That's cool. Okay, let's see how this works. And compare that to what we got before. So again, first thing I'm gonna do is shoot with the entire thing in the scene. We'll show this, it says I love this modifier. It gives us nice soft light. It's not as soft as an umbrella. You can see when this finally pops in here. These transitions on these shadows aren't quite as soft as I would love from a big modifier, but it's pretty cool. So let's make it more realistic. I'm gonna zip in, get this a nice tight shot on Teresa beautiful Theresa, just like that and look at this. Now we have a very controlled light source because it's so small and because I put it really close, remember that effective size I was talking about getting the light close, we'll make it look softer. I can create some really interesting looks with this modifier. I'm gonna show you one other thing with this modifier that I really love doing. So I'm gonna take off this diffusion material on the front. These rogue flash vendors are fantastic. Again, these guys have not, they don't even know I'm using these in this class. So what I'm gonna do is I'm gonna sort of bend this around. I'm gonna bring this up here to the front camera. So you see this, see how this you can bend this. That's why it's called the Flash of Bender. You can bend these, you can shape them in different things. So I'm just gonna sort of bend this like this. So the flash is going to illuminate this. And what that will do is it will create a big sort of area here. That's going to illuminate Teresa. So what I'm gonna try to do, Theresa, we're gonna do something sort of wacky here. I want you to face this straight on. Just a profile shot like that. Okay, let's see what we get with this. So again, the first thing I'm gonna do is show the entire seen. So I'm gonna zoom way out so we can see everything that's going on. I'll take a photo of that and you can see what the modifier is doing. But look what it's doing to Teresa. So this is what the flash is doing. All this light is bouncing off of this and it's creating this really cool soft side light which I love. So let's make this realistic. I'm gonna have you face a little bit more toward me. Something like that. Great. We're just using this little flash bender. We don't have a fancy fancy soft box or anything. So move your chin just a little bit more this way. There you go. Yeah, there you go. So this is almost a profile shot. And look what we're getting here. I like this. It's a little too contrasting for me. So, I want to do is look straight into that. There you go, yep. Straight into it. Perfect. We're able to do some fun things with this modifier. I love this side light. We can move it around. So basically we have the benefit of a small soft box with this just little small flash bender. We could put this to a 45 just because I love this. I'm gonna show you one more thing we can do. So face me and then cheat a little bit towards that and then your eyes towards me. Beautiful! Okay, so wow, this is crazy. So it's this tiny little light modifier and it behaves like a soft box. Now of course we have harder shadows under the chin, but for that tiny modifier, The result here is it's pretty spectacular. I like that. All right, let's keep going. Let's keep going with these light modifiers. So, we have our flash vendor, we have this thing. This thing is called a snoot. What is the snoot? It is a tube, essentially. So, this is just a little tube that light goes through. You can see there it is. In fact, I'll do this here. It is. Okay, So that allows us to create some interesting shapes. So, here's what I'm gonna do. I'm gonna put this snoot on this flash. I'm gonna put the Snoot on this flash. It seems like that should be a song of some sort, doesn't it? Like we built this city on rock and roll and put the snow on the flash. I don't know, maybe not. Maybe it's just getting long in the day. All right, So, now, what I can do is I can start shaping this snoot can make it vertical. I can make a horizontal, I can make it round, you can do whatever I want. So, I'm gonna keep it sort of vertical ish like this. I'm gonna come back here. I'm going to point this at Teresa. Here we go. Let me see if I can see what happens here. Okay, now zoom way out. Take a shot, cool. And you can see that we have this tiny pocket of light. It's almost like a a a spotlight. You've been spot lit. I have a spotlight on Teresa. I could try to shape this, making it more vertical and see if I can make it into a little tiny sliver of light, see what I get there, that looks like a window light. How cool is that? So let's have you look sort of over here, like you're looking out at the window, there's like a beautiful morning morning is broken, all that kind of stuff and then I'm gonna zoom in just a little bit. Here we go. I'm going to zoom out a little bit because I think I ruined the effect loops. Sorry, I shot twice. Let me do that one more time. There you go. Okay, so this last shot that I just did, how cool is this? So you have this really hard light but it has this shape like it's a window or something. So with the snoot, what you're able to do is you're able to with the Flashman or you can make that vertical or horizontal or round or square or whatever you want to do and you can create some interesting looks and really be specific about where that light is. The other thing you can do with the snoot is if you're not using it as a main illumination, which is very rare, you can use it just to illuminate something like hair, something really specific. So again, I'm gonna go really wide. Here we go. Take a shot and you can see how this is just illuminating Teresa's hair. If I zoomed in on Theresa take that shot again, you can see that is if I added a key light to this and added some fill and all those things we talked about with the three lights set up. We have a very controllable light that we can just splash in a very specific place. It works really, really well. The same thing is true of grids. So we have these grids there it is, there's a grid so it's the same kind of thing as a snoot. But with these you get a predictable, A predictable way to light up your flash. So you can say we only want it to be 15° or 20° or whatever that is. So this one right now we know it's a 45° spread. And so for these, I'll come back over here, let's put this here go really wide and then let's take this shot again, click. You can see that we have around source of light that's behind Teresa. It's very, very constrained. I thought they had a couple more grids around here. I don't know where they went. But anyway, you can change how constrained those grids are. So you can go maybe five degrees. So it's really, really tight, maybe 15 degrees, 45 degrees grids help you control exactly where light is spilling and that's what these guys are used for. If I went closer to Teresa. So I'll go about like that. I'll shoot really wide again, you can see that Now I have really specific light on Teresa, it's overexposed. We have to use some flash exposure compensation but it still works okay. Thank you Teresa. I hope that helps you understand some of the basic light modifiers. The thing that's important to understand is how you can shape light, how you can control that light. Do you want your light to be soft? If so you need a larger light modifier closer to your subject so it can surround your subject. Kill all those shadows and create nice soft light. If you take that large amount of fire and put it to the side you can get more directional light and you can still have contrast but still some soft light. You wanna make sure that that light isn't bouncing everywhere. You don't have any spill. You probably want to use a soft box if you want to control how the lights look in the reflection of eyes. Let me go back here and see if we can show you this if we look at the eyes. This is another big deal. So we'll start here with our where did we have? There we go. So here's our soft box. I don't know if we can get close enough but in the eyes of Teresa these reflections would be square if we were really, really tight on Teresa um with something like a an umbrella. If you get really close those light modifiers you can see right here in Theresa's eyes, You can see the shape is round, not square and so the source of our light is going to determine the reflection of our light. So if you want round highlights in the eyes, you need to use a round source of light. If you want to square source of light, uh square reflection of light in the eyes uses a square light. The same is true of shooting glass or anything highly reflective. Whatever the shape of your light source is, the reflections will show up in that same shape. One of my favorite things to do is to go to a big place like a mall or something with billboards to have a giant prints and then walk really close and look at the eyes or look at shiny objects in the photo. And what you'll see most of the time is you can see the entire light set up, You can see the photographer, the lights that are used. The assistance, the studio, all kinds of stuff. If you just look closely, those are called speculate highlights, the reflections of the light sources. So if you're concerned about what those look like that will also help you determine what kind of light modifiers you use grids and snoops and those things that really refined light. I tend to use those just to add pockets of light or add hair lights or add a little bit of highlight on the cheek, something like that. They're all tools for you to use if you're still not sure exactly what to get. Well, what I would do is rent some gear, join a photo club, find some friends that have some gear and try different things and you'll determine which things you like. For me. I like giant soft box is really close, usually with a grid on them. For some of my friends, they just like umbrellas all day long. It's up to you and your photographic style. Well speaking of photographic style, we haven't really done any kind of rear curtain sync and so we're gonna have some fun in the next session playing with rear curtain sync and creating an unusual portraits. And we'll see what we can do with Teresa and some special kind of dragging the shutter effects and so stay tuned. That's coming up next.
Class Materials
Bonus Materials with Purchase
Ratings and Reviews
Erika Matkovich
This course has been amazing! I have learned more through this class than any other YouTube video. Thank you for being so thorough. You are giving me confidence to add OFC to my work.
Student Work
Related Classes
Speedlights