Digital Darkroom: Enhancing Infrared Images
Lesson 11 from: Creative Wow: Infrared PhotographyJack Davis
Digital Darkroom: Enhancing Infrared Images
Lesson 11 from: Creative Wow: Infrared PhotographyJack Davis
Lesson Info
11. Digital Darkroom: Enhancing Infrared Images
Lessons
12 Pre-Show
11:05 2Why Infrared?
18:54 3Infrared: Behind the Image
26:56 4Infrared Q and A
33:41 5Fake vs. Real Infrared
22:19 6Types of Infrared Cameras
22:31 7White Balancing Infrared Cameras
16:57 8Infrared JPEG vs. RAW
20:01Lesson Info
Digital Darkroom: Enhancing Infrared Images
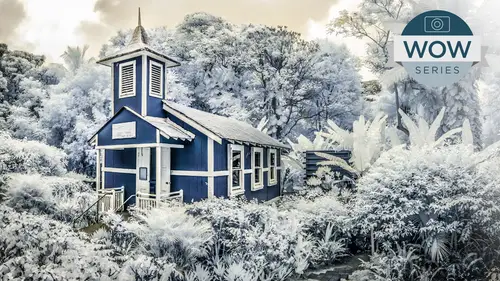
that was a little bit remiss in showing some of the, um context of what we were working on in the park the other day at the Gasworks. Primarily is where we were at, and they have some wonderful, wonderful stuff there to work on that we were able to play with. And, um, I'll show you the infrared, which you will notice right over here to what we're gonna find in the second when we shift around over here. So these beautiful industrial large, you know, storage containers as well as the processing plant itself and with the blue skies, the nice little streaks of cloud that we had is really wasn't wonderful. Whenever you see a day like this, that's got the dramatic sky, and especially with the part setting of our I'm grass situation, it's just a natural. Um, if you've got even mawr clouds even better, it's it's nice. But as long as you've got some of that blue because the blue is obviously reflecting the infrared, you know the least it's getting the least amount and hence the black aspects of...
that. So I absolutely love this park, and I love the day that we were shooting. I was also going up on. We were doing a little bit of small, most macro work with, um, little teeny fern that you're going to see in a second. And here, the one thing that's a little bit unique about you're gonna see that I'm actually not only on this can and pen can upend the Olympus pen is that they've got a really nice articulated LCD on the back. But this is also a touch screen, and the touchscreen can be used for both. Setting your focus point as well is triggering the shutter, so you'll notice the nice thing when you're getting into these little convoluted spaces. You know, when I would be shooting either a macro, laying it down rather than setting a focus point and setting another point. It's simply tapping on what you want to shoot, and they will set both the focus instantaneously as well. Let's take the shot. So this is what I'm doing. I'm actually triggering the shutter a same time that I am setting the focus point. And of course, with Macro. That's one of the nice things to be able to do is tow, you know, not have to tell the camera, Where are you searching? Especially when you're down this convoluted space where your if you were needing to move your focus point using a deep had the little directional pad that can get a little maddening Or you, you know, say no, it's that No, it's that block, you know, gets a little maddening. So it's actually, it's a really nice feature when it comes to these little tight settings to be able to set the focus exactly where you want it on the object, as well as triggered the shot at the same time. So that is what is going on in this particular shot here with the cannon. And we're looking down into the actual shadows of this. You know, rock, which you'll see with the still image in a second right here will jump right back up to our image here. And this is basically what I was shooting. And this is the shot coming from the pen at that time. Ah, with what we were we were working on. So I like that. Okay, So is being and wish. Now you're seeing a bit more of the context for some of these images here, and you're also seeing the range of files. This is a process J pay coming from that camera, as I mentioned, a little bit monochromatic that it has a nice gold to it. This is the raw file that I was working with, and we'll just use those as the comparison we have. This is those containers off in the distance you're seeing the, um a little bit of exaggeration of the clouds between the blue sky. Obviously, we have our snowy white foreground. This is can again coming from the pin. This is coming from the cannon. So this one remember that each one of these has a different sensor. This also is using the enhanced color option. And that's giving me Mawr variations within the scene in terms of the cools and warms of the file, Another just straight shot. This is probably coming from again a pocket camera. J peg here is our beloved shot of mother mole. Okay, as we love to say it and another probably cannon shot, um, and a portrait. I thought I would show a portrait because this yellow skin is a little disconcerting. And oftentimes people want to give it a that I think I'll also go ahead and do a hand tinting based upon this one just because I love that church will also use this for up, swapping out our sky to get our nice blue skies with it. So those are some of the things that we've got going on. Now let's actually start off with that firm that we were just looking at that video clip on, and in this case, I do have my little presets, right? So I started off. Remember they were IR. There's the the G 15 and enhanced That's got just the white balance setting. And here is the one that actually had the clarity and everything else added to it. I'm going to come up here. The story for this one. It's a little bit interesting. It's not the greatest shot in the world, but we'll see what we can do with it. I am in a crop it right into our subject matter. Here, I can play around with how much negative space I want. We're talking about this a lot more yesterday in terms of how we're wanting to frame that shot. I did take a look at it here, but because of how it's leaning, that's a little disconcerting. I like, um cemetery and I have used it. You saw another fern leaf that was very similar to this in the samples that we showed. But in this case, I'm actually liking it this way in this particular one. So I'll come up here and crop to that. We've done a basic setting by using that preset to get our white balance and that clarity I did not. If you remember in this one here, I did not add that post crop in yet. But let's rather than using the post crop vignette here, let's go ahead and use that new advanced cool groovy A k a bitchin way of doing vignette that has come in with the current version of a CR and light room are radio filter because thes three tools up here, your adjustment brush, graduated filter and the radio filter are really the magic in these programs that can allow you to not need to use Photoshop. For the majority of your work, you can get away with a huge amount of work with these targeted adjustment tools that in concert with this new version of our what was the spot removal tool now often called the advanced healing brush. Both of those aspects of being able to do a targeted adjustment and a targeted retouch, we're gonna allow you to do a huge amount of work that was never possible before inside of light room or a CR speak English. Well, we're here on the healing. This may be ah, good part to talk a little bit about retouching. Because if you can't, if you've got a number, a number of distractions And, um, you need to figure out at what point do you do your retouching, and is it possible to do it inside of light room or whether you're gonna our A c r or make a trip into photo shop? If so, if you already know you're gonna go into photo shop, where should I be doing my tweaking? And if I'm going to go in photo shop, am I going to use a filter that nick effects and different things like that? So one the tip the general tip that I would give you is always do as much as you conduce you in your raw converter either a cr like room special. If you're shooting Ross, we have here because, um, SCR and light room are not technically even working with pixels. When you have a raw file, a raw file, a sensor data red green blue sensor data hasn't technically be turned into pixels, even though we often call them that. The sensor data is working at a very different level than a pixel level. It's using a different color space. This is actually using a lab color space in which to do its work. It's separating a color from tone. That's why the luminosity slider is so powerful inside of a C on light room is it has direct access to the luminosity of the file, distinct from the color setting. So, um, there's a lot of reasons, so anything that you can possibly do inside of a CR or light room, do it even if you're working on a J peg. I would do it here because everything you do here is also nondestructive. You can always get back and change it later, even something like a black and white conversion you could undo or change later. Even when we go into Photoshopped. We're going to be taking advantage of this option down here called Open object or open as smart object in light room. If you right click down in your film strip you of the option of open a smart object. And that means that whatever we do here is going to be embedded inside of our photo show documents, including all the sliders, including all our snapshots. Everything that we do here is still accessible, and we can undo it, change it, manipulated, weaken, duplicate a layer in photo shop and turn on different snapshots within the different files if we want. So there's just gives us a huge amount of power by doing the vast majority of our work here rather than inside a photo shop. Okay, so we're talking about retouching, and for that we will do absolutely recommend that we use are welcome tablet if we can, Um, just because anything dealing with gestures, it's much better to do it with something built for that as opposed to our proverbial soap on a rope. In the olden days, they used to walk him because people did like me. Dinosaurs like the mouse you can get a mouse for your welcome. They don't longer ship is a default in that. But they do have, ah, mouse with walking, and I like that. Okay, so what we've got here is we've got two options inside the spot removal tool that have been around for a while. You've got three options that have been around for a while. One of them, that is brand new. You've had hell and clone as an option. The hell is going to try and match the texture of whatever your healing it's gonna try and blended in and match that, um the vast majority of time healing is is the way you're going to go because the source that you're going to use to fix the problem over here, you don't necessarily want to use the tone from it. It's gonna be the texture you want to cover that we don't have to match perfectly. Um, with that, um, the alternative is clone, where it's literally gonna pick up everything associated with one area and move it to another texture, color, tone, everything. And, um, that has its uses as well. Both of these now have the option of feather. Feather is what's brand new to the tool, in addition to being able to do it on a path because clone as a default was moving an entire chunk of something over to another one as a default, it automatically had a feather built into it. You couldn't turn it on or adjust it automatically, feathered to blend in in the past. And even now, hell is so I'm good. It never had a feather option. It was a razor sharp edge, but it did such a great job of matching the texture of one area to another. It didn't really need it didn't hurt by adding it. And so they have added it. So now you've got a feather to both of these tools, both hell and clone. And now, in addition to just doing a spot, if you click, it will automatically choose a spot to do its work. And again as a default, I actually leave my feather off for the healing tool. It's always worked that way, and for the most part it does such a great job. It's fine to have that if you want to. If that kind of makes you a little scared, do not have any feather on there, go ahead and do a little bit. It really becomes in handy when we start doing some cloning. What's new to the tool is coming up here and be able to draw out a organic shape with the tool and use that for doing your healing process. But here's an example where it's saying, you know what? That rock really looks a lot like this dirt and I go Sorry. It really doesn't. You need to be matching as close as possible that the texture of the area and the focus as we move away. This is actually more blurred than this, so there's really no reason in the world for it to do that. They have added a little option because oftentimes, if you're zoomed in, you'll notice it grabbed a spot way out of the scene, and I can't drag it back into position. It's a little disconcerting we've ever used that. It drowns out and says, I think it should be off the scene here. No, you go find over. So what they've done is they've added the ability to use the forward slash key to say, Would you please try it again? nice try, not really. The fourth slash key in both adobe camera raw and in light room and on the Mac and on the PC is automatically set to shift the point around. In this case, it just shifted around to a much more appropriate point, and I may not need to reposition it. At least that poured slash key is useful because it allows you to move it into the scene. So you confined to knit and tell it exactly where it should be. But in that case, that secondary one actually did a good job. And this is where I can come up and do the wiki for Visualize. He looked down there. It's saying show overlay So the wiki can be used to hide or show these little parameters that are being fixed in light room instead of the wiki. It's the H key for hide. It's just one of those things where it's not the exact same keyboard shortcut. That would be nice if it waas and again you can use it for larger areas that we're going to do here. We're gonna come over here and we'll do this. This is nothing wrong with this particular area here, it's just a little bit distracting. The I is gonna go to every thing that's light in the scene. If you are using a little feather, make sure that you go outside of your image because by definition, you're saying you on that feather. So for it to sample and fix that image, you're gonna want it to, um, have permission to have a little bit of feathering going on in there. How much he retouch is up to you how anal retentive you are. I will not get into that question. But you certainly do want Teoh. Make sure that you're going to get rid of distractions and things. I'm looking more for lights and darks. Yesterday we mentioned, if you're actually are using it for doing spot removal sensor dot's spot removal as what it was designed for. You have the new visualize spots option down here, which is awesome. So if I look in here these things, probably here, these little circles are actually despots. There's so much texture that they're not anything that I have to be concerned with, but it's a wonderful, wonderful feature for being ableto find where the problems are in the file. If we come over here and click on one of these other files here again, if this is coming off one of the other benefits of working with a point and shoot because you can't take off the lens by definition, these air coming off the cannon uh, which doesnt have removable lens? Um, you probably will have no dust spots just because you have no ability for dust. It's a sealed unit, and I'm not getting any despots at all. So if I had a one of the samples from the Nikon, I'd probably be pulling up despots if I come over here and look at even are manipulated image here again. Not better at all, but maybe some despot. So it's a great feature, the visualize spots. I'm going back here. It is, um, something that's really I'm not gonna worry about here, but so far I like that going back. I'm back here on my basic panel. I've added clarity that was part of that preset. I'm gonna exaggerate that, cause I'm just that kind of guy, and I'm also gonna probably take those highlights up. I don't want it to blow out, but I'm exaggerating atonality in the scene. So this may be where I'm gonna purposely come up here and dark in the shadows. Well, lightning my highlights. Okay, so I'm gonna exaggerate what's already part of the infrared, you know, environment. I'm also because I really want to focus on the beauty of the fern leaf I am gonna use, as I started to say, Take advantage. Have been yet ing. But I'm gonna use that with the graduated filter, The radio filter next to the graduated filter and our mid tone exposure, which will call for a rock, was gonna be exposure. So I'm gonna take that down. The nice thing with adobe camera raw versus light room is if you click any of the pluses or minuses over here on this panel, it automatically. If I've got if the last thing I did had five manipulations on it by simply clicking anyone of the plus or minus is it resets everything else. So it's a nice reset option. There is no plus and minus inside of light room. There's a little word up here that says effects. If you double click on that word, it will reset all your different parameters, Good habit to get into because it is sticky. And you may not realize that you actually had some sort of, you know, obscure parameter already chosen, um, in light room as a general thing, because some of these little buttons air hidden holding down the option key on the Mac of the old key on the PC will hide like highlight up. So, as an example, that word that says effects automatically switches to reset. So if you're trying to look, where's my reset button and you can't find it, the option are all key is great in light room to kind of show all the changes that are available within the interface the synchronized button is again Will holding down the option of the shift key Will sich to sink will switch to auto sing or some other parameter in terms of your options within, like room. So just a good habit to get into. Also, in terms of shortcuts, command or control, zero will fit in screen. Looking at our little zoom options down here. That's a General Photoshopped option. Commander Control Zero is fit in screen versus command or control one, which again is not going toe. Change your magnification to it. Okay, command, plus or minus will let you zoom in or out. But the command zero is a nice one. Just cause it's filling frame. Okay, Back to our raedle radio. Back to exposure down. A nice shortcut is if you do want to do a general, then getting effect and we're gonna do it for the outside of the area is simply double click on the tool anywhere inside the window and automatically fills your current campus size. So it's a nice little option there. I'm gonna come up here now, and I've already done a little bit with that exposure. But I can now come down here and exaggerate more. Okay. And at the same time, kind of like that protect highlight that's available in the post crop. And yet I can also come over here and make sure that in that area, my highlights don't get muddied. I have all these different parameters at my disposal. If I were to be, have access to a nice soft edged selection in footer shop and I wanted to manipulate, say all of these things, Let's add another parameter here. Let's say add an anti sharpness to it. Okay, if we zoom up here on the file, you're going to notice that now, I'm actually blurring not only darkening that background, but I'm actually softening it as well. Okay, Yes. Question. You're using a horizontal format. It automatically puts the vignette in at the format urine. It follows the contours of whatever the current crop is that you have so horizontal or vertical. If you were toe, you really don't want to do localized things as a preset. Um, but if you were synchronizing this to multiple images, that's a good question. If we come over here and say synchronize and we just want to do local adjustments which right now we have that that and we look at our radio it Is it new? Because I used a shortcut of double click inside that that what I wanted was not this oval that fit that particular frame, but an oval that fits the countries of whatever it ISS. So I believe that was the case. And now we have confirmed that yes. So now I've come up here and I have darkened the parameter. I've exaggerated my vignette. I've even added a little bit of softening to it. I can. I do have my feather option within here so I can feather itm or which is gonna bring that softening in further in which will include a tip here. I'm not sure if I like that, but again, it can soften up that both the blurring as well as the darkening of the file, um, actually helps if I selected before I do that. So now the feathering Okay, you can see there's the hard edge and here it is now, coming further into this into the file. Okay? And you can see even on the tip. So it's a beautiful soft edge selection. It's wonderful. The nice thing is, because it is sticky, I laugh, actually use it kind of like I did in the palm trees saying, Remember, I set up one for a nice soft edge lightning of it, and I can drag out, drag out, drag out, drag out and do the different portions of the palm tree similar to the adjustment brush. Why could have a nice, big soft brush and go click, Click, click, click. Those are all gonna be nice. Soft adjustments. The difference is if I use the radio filter each one of those air separate adjustments that I could go back and find tune later. So this trio, on a little bit less, a little bit more. I come up here with the pan and I go click, click, click, click. That's all considered one mask, and I would actually have to erase or manipulate that in order to have each one of those different areas have a slightly different parameter. So the radio filter is actually really nice because of the ability to go in there. And as you draw one out draw one out each one is its own little separate adjustment. Okay, The last thing if I really wanted to exaggerate the nature of the leaf here, remember, we do have inside of a CR in light room. We have an adjustment brush, and that adjustment brush does have the option of auto mask, and it actually does a great job if it can find use, color or tone, texture or detail. It looks at all of those parameters. So if let's say I wanted to exaggerate this and kind of dark in this area here, I can I always like showing them Ask if I'm gonna use that. I want to make sure that I start completely in the area that I want to work on. So if it's this kind of background texture, I don't want to be anywhere near the leaf that I want to work on. So now let's rather than do sharpness and everything. Let's just do, you know, exposure. I've got my auto mass turned on. I've got show mass turned on which, by the way, I can change the color of the masto whatever I'd like. And I'm gonna make sure that I start over in this area here that has the color that I'm interested in, and then I can actually go in and I'm overlapping. You can see how large it is, and then I'm actually able to go in and come inside. Even though I'm actually overlapping the leaf. I can actually come up there and get a hard edged mask. If it does a little bit of overlap, as it's doing here, when I can zoom in and, you know, clean it up where it didn't catch those particular areas. But holding down the option of the all key is gonna automatically turn the brush into the eraser version of it, holding down the option or all you can see that shifts to eraser. And when I come up here and erase what I don't want in this case, the light of the fern, it actually is becoming mawr intelligent. The tool is actually going. Oh, OK, Now I know what you wanted to keep on what you're wanting to toss. So now, as I continue to paint around that image, it actually will get better and better at finding that masked edged. So in this case, um, I think I'm pretty much set in what I need there if it starts getting where it's still looking for an edge over here. Once I'm done with the edge that I'm concerned with, then what I'll do is I will turn off that auto mask and I can come up here and with a much bigger brush, I can kind of soften that transition to what? I'm not wanting to have a hard edge so you can see all this here. It's continuing to try and find little edges all throughout, so I will just turn off the auto mask and go ahead and just do a regular painting without auto mass turned on hiding that mask, which, by the way, has a keyboard shortcut of the Y key. Why? Because we like you. But why Key allows you to hide or show that mask inside of a CR inside of light room. It's the okey. Think of Oh, is the hole in a mask that is the preview for your mask. Also in light room, you won't see the ability to change the color of the mask as you can hear without knowing the keyboard shortcut. That shift Oh, that you go through different colors that are available to showcase this mask inside of flight grew slightly different interface tweaks there and again, I'll hold down the option key, and now I'm gonna find Tune that They're So there is my preview. It's actually now showing me portion of my preview, Um, to further accentuate that. So we did. First, a targeted adjustment of my radio filter went back into the brush, taking advantage of the auto mask to fine tune it. To make that pop out, we did our white balance by taking advantage of a preset that I already made for this camera. So that gave me a good part of the way there. Exaggerated a bit with clarity to further make that pop. That's actually what we've got. This here in that same area might as well, right. No reason to not go ahead. Kind of Take that down a notch as well there. I'm not using the mask. I'm just kind of exaggerating that I'm gonna leave that rock, because I'd like that. But, uh, there is my adjustment, and I'll often times come up here over to this snapshot area. We talked about this yesterday where I take advantage of the fact that you can save an unlimited number of versions of your file what you would normally do with a save as inside a photo shop, the quick they're easy. They don't take up any memory of significance. And so I will always, when I'm done with the manipulation, I'll come over here. I like just tapping one so I can keep track of it oftentimes for teaching purposes so I can see where I started from. I'll come over here and I will in the upper right hand corner. Say camera raw defaults. Okay. And there is my original file. I'll make another snapshot called zero. So in my teaching files, you'll also always find a zero for the beginning part and the one for one manipulation. And I can continue to fine tune this any way. I want any versions. Yeah, because now I can come up here. If I got any of those funky little things here, like, you know, antique or something like that. I can go through knowing that I've got one nice, you know, set up for this has got some or exaggerated glow. And this is where I can, you know, save every version. Here's the misty, you know, metaphysical fern leaf. Now that's gonna be too. And I could continue to just, you know, whatever presets. I've got other colors in here, so you know, why not? Um, not making a preset my back over to snapshots. Come over here and make a new one. So it's quick. It's easy. It's free. It's non fattening. Why not take advantage of them?
Class Materials
bonus material with purchase
Ratings and Reviews
a Creativelive Student
This was an excellent course, clear and informative. I teach Photoshop but learned some new tricks as well as the great info on infrared photography. As one of the 5 people left in the world who isn't on Facebook, a link to his Actions would be appreciated!
a Creativelive Student
I thought this workshop was great, and really enjoy the creative uses of the gopro. There is a gear segment, and gear guide to download. But what I want to know is what card reader he was using. For some reason I can't find it.