Digital Darkroom: Starting on Panoramas
Lesson 6 from: Creative Wow: Panorama PhotographyJack Davis
Digital Darkroom: Starting on Panoramas
Lesson 6 from: Creative Wow: Panorama PhotographyJack Davis
Lesson Info
6. Digital Darkroom: Starting on Panoramas
Lessons
10 Pre-Show
10:06 2Why Panoramas are Awesome Part 1
41:37 3Why Panoramas are Awesome Part 2
29:33 4"Rules" Of Panoramic Photography
38:39 5iPhone Demo: Panorama and HDR Apps
36:30 6Digital Darkroom: Starting on Panoramas
21:52 7Digial Darkroom: Enhancing Images
40:11 8Digital Darkroom: Stitching a Panorama
17:35Lesson Info
Digital Darkroom: Starting on Panoramas
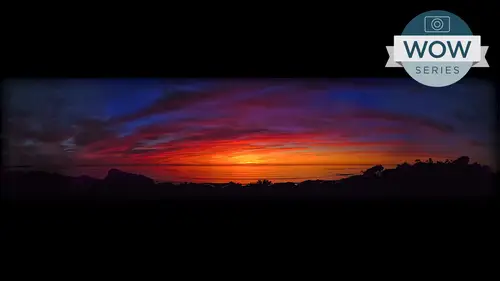
right here. I'm gonna let you come into my finger print laden thing to show, um, nap called sphere that works with this moto Galileo. I was talking about terms of panoramas. This is very nice for creating, like, quick time VR is of inside of buildings and stuff like this, but I'm taking this out into the world is very cool. I'm actually a good have a trip coming up to, um, river rafting in the Grand Canyon for week. We're going to be flying drones. We'll be shooting. Panorama is an IPhone, an infrared and yes, it's gonna be disgustingly fantastic. But what I'm looking forward to doing is using this little thing right here. So if you can keep zooming in on this little thing, it's Bluetooth is how it connects to it. So the phone is not connected. Um, be a cable or anything else, so it's wirelessly connecting it. I've got this set up in a mode where it's going to automatically shoot a panorama 360 degree, three different levels of panorama while we chat. But you can also control the diffe...
rent things that work with the Galileo wirelessly from a different phone which is kind of creepy. I may put it on after I shoot this. They've got basically a smile cam. They call it a party cam or something like that, where it will continue to go around the room in circles, looking for faces and smiles on every single times it finds ones, it'll take a shot. So you put this in the center of your room during the proverbial party. And of course, everybody's making an ass of themselves and you get it all documented because for some reason, people like that being documented, and then they'll put it up on Facebook anyway. So I'm gonna say, um um, start and ah, so that will take a shot. So you're gonna see kind of a creepy little thing doing its own thing. But as I mentioned before, it can also be used. Teoh. Yeah, so that it's doing. You can see how far it's going down. That's why I put on the edge of the table. You can put it on a tripod. You tell it whether it's on a tripod or on a surface. But, um, they will even smile. It's drink. So anyway, um, that's a very cool device. And it's also, as I mentioned, used for time lapse, where you can even dio supplying based directional paths for the time lapse. So is it spinning around? It will come up and continue to do. It's a pan and, uh, very, very cool. I think it's an ingenious use of technology affected. The people at Motor Moto, a motor mot Oh, are, um, have made it an open source piece of software so as to allow people to write their own code for it. It did that. Let's go ahead and take a look at it because it did it as real fast actually enhancing the picture. Because, of course, now it's stitching speaking about our panoramas. This is I guess I did move in here. That is interesting. And, um, but that's what it shot, including looking straight up. Okay, which is a pretty good trick. Me and my twin. That's how I'm gonna feel. After the end of class today. I'm gonna need a margarita, and I'm gonna look just like that. Um, and it actually has on turned on to it that the gyroscope So it's actually I'm looking around the world around the room by actually moving my IPhone. Anyway, you get the idea. That's a pretty elaborate panorama for it to do this multiple tiles situation, including, um, close up objects in my scene. So anyway, so that is the hardware on this is from company called Motor. The device is a Galileo, and this particular piece of software is called sphere. Other ones that come with us of you upload, um, motor M o t our. It has a Siris of APS, and these are the all the APS that work with it. And that one guana time lapse is the one that does time lapse on a spine. So you can do these, you know, one frame a second for hours and hours. This one right up here, face snap. That top one is the one that does party cam. So you it will automatically search a room and shoot all the smiles and spears when we were using and switches. Very quote. You can use this for a multi camera video shoot where it actually does multiple feeds of video. Shows them all in one interface, and you switch between beads like this What they're doing here. So you guys are basically out of a job all you guys, But, um and because it has the remote control, it actually controls the camera. So you can pan around in the scene, control the cameras on a multi camera shoot and switch between video feeds from the AB. That's just pretty. Gosh darn cool. Ah, and then there are other ones as well. Time lapse is the one that I mentioned that I love for doing time left as well. That's the one that will shoot four k video time lapse in four K. Video is the time lapse at that works with the Galileo, okay. And also in terms of shooting we did. We showed a little bit of video. I was working with the, um, GoPro out in the field. Let's see if we've got this. They're all the quick time videos. I think I showed you way left off the day with that little video clip that I mentioned with the GoPro. This is my and said this is my poor man's copter here, So this is a little extendable mono pod, and, uh, just doing a little sweep. I know. For those you guys were trying to see you. Yes, messing with my videography. So anyway, um, it's great. I use it for a lot of things. And like I said, when the first statement, we're talking about creative photography, and I'm going to stand up to really make you guys do it. One of the things that I loved and there was a shot of a family running on the beach. Wet sand. So you get the reflection of it. Remember it with mother and child. And because this could be set to an interval, ometer, In other words, they will shoot at a regular set regular sequence. This will shoot two frames a second unlimited, literally thousands of shots and at full resolution, which in this case is 12 megapixel. This is the hero, three really good in low light. And that means that also is very sensitive in terms of motion. So what I'll do is I'll tell the kids Okay, whoever catches the camera gets some sort of goody. So I've got two little girls. They probably four and six, and I'm going like this. Down on the sand is a aunt camp, and I'm going like this and they're just and It's the most wonderful way you'll ever shoot a family. I just doubled your income right now, if you're a portrait photographer, I just doubled your income working with kids because you'll go like this and you get a fish eye of the parents in the background cause I can't keep up with the kids. The kids were laughing their heads off. I'll pull up the image, but this is also what I was doing when we were out in the field the other day was coming up here and doing this. This is my little rotation, which is gonna be I'll do down here just because doing so. I'm just rotating it, trying to keep that nodal point going on, and that is grabbing all these different scenes. Now the question is, it's fish. I remember. That's one of our rules that we don't like to break, but we can and getting a very unique. Actually, I prefer this view of this little bay area here, then with my big board camera. So I'm getting nice quality megapixel. I use the GoPro Ah, a lot of the time and of course, I put it in a waterproof housing when I take it in the water, which I do put on the nose of my surfboard. I gotta shoot a lot of selfies. All my selfies are out in the water, but this is a little bracket you can get that doesn't have the waterproof housing. So it grabs the sound. It also has set up in this case. I got the, um they, um optional LCD back on it. So for those of you who actually like to see what you're shooting, you can do that. The GoPro is the default does not have a any kind of way of seeing it. It's basically official, and you stick it on the side of your dragster and jump off a cliff or whatever you do those people. But anyway, so the LCD back allows you to control it. And, um, I think they're just a kick in the pants and for their price, the quality, the fact that you have a fisheye with you, the fact that you can make it indestructible and waterproof makes it It's just a great tool. And of course, prior to the current state of drones of the copter photography, really the the only way to get decent video was to stick one of these on a ah helicopter. Now, the current phantom vision to plus has got a stabilized video system. So there are alternatives to go pro for shooting aerial video. Okay with that and we've processed are images. Let's go back. Okay, Um, what we've got going on since for the first couple days of this Siri's, um, we were working in bridge on adobe camera, raw as the main way that we were processing our digital darkroom, knowing that the vast majority of people who are like room centric and the workflow also have a photo shop. A lot of people have photoshopped and don't have light room. I was using adobe camera raw and Bridge as the center of the hub. But a lot of people lot of you. How many of you are like room vs issue are light room. Okay, so most of you are light room and that Emma's be again. Creativelive is a release cool and groovy set and people have light room which cool and groovy people do have. So I'm gonna do this segment mainly inside of light room, though I'll also be using Bridge and Adobe Kamerad bounce back and forth from that one of the things that I did here inside of when I brought in the series of images into light room. Which, by the way, is looking at the exact same images in the bridge. I mentioned before that adobe camera, raw and light room and how they handled images are completely compatible in the sense that what you do with your sliders and your manipulation of images is exactly the same in light room as it is in bridge. Making sure that they have access to that same metadata and what you tweak is not recommended that you access the same images in both areas, but you can, and that's what we're doing. We're actually looking at the same images in both of those just because I like living on the edge and one thing you're going to notice here looking in light room in terms of this issue of creating panoramas is you'll notice these numbers of images okay in some of the corners of some of these files here and what we've got going on here is what are known as stacks. So what I did when I opened up This series of images that are associate ID with panoramas is I went up here under photo stacking an auto stack by captured time. This is the issue came up, you know? How do you make sure that you don't delete images when most of them may look, you know, like non great award winning shots because they're part of a panel. Both leg room and the bridge both have this feature of auto stack by capture time. The nice thing about light room. When you bring up this feature, it's going to ask you how long of a time between the shots do we want to consider it being a stack. In other words, if you know that when you shoot Panorama is it's click and maybe even do some sort of exposure difference between shots, cause it's so radical. But as we've said, you could get away with murder. But you're going click click, click, click. You're not doing any sort of real quick Siris of shots, as opposed to using it for combining a bracket instead of shots. Maybe you're using it for creating an HDR where you're coming up here and you've got it set up for a five shot bracket. We're gonna go quickly, quickly click, and that is literally a second or a fraction of a second between your shots. When you're shooting, Panorama is much, much, maybe much longer. So you can see as I change this, it's actually going to change the number. Now there's 18 stacks now depend upon there's and again it's bearing out pretty well what was shot in close sequence to each other and what wasn't in the bridge. Come over here. You know, if there's that hand we talked about, that's another way of doing it. Hand stacking, Which, by the way, in both programs you can simply come up here. And even if it doesn't auto, stack it. You can group as stack so you can manually do it just yourself, especially if you do something like putting a hand at the beginning of a sequence and end at the sequence. So you know where this serious begins and ends. But in this case, if I go back to my panorama is and let's go into our go into our projects, you'll see I have those same kind of numeric values inside of the bridge, and that was done via the stacks menu and auto stack Panorama HDR. And you'll notice an interface thing if you haven't noticed it. Wherever there's a dot, dot, dot on their lips. Adobes gonna ask your opinion? What? How would you like to do it like that? Previous when it asked what was your time frame? This one? You'll notice there's no dot, dot, dot, dot, DOT means it could care less. Okay, it's not gonna ask. It just does. It is best that it can. Okay, um, but it did do that. And it also has this nice little future right here. You'll notice that there's a when we zoom up on it that I've got five shots in this stack and it actually plays the little video video clip so you can see what's in the stack. And if you're having to be using this for doing time lapse, that actually will show you your video, whatever is in that stack. So it's nice from that standpoint. It allows you to see it, or what you can do is click on the number and it automatically will extend, expand that stack. Okay, so it is a toggle. And if you click on the back half of the image, you can see here that I've got this little stack of cards. The difference between clicking here and clicking here is even though it doesn't expand it with inside this content window. When I click it here, it expands them inside of my little preview window. So you have these options as if you click on the number it expands it within the content window. The little thumbnails. That's a toggle. Clicking on that back is a toggle for expanding it within your preview window. Okay, here, within the bridge Makes sense. Nice feature. Like cursive on your egg drawer. Yes. OK, so, um, we did show that image it process there. I don't think I'm gonna show you right now Any more of that processing. So let's go ahead and combined some panoramas in here, and we've got sea. Which one? We've got a number of different topics to bring on. Let's go ahead. And speaking of, we've got this nice, beautiful traditional one of, um, the arch here, So I'm gonna have these five images selected and the first thing that you want to dio is rather than stitch, when at all possible, especially if you're shooting raw. Most of these I've reduced down into J pegs in the smaller size J pegs, just because of you guys sat around and actually watched me stitch every one of the panels we're going to dio. It's live. Let's not do that. So I've reduced them down in size. Which as an aside, if you have a really big panel and you want to do a quick test of recommend if you're inside of the adobe camera raw bridge environment, you're gonna tools, footer shop, image processor tools, photo shop image processor and that's going Teoh allow you to automatically come up here and say, Would you take all those images and save him off his tip so it doesn't re compress them? As J pegs take him down to something like 1000 pixels so you could do a quick test, right? I get lunch. What I did for some of the larger panorama is is I knocked him down so we can do a quick test of a panorama without literally waiting. For sometimes if you've got 50 images, you're doing one of those giant checkerboard patterns. The last thing you want to do is go ups, you know, let it run for an hour and then figure out that it didn't actually didn't have all the shots that you needed. So this thing is called Image Processor. It's been built into the bridge for about a 1,000,000 years. It's really the only way that you should be saving on files from Photoshop if you are going one at a time and opening them up and changing file size or changing them to S RGB so you can put them up on the Web, all that sort of stuff, or just open them up so you can put in your copyright. You can see here I can change file format again. If it's going out to a J pig, I can convert it to S RGB, which you would want to do for any image that you ever upload or email for anything you've done. You all know that as we've talked about your shooting in Adobe RGB, but all of you are converting your images into S RGB prior to sharing them all email applications and all Web browsers are based upon the S RGB color space. If you've ever wondered why your images don't match what you're seeing inside of light room or Photoshopped proper, Um, it's because you're probably have it still in the adobe RGB color space. So this allows you to change file size, add your copyright. I'm include the color profile. In this case, it made a separate little folder inside the same location, and it named it if that's what we were coming up with. Okay. And of course, when inside of light room, you have the little export button in the lower left hand corner, select the images that you want to do this little test on, and then you could do a little export, and you can also within that export, add back to the catalogue after export. There's that button inside of there that you're probably familiar with. Okay, so we've got our images. We're Presuppose that you're shooting raw. That Presupposes that you're never going to get Maurin formacion than when you press the shutter. That is your digital negative, and you should always process from that file whenever possible. Never, ever, ever take your raw files and open them up into photo shop and start working on them. The reason is is that it has to cook them. Photoshopped Onley deals with pixels. It has to create pixels. Remember, you're technically your raw files don't contain pixels. They contain sensor data, and that sensor data has to be converted into pixels that hence, the term these air raw converters like room and a CR is a rock and burger bays. One. These air raw converters capture in next two is a rock inverter for put a shop to work with them, they need to be pixels. They need to be cooked. Hence the analogy of raw, which we talked again about that first day. So if you were to take your image with, let's say, some compromise shatter detail, it would cook in this shadow detail into the file before you bring. Brought it into photo shop, and therefore you wouldn't necessarily have access to the billions of tone that air in, say, a 12 bits of information file raw file. You open it up is a default. It may open it up into Photoshopped, your default setting for your color space, maybe eight bit RGB so it would be throwing away just like a J peg. That's what Ajay Pages is a cooked raw file. So if you were going straight into Photoshopped from your raw file and then doing your layers layer miss masks, adjustment layers, that sort of thing, let's not do that. So you're always gonna want to process it. At least optimized your image prior to stitching together your panoramas in either adobe camera, raw or in light room. Always do your initial tweet there. No reason to not take advantage of the fact that you're dealing with raw sensor data and as we mentioned also before, everything is going to be non destructive if you stay within those applications.
Class Materials
bonus material with purchase