Lessons
Preview Workout
10:04 2How-To Approach This Class
01:31 3Day 1: Scapular Strength
25:51 4Day 2: Core Strengthening
18:30 5Day 3: Front Body Opening
20:19 6Day 4: Rest
7Day 5: Mobility & Movement
21:07 8Day 6: Bent Arm Strength
20:26Day 7: Core Stability
20:51 10Day 8: Back Body Strength
19:53 11Day 9: Rest
12Day 10: Leg Strength
25:39 13Day 11: Strengthen Your Vinyasa
24:56 14Day 12: Side Body & Core Lift
19:13 15Day 13: Back Body Opening
23:13 16Day 14: Standing Balance
27:16 17Day 15: Rest
18Day 16: Rest
19Day 17: Scapular Strength
25:51 20Day 18: Core Strengthening
18:30 21Day 19: Front Body Opening
20:19 22Day 20: Mobility & Movement
21:07 23Day 21: Bent Arm Strength
20:26 24Day 22: Rest
25Day 23: Static Core Stability
20:51 26Day 24: Back Body Strength
19:53 27Day 25: Leg Strength
25:39 28Day 26: Strengthen Your Vinyasa
24:56 29Day 27: Rest
30Day 28: Side Body & Core Lift
19:13 31Day 29: Back Body Opening
23:13 32Day 30: Standing Balance
27:16Lesson Info
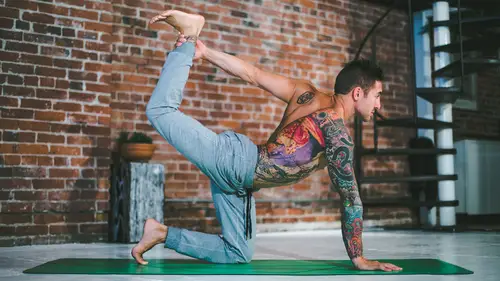
Day 1: Scapular Strength
scapular strength is really important when we're working through any kind of yoga movement where the arms are straight because the arms on Lea attached to the body right here at the sternal clavicle, their joint. We really need to make sure that we're supporting our arms through our back body. So this class is really focused on developing this kind of strength, learning how to recruit and engage out of the arms. When we do this and we support our body with our core, were much more stable, were more balanced. And we're stronger all over. Let's come onto our hands and knees. So any time that we're working into any position where the arms are supporting the body, it's really important that we spend a little time to warm up our wrist. So plant the hands directly underneath the shoulders. Rather, try says back, we're going to start by just gently shifting Ford when she keep the arms. Nice and straight press the center of the chest up, so we have a tendency to want to sag the chest down. I w...
ant you lift the chest up and this will be a theme through through the rest of this class and really through every time we're on our hands and knees, so just shift forward. The more reflection that we have in the risk, the healthier that are risk are the better that they are supporting us. And also the better we are when we want to start working in the handstands and arm balances. If you notice that you have risk pain any time you're coming in a plank pose or side playing her downward facing dog, it's not necessary that you need to come off of the risks. But you need to spend more time warming them up. If you warm up your wrist properly, this should all go away. Let's do another three more to shift and Ford keeping the arms straight rock and from the hips to last one, come back to neutral. Bring the hands around, face the fingers towards the knees. We're gonna lean back. But when we lean back, I want you to let the palm's lift. Also, if you think that the risks are involved, all the muscles from the fingers to the elbows and we want to stretch all those out, it makes more sense if we lift the palms that were getting some stretching through the forms and through the fingers as well and still working, deflection into the wrist nice and slow. No need to rush it for three to one. Come back to neutral. Point the hands to the outside walls still directly underneath the shoulders. Start to circle around towards the left. Again, Keep the arms straight. Try not to let the body sack too much. You might experience some clicking in the wrist. This is normal, you know, as long as there's no pain while you're doing it, I want it really worry about it too much. Three to one. Switch sides. Get the whole body involved. Last three to one and sit back on the heels. It's it's nice, like I like to stretch out my feet a lot, so if you sit back, try to curl the toes under. If this is if this is too much. Currently, toes under is too much pain. You could always put something, anything, ankles or sit on the tops of the feet, but we're only gonna be here for a short time. Grab the wrist, roll it out and just loosen it up. But I like to do is if you feel right here with your index finger and a thumb, there's a little joint capsule, a joint. You squeeze that you're going to start to feel little separation. Keep the hand, relax, feel little separation and then make a slight fist not too strong, engaged around the wrist and roll it out. Get a little bit more synovial fluid going in through there. This lubricate er joins up. Switch directions, maybe untucked the toes come onto the tops of the feet. If you're on already there. Other side. Reach around the wrist. Keep the hand, relax. Feel little separation in the wrist. Slight cyst. Roll it out. Hopefully your wrist or feeling good. It was just roll amount. Give you shakes through it. Any time that I'm working through something to my wrist, start to feel sore. Always stop role amount. I spent a lot of time on my hands and in yoga, you know, we think of all these these poses that were on her hands downward facing dog plank pose Tchad wrong a side plank pose. You know, we spent a lot of time to put a lot of weight where the wrist aren't meant to support that. So make sure that any time you're in class that you spend the time to warm up your wrist and your practice will get stronger and you'll be healthier for the duration of your practice. So it's come onto the hands and knees again, plant the hands directly underneath the shoulders. We're gonna start to discover our scapula us, right. So the scapula is or the shoulder blades are on the back, right? They're responsible for moving the armed Ford and back. Any time that we moved the hand up past here, the scapula starts to take over. In time, we move the arm back like this. The scapula is take over. If we press up scabrous, take over, you know? So it's really all this My motion. All this movement happened through the back. And so when we want to support the body with the arms, support the body with the hands, we really have to think about pressing out finding this engagement. If you could see the difference from mice capitals back here, I have no engagement to the shoulders versus if I push out and extend out to the arms now I'm strong and supported. So when I say lift the hard up, I'm looking for this position through the back versus this one which would be sagged the heart down, the shoulder blades come together. This isn't this is a polling position. So you want to make sure any time you're pushing that you're engaging. That's what I mean by engaging the recruiting, the muscles. So from their hands and knees, we're gonna find the scapula. Straighten the arms wrapped. The try says back, bring the elbows back towards the knees, sag the heart. Now press up through the center of the chest, engaged. Find a little slight tuck of the tailbone. Come back down. He's going for five of these. Press it up every time. Really engaged at the top. Think Kappos without tucking the chin repressing upward like a scared cat. Rounding out down, two more down. Really engaged. Last one. Turn the palms. Oh, take the hands a little bit wider. So and this one, we're gonna work on the motion, the rotation of the scaffolds. They do all these wonderful things. If we understand how much movement that they have and how to use them. It's really. It's really neat what we could get out of our arms as faras movement goes. So when she sagged the chest down, take it over towards the left, bring it up over towards the right and down. We're gonna make this smooth circles if you can't as fluid as you can for five. Four, keep the belly engaged. Three to one. Switch sides five, four, three to one. Come on to the knees. Sit back on the heels. Take the shoulders, Drama. Slide him down the back. Pull him up, Slide him down the back. Just understanding what the scabbard start to do as far as movement goes back down, up and down. Pull the shoulders back. Slide him up. Roll them down, back up and down last time. Come back onto the hands and knees. Now, when we found our scapular engagement, we really concentrated a lot impressing the center, the heart up. So work on pressing the ground up. And now we're gonna look for a little bit of core control. Of course, strength here. So you take the tailbone and talk it under right. We want to think of closing the gap between the hips, the hips and the lower ribs. So we pull this together as we pull this together, the core engages. We squeeze this in like that so that the core is nice and strong, so you come onto the hands and knees. Talk to tail under engaged the course. Squeeze impressive. Center the heart up back to neutral spine. Press the center, the chest out. Talk to tailbone under for two neutral spine talking under. Press it up for three back to neutral spine. Press it up for four neutral spine. Five. Five more. Six. Engage. Press out. Seven. A nine should start to feel this by now. 10. Now what she depress up. Engage the chest. Keep the tailbone tucked. Court core engaged. Press out through the center The heart never gonna find the arms So I get a lot of questions on the hands. How should the hands be? Well, I see a lot of people lifting up inside of hands. Well, it's hard to engage the arms properly. It also puts a lot of pressure on the outside of the rest. So make sure that the hands air grounded down that this first knuckles always pressing in and most of weights coming down through the first line of knuckles right here at the top of the palm. Press out a little bit more. Wrap the elbows back towards the back of the room Biceps Ford, take it out just to feel the rotation. So a lot of times we think like the arms are out like this. But I know that the hit the tricep should come back. Route the biceps. Four. Take it out, Ford. Keep engaging. Pressing up three to one. Hold it Here, engage. Press up. Go for five more. Take the elbows out, Rapid. And every time we wrap now we're gonna add in the chest, Squeeze the hands together, engage the chest. So much is going on here that you really feel that maybe don't see so much out. Four three to keep the core engaged one. Now we're gonna hold this up. Keep the tailbone tucked. Step the right foot back first plank pose. Step the left foot back. Engage the core presses. Center the heart up. You want the hips the same height as his shoulders. The shoulders above the wrist Really engaged. Will hold for nine a seven six, five four three to once Sat the knees down nice and controlled Take the hands behind the back Lift the shoulders up and back Maybe gaze up, Stretch the arms out, Right arm out front And I stretch out to the deltoids Left arm in front Let's come back to the hands and knees So we're gonna plant the hands directly under the shoulders, Wrapped the triceps back, curl the toes under talk to tailbone Gonna lift the knees up Really? So what we're trying to find here is the straight arm press. So this whole classes about finding the straight arm scapular strength. So when we're lifting up, this is the engagement that we're looking for. If we're sagging down into the heart, we're not using all the muscles that we need. We're not recruiting. We're not engaging, you know? So every exercise press up, press the center, the heart up, talk the tailbone. Now keep this engagement. Keep the toes curled under. Lift the knees up off the mat. Engage the course. Lower back down for five. Four, three to one. Hold five, four, three. Talk the tailbone. Press the heart up to once. Set the knees down. Inhale gates up Exhale, inhale up Exhale Find the scalpers strength Inhale up. Exhale, engage Last time Inhale up Exhale tuck. So find this the top of the the top of the cat. Gaze down right between the index fingers wrapped the try suspects. Squeeze with hands together. Engage the core Talked the tailbone. Lift for five, four, three to one. Hold five, engage four three to one Good shop Set the knees down. Bring the left hand four. Take the right arm through Bring the right shoulder down to the mat Sit back on the heels of nice little stretch Maybe the side of the face down in the left hand back. Press it up. Press right hand underneath. Reached the right hand out Slide left hand through Take it down. Nice little stretch on the outside of the left shoulder. Try to soften the right shoulder down. Sit back into the heels, extend out Good. Come back up. So now we're going to, um, plant the hands underneath, wrapped the triceps back. I want you to take your right foot and take it out to the side to use for balance. Plant the right hand underneath. Step the left leg back on a leach. Reach the left arm up to the sky, finding a modified side plank. Now, a lot of us, we sink down into the arm here. So this is all about finding the scab off their engagement. So I want you to wrap the bicep back, engage the shoulder, then lift the bottom body up. Reach out through the side body, find the side core lifted up. Extend the left hand up. We're gonna hold for five, four, three to one. Come back down to all force. Get left. What's going to come out to the side? Plant the left hand, Take the right foot back. Reach the right arm up, wrapped the left. Try setback. Engage up. Press out. Maybe if you really want to challenge itself, bring the the gaze up to the right hand. Press up. Engage the side body for five, four, three to one. Come back to hands and knees. Do the right side again. Take the right foot out. Left foot back. Reached the left arm up. This time, if you want to add on here, either stay here a challenge. The balance. Lift the left leg up. Press out through the heels. Engage for five for three to one. Place left hand down, left knee down, left foot out to the outside stack. The hips reached the right arm up. Lift the bottom left ribs. If you feel like adding on, reached the right leg up and hold for five. Four. Engage three to once at the foot down. Come down onto the hands and needs wrapped the triceps back hurled a tailbone under again. Find a strong straight arm scapular pose as you engage up. Step the legs back. We're gonna hold this for another 10. Talk to tailbone. Nine eighth seven, six five four, three to one. Set the knees down. Child's pose. Rest the head on the mat. Send the arms, Ford. The heart started to race it all. Just try to slow down the breath. Relax into the body as much as you can. We're almost on. We just have one more post toehold. Try to hold plank pose again for twice as long. So this is like more of like a bonus plank. You know, if you could hold it for 10 seconds or 10. 10 count, hold it for 10. If you could hold it longer. Hold it for longer. Really? As he moved through this, the length and time that you hold should grow longer, longer. She gradually increases a body gets stronger. Don't worry about if this is your first time running through the video if you're not able to hold it for the whole time, you know, that's okay. That's why we have something to work on to. But if you've already gone through this video 34 times, you're starting to feel strong. Feel free to pause the video or just let it keep running and hold it for long as you can, you know, really start to challenge yourself. What I like to do is like to pull out a timer and place it down there and and set give myself goals. You know, say I'm today. I'm gonna hold it for a minute based on how I feel or maybe two minutes or I'm gonna beat my time last week This way. We know as the body grows. But don't worry if maybe one day you can't do it as long as you did last week because we have strong days and weeks today. So we have to account for that. So when you're ready, we're gonna come back to the hands and knees, plant the hands directly underneath the shoulders, wrap the tresses back, press the center the heart up and talk to tailbone. Remember, the most important part is finding this recruitment. It's his engagement. I see plank pose where it's like this and a lot of teachers maybe teach like this. But this pose isn't building anything, right? It's not. It's not doing anything for us. Right where Sagon were not supported, were not engaged, were not able to sustain us for any period of time like that. Every post has a purpose. Plank poses to build recruitment, to build strength toe, learn engagement, right. More muscles. We add into it, the stronger we are. You know, it's better to have 100 weak muscles in one strong one. Saraf the triceps back. Tuck the tailbone. We're gonna try to hold this for a 20 count. Do your best. Stay with me if you can. If the belly starts to sag, put the knees down, you know, try to hold hold with it. Keep good form. It's the most important part of this. If you're not keeping good form or not doing things suppress up, step the feet back, right foot back. Press the center the heart up for 19. Engage 16 15 14 you can do this. 13 12 11. Lift up a little bit higher. 10. Squeeze nine eight seven six five four three to one. Set the knees down onto the mat. Cross ankles. Sit back onto the but reach the legs. Ford. Bring the hands behind the back. Plant the feet. Lift the butt up towards the heels. Sink the but Ford and down. Wrap the triceps back. Sink down into the shoulders. Tuck the chin and it's a nice little stretch through the interior part of the shoulders. Sure, you're wrapping back. Keep it nice and healthy. Tuck the chin and hold it here and breathe last few breaths. Lift the hips up, said the but back. Cross the ankles. Roll over the knees, comes onto the hands and knees laid out onto the belly. Take the right arm. Reach it out towards the right wall. Ground the right shoulder, head down onto the mat, roll onto the right hip, stack the hips or even take the left leg and reach it back. Crawl the right hand forward a little bit more towards the front of the room than open the chest up. You may be coming to reach the left arm up or take it back. Just a nice opening across the front part of the chest. We did so much stuff that was close, shoulder working, the strength into the shoulder girdle that it's really important to counter that by opening. Otherwise, we end up like hunch backs and yoga is all about balance and finding balance. So we really want to make sure every time we strengthen something that we open it up a swell. As long as we maintain that flexibility, we state mobile and we eventually gets a lot stronger because of it. Come down onto the chest, reached the left hand over towards the left wall, rollover onto the left hip, maybe reach the left arm a little bit forward. Lift yourself up. You take the right leg, reach it behind you just to add a little extra stretch and take the right arm up to the sky. Or maybe open up into the chest a little bit more. You should feel a nice opening across the left shoulder, maybe even into the chest or the top of the shoulder If you feel any pain back off. Stretching is a very intelligent practice. You know, we have to listen to the body every time we're coming into it for finding pain. Then we're not being intelligent or practice. Come back, lift up, take the right arm across the front of Matt palm up, roll down on top of the shoulder, reached the left arm. Ford, if this is too much for you, you know, is modified by bringing the hand here or come up a little bit higher. But as we get deeper and deeper, bring the left shoulder down to the mat. Maybe crawl it 40. Ring the forehead down on the right cheek, left cheek. You know, dispensing what feels good for you. Take the breast. Nice and slow in the left hand. Back pressing underneath. Lift yourself up. Plant the right hand, Slide the left arm through. Bring the left shoulder, head down to the mat, Reach the right arm. Ford, pull the right chest down to the mat. Maybe rest and relax onto it. Really? Just looking for the sensation, not looking about to see how deep you are or how far you get the right the left shoulder, the right shoulder down. We're just trying to find this sensation of a stretch going on, opening up into the outer part of the shoulder. Bring the hand up was in a rollover onto the back. Move over onto the mat. Draw the knees and give him a little squeeze. Take a nice deep inhale the exhale. Straighten the legs. Turn the palms up. Well, the shoulders. Under finding a few breaths into Shiva Sena, give yourself a few minutes just to release and relax into this pose. Take a much time, as you need in Chivas and at least two or three minutes based on the length of this practice to kind of rest and recover the shoulder girdle takes time. It takes, Ah, a lot of effort, a lot of strength to develop this. And for a lot of us it's an area that were weakened, right, so if we take more time, we spend more time on proper engagement in recruitment of these muscles will be much stronger in the long run, though plank pose might seem impossible to hold this way by adding all that in, you know, the extending out and contracting the core Over time it gets much easier. And you could hold it for longer periods of time much longer than he ever you know, Thought you could Maybe you could only hold it for 30 seconds. Now you practice this. You know, one day you'll be holding it for 10 minutes without any problem. Thank you for allowing me to share my practice with you with love and gratitude. Low Casa must assume you know, Bob in two male beans Be happy and free home. Shonte! Shonte! Shonte Not must a
Ratings and Reviews
TraceyD
Yoga Strength Basics for Beginners has an amazing amount of quality content. The title of the class says it all. These workouts are designed to target various muscle groups in the body to build strength and stamina, which can be applied to yoga moves or, quite frankly, to living life to its fullest. Each class begins with a short warm up of the targeted body part and ends with a short relaxation. Instructor Dylan Werner, offers clear, concise instructions about how to position yourself and how to perform the movements properly. As a novice in the world of yoga, I appreciated his suggestions for beginner modifications and his pleasant and encouraging tone. The workouts have no background music, which means you can have your own music playing at the same time, if you choose. In addition, it was easy to find time in the day for these lessons, as they range in length from 18-27 minutes. Thanks to the presentation of this class as a 30-day program, where 12 individual lessons are offered twice with six intermittent rest days, I feel it helped foster a routine for me. The skill level of this class is set to “beginner,” and while I believe anyone can learn from these videos, I think it did help me to already have some exercising experience (I have been an at-home, video exerciser for over three decades.) I plan to continue watching through this class again and again because the content is so good and I have lots of room for improvement. In my opinion, Yoga Strength Basics for Beginners certainly adds to the quality lineup of classes that Creative Live offers.
Hilary Larson
Great course for yogis of ALL levels. Dylan does an excellent job of explaining how the body should be working through even the "simplest" poses in order to get the most out of your practice & grow stronger faster. Even after just 20 min, my muscles feel it the next day. I look forward to taking what I have learned and integrating it into my own routine! What a nice surprise to find an online course which gets me excited to deepen my yoga practice.
ROxanne FLeck
This is a great class, after years of bad form in yoga due to lack of strength, I am building up my core so I can rock a sun salutation. Straight forward, easy to follow, nice short classes that you can double up on if you want to work more. Super great way to start your day.
Student Work
Related Classes
Wellness