Lessons
Preview Workout
10:04 2How-To Approach This Class
01:31 3Day 1: Scapular Strength
25:51 4Day 2: Core Strengthening
18:30 5Day 3: Front Body Opening
20:19 6Day 4: Rest
7Day 5: Mobility & Movement
21:07 8Day 6: Bent Arm Strength
20:26Day 7: Core Stability
20:51 10Day 8: Back Body Strength
19:53 11Day 9: Rest
12Day 10: Leg Strength
25:39 13Day 11: Strengthen Your Vinyasa
24:56 14Day 12: Side Body & Core Lift
19:13 15Day 13: Back Body Opening
23:13 16Day 14: Standing Balance
27:16 17Day 15: Rest
18Day 16: Rest
19Day 17: Scapular Strength
25:51 20Day 18: Core Strengthening
18:30 21Day 19: Front Body Opening
20:19 22Day 20: Mobility & Movement
21:07 23Day 21: Bent Arm Strength
20:26 24Day 22: Rest
25Day 23: Static Core Stability
20:51 26Day 24: Back Body Strength
19:53 27Day 25: Leg Strength
25:39 28Day 26: Strengthen Your Vinyasa
24:56 29Day 27: Rest
30Day 28: Side Body & Core Lift
19:13 31Day 29: Back Body Opening
23:13 32Day 30: Standing Balance
27:16Lesson Info
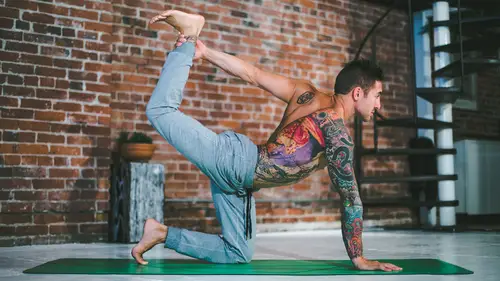
Day 29: Back Body Opening
One of the most challenging things to do is to open the back body up. One of things I see a lot of students have difficulty with is there back men's. And this is because nothing that we do in life actually requires us to really open up. The back body were always hunching forward as we sit and stuff. None of the sports that we may be did growing up had anything to do with opening up into back bends. So we're naturally just not flexible in the back, through the shoulders or anything. So it's it's a lot of work to get there. It takes work and it takes time. Let's stand up on her mats, take the feet about hips distance or a little bit wider in the hips, turned the outer edges of the feet out slight, tucking the tailbone engaged to the core. Reach the arms up through the fingers, extend out, grab a hold of the left wrist with the right hand. Press the left hip over towards the right wall, opened the left shoulder back and reach through the left hand towards the right side of the body or sta...
rt sorry towards the right side of the room. Breathe deep into the left side of the body. Inhale back up to center. Grab ahold of the right wrist with left hand reached the right hand over towards the left wall. Send the right hip over towards the right while I'm breathe deep into the right side. The body Take the back, Bend out, Open the chest up. Create a little bit more side body and extension. Inhale up. Release the arms down will shake out Take the hands around to the low back Support the sacred, um, with the hands squeezy elbows together, Open the chest up. Start pressing the thighs Ford As you press the thighs, Ford, gaze up. Lift the hard up. So I want you to think more instead of trying to lean back into it. Press the Ford and lift the chest up. We're gonna hold for three to one. Come back. Do that two more times. Sweezy Elbows back. Press a thighs for just gently opening up through the back. Bring it back up last time, send the hips foreground down to the heels. Lift the chest up. Gaze up. Come back. Release the back. Slowly full down into the legs relaxed down, create some length through the spine, has worked through back men's. We always want to think of extension extending out, lengthening the spine length in the space between each vertebra so that we have a nice, healthy, long open spine to bend through. It's kind of relaxed. Release into this inhale come up. Plant the right foot. Step the left foot to the back of the mat. Lower the left knee down, untucked the toast. Shift the hips. Ford. Slide the hands back. If you can keep the fingers along Matt, as much as you can, lift him up. Reach the arms up. We're gonna take the arms into goalpost to spread the palms. Open the chest wide. Lift the gaze up lift. The hard ups were not sinking down. We're lifting at the same time. Or coming forward. Lift the chest up a little bit more. Sink down a little bit forward and will hold for three. Breathe into the chest, too. Breathing. One. Release the hands down. Step the left foot Ford. Bring the feet a little bit. The little Why about hip's distance apart, Bended knees. Lift the chest up again. Come into this bowl Goalpost! Lift the hard up! Open up, Rechy arms! Ford! Send the shins back. Inhale, Open the chest up! Lift the heart, little Backman, Exhale Reached arms four. Take the shins back Last time, inhale lifted up Press Who the hell stand? Exhale Fold for Take the hands behind the back in relates the fingers. If you can't grab the fingers, use a strap, of course between the hands. And if you can start taking the hands up overhead or even towards the front of the room as he melt down into lakes, the hamstrings feel tight. Take a nice little soft bend in the knees. Relax the back of the head. Maybe shake the head. Yes and no. Lower the hands back down. Graze amat. Bended knees. Reach the arms up. Taken into gold posts. Open the chest. Sink down a little bit deeper. Reaching arms. Ford pulled the shins back. Inhale three. Lift the heart back to Chester. Thigh shins back. Reach the arms. Ford last one. Inhale. Sink down a little bit deeper. Exhale. Fold for inhale. Lengthen up halfway. Exhale. Step the left foot to the back of the mat. Lower the left knee down, untucked the back toast. Sink the hips, Ford and down. Slide the hands back as much as you can. Reach the arms up. Open up across the chest, lifting sink down into it. Sink down a little bit deeper. Pull the left hip back, open the chest up. Keep lifting, sinking and really working into opening up into the front body. As you lift the hard up, open the chest a little wider. Bring the hands back, then plant the hands. Step back on the whole force. Curl the toes under, sit back on the heels. Now, when we're working in the back men's, it's really important that we keep really strong thighs. Really start engage with the thighs or what's gonna help support the so, as in the front part of the body is we as we work into any kind of back band through the especially camel pose or drop back so anything that you might work on into the future and also learning how to control the thighs and control the core together. When we move into these back men's, we're going to support the core so we could go deeper, so want you to come up onto the knees. This is too much pressure on the needs. You could always put something underneath to pad the knees and the ring in the hands of the belly. We're gonna find the core stability. We talked a lot about this. Pull the frontal hit points up, Lower ribs down. Really crunched down here. I want you keep your hands on your belly just to feel this engagement. If you start to lose it, Stop. Don't come back as far now if you want, you can un talk onto the tops of the toe on tops of the feet. Keep the core engaged. Thighs engaged shall see Shape through the body. Start to lean back. Lean, lean, lean, lean, lean Keep the thigh strong. Core engaged. Bring it back up. We'll do this two more times. Really strong thighs. Pull it all in. Start to lean back. Lean back. Lean back. Hold it Here. Engage the core. Pull it back up. Notice the co Rwanda's wanted to let go or get weak on you. If that happens, don't go back us for Onley. Take it as far back as you could keep the core controlled and this really plays until all back men's keep the core engaged, startling back a little bit more, a little bit more. Hold it here, hold it. It's all right. If it's shaking a little bit, bring it back up. Curl the toes under, sit back on the heels as we work into the back body. You know, we wanna work into opening up back bends are the entire body. If you think of taking ah, piece of wire, you know, and you take it right in the middle and you kink it in the middle, you're gonna have this nine degree bend and it's going to be damaged. And if we do back bends the same way than our back is going to be damaged. So instead, you want to think about taking that wire and say long and grabbing up both ends like this and bending it smooth through the entire thing. And we think of the back men's and involving the entire body from toes, two fingers. Then we could create that healthy Backman to entire part of the body. So as we come into Camel, I want you to think of creating that healthy Backman. So we're not just into the back, but we're actually moving into the hips. Bring the hands a little back to support it. I want you to keep the core engaged, just like we're leaning back. But this time it said, leaning back, we're gonna press the thighs Ford and lift the hard up. So bring the hands the low back. Squeeze the elbows together. Press the thighs, Ford almost imagine like you're going into a wallet and lift the chest up. Keep coming forward with the thighs. Lift the heart up. Four with the thighs. Create this nice, healthy back then and the rise back up. Sit back down onto the heels, going that two more times. Lift up dyes Ford. Keep pressing, core engaged. Gaze up, bring it back. Sit back down. I really love this pose for opening up the so as and when I'm trying to move into more advanced postures and my back comments. I know it's my hips and my so s that are ah that are lacking that need to get deeper for me to get into those deeper opposes. Press a thighs forward, lift the chest up, maybe even start to gaze back. Engage the core. Squeeze the belly, sit back onto the heels. Bring your hands to your ankles. Now, depending on your back, then this might be too hard for you. If that's the case, you could take your blocks. Just lift your heels up a little bit higher and bring the hands to the tops of the blocks or even stack the blocks. But we're gonna keep the hips here so I'll show the first time with the blocks. And then we'll go to the heels and we'll show all three different levels and you choose which one is best for. You is going to come into Cam a little bit different, pressing the hands free and lift the hips up. I want you to think of pressing the thighs and hips Ford, Right? As you do, lift the chest up and keep opening up into this. Backman, You know, it might not go very far, very deep into it. But if you feel on opening through the front part of the body and a lift through the chest, then we're doing it right. Sink the butt back down. Maybe you want to try it with the hands on the ankles. I think this weighs a little bit better into the knees. Press thighs. Ford. Lift the chest up. Roll forward. Keep sinking the hips towards the front of room. Maybe even bring the gaze back. Press into the thighs. Think thighs Ford More than anything. Sit back onto the heels. Nice and slow. Same way we came up into it. Maybe you want to take it one step deeper. Untucked the toes, hands at the ankles. Thighs forward. Roll up this way is quite a bit more challenging. So only take it to your level. It's Ford. Gaze up. Support the low back with the court. Well, hold it for three to one. Slowly come back. Sit back onto the heels. Come into heroes. Pose so feet to the outside. Maybe block. Because remember, when we're working a Tabackman, the quads, they're all involved into it, you know? So as all this, um, So we need We need to have nice, healthy, flexible quads. Take it to whatever level. If you could go deeper, go deeper into it. And if you could recline back, maybe lay down onto the back onto the elbows. Hold this for, like, another 10 15 seconds come back up. Hands and knees across the ankles. Sit down onto the but pressing the hell. Slowly roll onto the back. Plant defeat firm on the mat, squeezing knees together. So it's really nice. Maybe use a phone block for this. If you have the option, take a block and squeeze it between the knees. Right. We're all different. So depending on how you have the block, it's gonna feel different for you, depending on how much space he have between the legs. I think for most of us, you know, sideways like this works pretty good. Squeeze the block together. All right. We want to engage the inner thighs. Plant the feet point the toes slightly inwards. So they're not coming out like this. It's just helps to protect the low back. Say, from a little bit more. Plant the hands flat on the mat. Run a lift the belly up. Engage. Take the certain towards the chin. Try to soften the glutes, Lift up a little bit higher and slowly lower back down. Lift it up for two. Lower down. Lift it up for three. Lower down. Four. Lower. Down. 5th 1 We're gonna hold for five for three to one. Lower the hips down, keep a little micro arch in the back, back bends of progressive. Every time we move into, we start to change the shape of the back. We change the shape of the disc in between. And so when we're moving into back men's, we want to keep that. That shaped those wedges, all going in the same direction. That way, we get deeper into it. It's healthier. Go for another five. Plant the hands. Lift the hips up lower down four. Three to last one. Hold for five four. Try to smooth the breath three to one. Set the butt down. Take the block off to the side but the knees fall over to one side. Take little twist. Gays over to the right. Bring the knees back up to center. Take it over to the left. Little twist Gaze through left back up to center, Little rock roll up, Plant the feet. Now we're gonna work into a full wheel. And to do this we've spent a lot of time opening up into the so as and the hip flexors and also into the back and into the upper back. So Now we need to open up a little bit more into the shoulders and we come into wheel. This is really where I see a lot of people struggling is they're not open enough through the shoulders to properly come into the post. So let's come over to the wall, plant the hands on the wall, walk the feet back, you know, just a couple feet back from it. It was sagged. The heart down wants you to really think about opening up into the chest as much as you can. We do this. Another video on a chair. This is just a little bit of a deeper variation into because it really want to open up the back to get into this deep Backman, sink the heart down a little bit. Lower melt into it, pressing in the hands engaged in the chest. Slowly lift back up, lower down. Melt the heart, Ford and down. Think of taking the head down to the mat, even create a little arch in the low back, but still keep the core nice. Engage sag deeper into it. Open the shoulders up. You should feel a nice opening across the chest and the arm pits. If you feel any kind of impingement Back off, press in the hands lifted up slowly last time. Melt the heart, Ford, take it down. Lifted backup. Walk the feet in. Now, this last part is really optional. You know, depending on where you are in your practice, you might not be ready for it. So I don't want you to think, Oh, I can't do it. I'm not. You know, I'm not there or whatever. It takes time to open up the body. Everything that we just did was to prepare it, so this doesn't work, and you can't come into wheel pose, which is an expose we're going into do the first part of the video, you know, repeat it week after week. Eventually the body will get there like everything it takes time and back bends, especially, take a lot of time. And if you rush it that you're gonna find injury, but, you know, work out it, take it. So we're going to come into the last pose. Uh, the last opening pose that we're going to dio, which is wheel pose or Irv Adani. Rocinha, upward facing boat offered facing bow pose. All different names. A nice, healthy way to do it to start out now. If you already have a great back, then that's awesome. You know, work it to keep working forward into it. Back Pens could always go deeper. They could always be more healthy. Take the blocks, place them up against the wall. You know I'm not gonna move my mouth right now, but feel free to move your mat. Come down onto your back. We're lay back down. You bring your hands to the blocks. You want your head right in the middle. Right? Right in between here. Plant firm onto the Met. When we come up, our palms are gonna come on top of the block and our fingers are gonna be on the side of the block. That's where we want to be. We're first going to see it. Start by lifting the hips up, pressing into the hands, lift up and set the crown of the head down here. Try not to put all the weight in the head, but keep it in the hands, right, engaging your quads. Squeeze it together. And if you can press up, lifted up, maybe the arms go straight maybe they don't. If you could get it all the way up straight in the arms up and we're gonna start working the chest, Ford, take it to whatever degree that you can. Maybe you're super open and you could come all the way in like this. Maybe or not. And you're somewhere like this where it's gonna hold it for five, four, three to one. Talk the chin. Lower down. Keep the arch in the back. We're gonna come into one more time, you know, do the best with what you have or what you could do to make it work for you. And you're ready. Keep the hands on the blocks again. Press into the feet. Make sure that the quads are nice and strong. Quads are gonna help lift you up. So you have a lot of quad strength their plant firm into dance, pressing the arms. Hopefully have enough arm strength and get you there. Lift the butt. Bring the crown of the head down to the mat. Keep the arms elbows squeezing in. Nis squeezing in here. Press it up. Hold it here for five. For whatever degree you're in three to one tuck the chin, Lower down, relax and release. Take one more back meant. But this is a nice restorative Backman. I really, really enjoy this for the upper back. Ah, you know, just cause we do so much opening through the low back. We don't get a lot to the upper back, So foam blocks work best for this. Just cause they're a little bit softer and more comfortable again. You work with what you have, and if you could go out and buy a set of each one, that's great. They're not that expensive. But if you only have one set, you know, do with what you can. The lay back. I want you to take the sideways block right across the shoulder blades that bring the other blocked to the back of the head. Alright, this might not be deep enough for you could bring it back like this, but this should feel pretty good. It's not about getting crazy deep into it, but it's more about just opening up into the front body. Take the arms out like this, like take the feet together into Vodicka Nossiter bound angle and open up into the chest. Slow down into the breath back. Men's could be really, really challenging, you know, work into it. And like anything, if we're not good at it, it makes it harder, and we don't want to do it. You know, we're always resistant against the things that we need the most. You know, people that are good at back men's due back men's all the time and they become great at back bends. People that are strong, they do all the strength stuff all the time. They get great at that. People that have bendy, uh are flexible hamstrings. You know, we usually play to our strengths because that's what makes us feel the best about ourselves. But really, you know, a smart practitioner strengthens their weaknesses so that they could have a well rounded practice. And when you start doing this, then you really notice a difference. You know, you really notice that you build, and then eventually that thing that you were so week at that thing that, you know you hated it becomes something that you love because you changed it. You know, now that you are open now that you're strong, now that you're capable now it's like, Hey, look at this and really, when it's when it's that way, it's like, Look how far I came and it's so much more rewarding every time I come into oppose or like, you know, when I really warm up and I could get into the splits or if I really warm up in my back and I could get really deep I'm like, Wow, I feel so good about it because I had to work so hard about hard at it, you know, if I could do 20 Charter wrong is whatever. I don't feel that great, because I have to work that hard at it, you know? So are you really going to find the reward in the things that you don't want to dio? You could spend the next few minutes here like this, just really enjoying this pose or if it's getting too much for you, you know, lay down onto your back and enter into Shiva Sena. Spend the next two or three minutes either in that restorative back bend or to three minutes in Shiva Sena religious letting go, being free. Thank you so much for allowing me to share my practice with you with love and gratitude. Look awesome. A Stosic. You know, Bob in two male being to be happy and free home. Shonte Shonte Shonte must
Ratings and Reviews
TraceyD
Yoga Strength Basics for Beginners has an amazing amount of quality content. The title of the class says it all. These workouts are designed to target various muscle groups in the body to build strength and stamina, which can be applied to yoga moves or, quite frankly, to living life to its fullest. Each class begins with a short warm up of the targeted body part and ends with a short relaxation. Instructor Dylan Werner, offers clear, concise instructions about how to position yourself and how to perform the movements properly. As a novice in the world of yoga, I appreciated his suggestions for beginner modifications and his pleasant and encouraging tone. The workouts have no background music, which means you can have your own music playing at the same time, if you choose. In addition, it was easy to find time in the day for these lessons, as they range in length from 18-27 minutes. Thanks to the presentation of this class as a 30-day program, where 12 individual lessons are offered twice with six intermittent rest days, I feel it helped foster a routine for me. The skill level of this class is set to “beginner,” and while I believe anyone can learn from these videos, I think it did help me to already have some exercising experience (I have been an at-home, video exerciser for over three decades.) I plan to continue watching through this class again and again because the content is so good and I have lots of room for improvement. In my opinion, Yoga Strength Basics for Beginners certainly adds to the quality lineup of classes that Creative Live offers.
Hilary Larson
Great course for yogis of ALL levels. Dylan does an excellent job of explaining how the body should be working through even the "simplest" poses in order to get the most out of your practice & grow stronger faster. Even after just 20 min, my muscles feel it the next day. I look forward to taking what I have learned and integrating it into my own routine! What a nice surprise to find an online course which gets me excited to deepen my yoga practice.
ROxanne FLeck
This is a great class, after years of bad form in yoga due to lack of strength, I am building up my core so I can rock a sun salutation. Straight forward, easy to follow, nice short classes that you can double up on if you want to work more. Super great way to start your day.
Student Work
Related Classes
Wellness