Lessons
Day 1
1Day 1 Pre-Show
10:54 2Flexibility & Creativity
1:34:54 3LIVE Photo Shoot for Brushes and Backgrounds
28:38 4Creating and Using Brushes and Backgrounds
1:48:23 5Finishing Touches
53:22 6Day 1 Wrap-Up
04:52Day 2
Lesson Info
Photo Shoot: Unusual Portrait
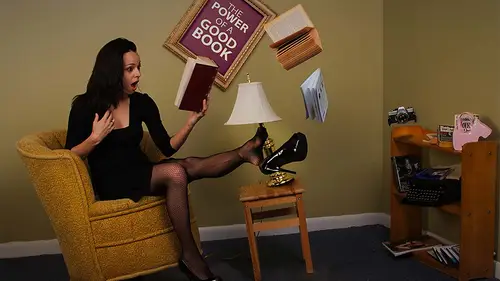
this is my new favorite thing to do is to to really embrace the idea of using photo shop and my camera together. So instead of just taking a photograph of enhancing it in photo shop, it's more taking advantage of that. So the course graphic with this one was the picture of the girl in the chair or living flying around. So we're gonna recreate that and a couple things to make note of right off the top. And that is you have toe almost. At least I think I feel like I have to change my mind set to use that those couple key phrases end up with the look that I want and think like Photoshopped. So, for example, if we look at the set I have right now in my shot right now there's a couple of C stands that are both in the shot and casting a shadow on the background, and normally that would be a bad thing. But it's not in this case because I'm gonna use them for a bit and then remove them so they won't be there anymore. So I'll have some shots where the floating things like the alarm clock. Anyth...
ing else are in the shot with the C stands or other ones without the C stand. So it's so much easier than the problem most people have is, they say I need to take that out of photo shop and you're making a tool like content aware, invent information here I'm using. The information's already there on the words, I'll have a shot where the wall behind the C stand is visible. So there will be much easier for me to combine them and say, Make it look like that. See, Stand was not there. So eventually we gonna have a model in here. But initially I have to get some shots done with the other pieces. So I'm gonna end up taking a series of photos and I'm gonna try and keep everything as consistent as possible. So the lighting is in one place. My camera's locked down on a tripod because everything I want to do, I want to make it easier to put them together in photo shop. So the mistake I made early on as I had ideas like this, but then I would take a shot and then five shots later, zoom out a little bit to get a bit more. And then I realized Now I just made my life way more challenging because they're not all the same. So find the right angle, set it up the way you want, lock everything down. So from then on, the only changes you make will be to the set and the positioning of the model. All those things. When you put it together in Photoshopped, it's much easier. So can I walk over here and show you a couple of things that we got going on here? So I wanted to look like things are kind of tilting and flying. So, for example, the bottom of this table, we got a couple of pieces of wood underneath there, so it looks like the tables tilted. Well, it doesn't look like it. It is tilted. But the ideas I'll take some shots like that and then I'll take out the table in the wood and I'll have exactly the same shot with the actual floor underneath. In other words, instead of trying toe clone out pieces of wood, I'll just replace it with the floor that's actually there, and that's the kind of the recurring theme is Instead of trying to make your life more difficult, we're going to say thinking like photo shop. And if I had a table with little piece of wood and then a shot exactly taken from the same angle without the piece of wood, it will be so much easier to make it look like it was never there. So eventually it'll look like the tables actually tilting of its own accord. Same ideas. The alarm clock wanna look like it's flying off the table so it's suspended on a will be sufficient line off of a C stand that you can currently see. But eventually you won't see that same with the book and everything else even back here on the bookcase. Got a couple pieces of wood underneath the globe for the same idea so that initially when I take photos with the globe in them, you'll see the pieces of wood. But then eventually, I'll take the wood and the globe out, but the shelf will still be there. So then I'll get the rest of the wood underneath. So what? This is the whole premise here is instead of me trying to get Photoshopped to invent pixels. I'm using pixels from different layers to combine them together. And the first time I did this, I didn't think it out very well. And it's like anything else is a learning process. So this time, I think Okay, I'm gonna see the first time I was worried about keeping the C stands out of the shot, which made it much more difficult. Now, I don't really care, because I take a bunch like this and then move everything out and then start building together. So this is a kind thing where it takes more time to set up and think it out than to actually do the photo shoot because I don't need ah 100 photos. I might need 15 or 20 but planning it out and taking these five and then moving a few things and making another five, making sure that my camera never changes because it moves a little bit. My life is gonna be more difficult in photo shop, and I'm lazy. I don't want to do that. So I want Teoh let the set up here help me get it done more easily when I bring things into Photoshopped. So that's kind of the idea here. And you can, of course, go any direction you want. This is just one example in the next segment, when we put them together, I'll show you another example. I just took some photos outside with someone with the intent of putting together a photo shop. So whether you're doing it like this in the studio, set up or outside, the one factor never changes. Put your camera on a tripod and lock it down and don't change. And if you're outside use, don't use aperture priority. Something where it will change on the fly. Locked the camera settings down so that even the exposure and everything is the same here. It doesn't matter. I've on manual mode because of the lighting we have in the in the studio. But those are things they're going to cause you grief. If you're taking a series of photos outside and you suddenly realize that you go to put them back together, they're slightly different because the exposure changed over the 10 minutes you're outside. That's gonna make life more challenging. And this is all about This whole concept is about creating something really unusual but not taking hours to do it in an ideal world would take on our to set it up a little bit of time to take the photos and then not that much time and Photoshopped to put them all together because we're talking about layers and masking and all those things we've been talking about throughout the whole process. So that's kind of the thought process. Everything I'm looking at here, I'm always thinking ahead, too, taking the pieces of wood out. So when you take a few shots like this with everything in here with all the C stands, everything else and gradually kind of take pieces out so eventually we'll just have the chair with the model and then start working with Jenin in that area. So I'm gonna start off by taking a few photos of just kind of my base information here to make sure it's all good. I feel like my shoes air really noisy because I have these tap shoes on here, I think. All right, so let's do a quick little test shot to make sure we're looking good with our tethered nous. And for those people that care about this kind of thing, I'm on F 10 that one sixties because that seemed to work well with this lighting set up. All right, So already that looks pretty good. And I'm not looking at the shadows on the wall cast by the C stands is again That's eventually not going to be there. So just to make sure, I'm gonna take a couple more. This is the one downside to being by yourself is I don't like the angle of this book, so I have to try and get a different angle so you don't have someone to stand there. Then you just have to kind of go there, that one trying captured at a different angle. So it looks a little more interesting. I might also move it a bit. I want to see that. I think that looks more interesting when you could see the pages like that. But now they're looking. I think I want a little further over. So let's move this. I want to give myself some variety, and I also eventually we're gonna have a photo or up some words in that frame. So if I put something right in front of it, it makes it more challenging this is like mesmerizing. Isn't watching moving books and China pick your timing. I like that little better, I think. Well, it really doesn't. And it's what I think makes it fun is that you have to think ahead and go. I know eventually I'm gonna take this out, Gonna add this in. So I don't have to kind of change my vision a little bit to not be right normally be distracted by the big shadow going right on the back wall. But it doesn't matter, because it's not gonna be there eventually. So this Stan has served its purpose. There is no shadow, Right, Dave? Well, in this case, there is no shadow. So let's just get this out of the equation completely. I don't need any more. So this is kind of the process. Now that I've done that, then I'll just take another photo to make sure that I've getting one. Where I've now eliminated whatever shadow was in the background. So you have to obviously do this to make sure that the pieces are the way you want. But now all of a sudden, I've got one that's clean on that side, so you don't have to worry about that anymore. Um, the alarm clock is looking kind of way I want it can't really see that camera too much, but I'm not too worried about that. It's not. Looks pretty good. I think so. Now I would start looking at these other pieces, like this table tilted. I don't think I've got what I need with that, he said confidently. Like It's gonna work and let me just add a lot of this is the first time I did this. I messed up at least three times where I move something too soon and regretted it instantly. So you have to kind of think out the progression of shots where you're making sure that your taking pieces out gradually and I need one that has a little bit of the shadows that's wanting to make sure there's one on the table, but now will have one with where you see the floor is clean. So then when I goto remove the little blocks of wood instead of me again trying to get Photoshopped to invent those pixels, I'm going to say, Well, they're already there. I just need to combine them together in different ways. So now we do the same thing bit by bit. So our lamp clips, which, by the way, is apparently a new technology because it's a lamp that actually isn't plugged in. So it's If I was really paying attention, I would have taken the cord and put that on like a wire, so it looked like the court was flying. But we're not going to in this case. Not that I need to take a couple every time. But I always tend do just to make sure, Even though nothing's changing, I want to make sure you see there's a slight difference between them. So that's not a bad idea to do that kind of progression like that camera guy would like to know which camera your years in there. This is my D Um, as we discovered yesterday. An interesting thing is that sometimes if I'm working by myself, I do like Teoh use interval timer shooting. But apparently it's a known fact that if you have a D 700 late room four, you can't do both. So if you shoot tethered, you can't do interval shooting. Unfortunately, because sometimes Afghan, if I was by myself. I want to experiment with an angle. It might be easier for me to stand over there and try different things as the cameras automatically shooting here. I can't do that. Today is because of the nature, so I put in more milers going back and forth. But that's okay. I forgot to mention also once I focus where I want to. Initially, I locked them, focused down so wouldn't keep trying to focus on something else. So I'm trying to keep the focal point pretty much the same. You can see there's a globe there with the piece of wood, and now it's gone. So the end result is when I put them together, I'll put the globe, but then start cloning out the wood are the little wood pieces so that the top of the shelf comes into play, so the net result hopefully will look like that. Globe is tilting of its own accord, so that's the kind of thought process you have to go through. So when you're building the pieces a bit at a time, then it makes better sense to say well out now they hopefully the global look like it's tilted and that'll camera look like it's bounced right off the top of the shelf because there'll be a gap underneath it. And the only thing I may need to add artificially is a few shadows, because if something was floating on top, it wouldn't just there were probably tend to be a little bit of a shadow, but that's easy photo shop stuff to do. And, Dave, do you go by memory or do you make yourself a sketch to figure out a plan, this whole thing out for when you're sitting down with Photoshopped, you don't forget something here. I don't the first time I did it, I probably should have at least thought it out better, because in my head I was like, Oh, I could just take this out Then I realized when I did because of my lighting, I didn't have the shadow that I needed. So I ended up trying to go back three days later and put things back in the same position, which was really, really difficult. So this time I've I thought it out more. Is that okay? I mean to progressively take things out and make sure that I'm doing it in order so I don't end up. But I mean, at worst. If I, for example, moved the sea standing thought later, I shouldn't have moved that. I can always put it back because it really all I'm using that for is the alarm clock and the other little camera hanging. So there's a level of a certain point where you can make those decisions now, Um, okay, so now we can take this other standout for now. I'm gonna use it again later on for something else. Movie things with flying, everyone Alarm clocks going off. Um, OK, so let's get a couple with that and again as a reminder, the empty frame on the wall. I deliberately did that because I have a graphic that I want to put in there. But instead of printing it off large and actually sticking on, I'll just put in later in Photoshopped. So that's one of things where it's cheaper. I don't want to use my expensive ink and paper to print something just for this purpose. Plus, I could change my mind later as to what graphic it really is that I'm using. So this point now I'm ready for our model Jen. Now everyone's different the way they work with models. I have this thing where I have a very poor ability to explain things to people what I have in my head. So I've already we already talked about a little bit, but I would explain what I was doing. But this is literally what I would do. And that's is why there's a whole collection somewhere, really awkward behind the scenes photos of Dave, because I'm, like, posed like this. And then someone takes a photo like, Really? Did you just do that? But by the time I say bend your back and turn, I just that doesn't work for me. So I just go do this and then they go exactly like that and like, Well, better so like in this case, I'm suggesting that Theo idea behind this is that you're sitting on this chair reading a book and you're so blown away that you're reacting. Don't take a photograph. I know you're gonna do it. But don't do it. So to me, it's just easier to explain. And also in this case, because this chair already has a bit of a tilt in it. So you're gonna have to kind of find the balance point. I suggest if you sit closer to the front, there are a couple of pieces of wooden hurry to try and make it tilt a little bit more. So at first, from a safety standpoint, safety first, I'm gonna have you sit in here and I'm gonna position myself just so we can kind of play with and you can find the right kind of angle before the chair tilts too far. So Okay, so that's a yes. No, that's good. And then we've got the official book she's going to be reading. So this is the book, and you want to kind of have a point where it's almost like you're reading an arm's length is we don't want to block that light too much and then react. So this is in this particular shoot. Jen has to be a bit of an actress, is not just pose. It's facial things and reacting. And it's the whole Oh, my gosh, this book is so amazing. I'm blown away, Get it blown away. That's why the whole thing is the theory of how this is gonna work. So Let's just do a quick little have fun and I want to make sure everything looks. It's looking good, so we'll just wait for the 1st 1 before we take a series of them. That's pretty good for the 1st 10 is a pro, All right, let's take a couple more. Put the book down just a little bit lower if you could. Perfect again. Very nice. And she's already doing what I would suggest is that someone who gets the ideas? I don't want just 15 of exactly the same photo because that gives me nothing to work with. So slight variations where chair the chair stays the same. Let's do a couple more where you're kind of trying to sow. The chair kind of tilts back a little bit. I don't I don't want to capture you actually doing a backwards flip. So perhaps not quite so energetic. That actually works really well, though. Thistles more. I'm terribly frightened by this book. Thats a keeper as actually it's like so this is like don't read horror books right before you go to bed, because it's like, OK, that's really good, though. So now the first time I was doing this one. Something that the model Tiffany I was working with that point did. She kicked her leg up in such a way that in my head, I thought, boy, she really kicked your leg, that her shoe might fly off. And that's what led to this idea of saying Shoo fly off, but again, trying to coordinate. Okay, I want you to lean back and kick your shoe off it. Exactly the right moment just became too challenging. So this is where we go back to introducing our Why not let helpers help us in this case, back to R C stand. So I put this here. I really need this anymore. Alarm clock is like taking away stop. All right? Somewhere I have tape. If the Internet says that, don't worry. No one's watching your awkward posing right now like no one's watching this or not. Yeah, they're really 11 this day. They're just saying that just a great way to when you pre think and pre visualize a shot that it really turns it into something that goes further and seemed better when the model does all the work for you and then actually ties her own shoe up there instead of me doing it. Okay, get it here. Just take this little bit. And do you use this in in your commercial work as well as your personal work? I mean, yeah, this is something it still fairly new. So I'm trying all kinds of things, but it's for me. This is kind of opening up interesting possibilities of just trying and seeing, You know what this will do and how will This will work. But, you know, honestly, the concept you could be shooting some photograph of a product where it's so shiny that it would be almost impossible to get it in one shot. So why not take four shots where you change the light in each one and then put them together in Photoshop or something like that? So that's this principle could easily be used with that whole my favorite expression. End up with the shot you want, so if it means you have to take five of them, so that ends up looking the way you want. That's kind of the idea. Okay, So if you can do the same path thing and just roughly position there you go to adjust this slightly. Now this chances are that she was gonna move a little bit. But that's OK. We'll just take a few. We get. See it will get if we can do one more. But this time kind of the expression, more of like blown away. And then try and maybe keep your your left hand a little up like, yeah, something like that. Thank you last night. Yeah, yeah. Now what's likely to happen? I'm noticing through the tethering you can see there. Sometimes there's a slight difference in the light, but that's OK, because we're gonna combine them and, for example, some of the back wall or where the floor is or something. I'm not so worried. The fact that you can see in this shot of the fishing line very clearly it's OK because in another shot I have one without that there, and that's kind of the thought process have to go through is not looking at that one photo, because if I was going to give her just this by itself, but that would be weird, but but also you, you wouldn't because you still have more work to be done. So that's and I that's get T shirts made. They end up with dot, dot dot because that's really the a recurring theme. All the time in this is you need to think from a creative standpoint we don't want to end up with. And it may well be that I love the angle of her foot and shoe in this one, but not her other leg. So I may even take another leg from another photo. Mean we'll see when we put them together in a photo shop. And this is where taking two or three variations on this is what's gonna make a difference. Thank. So let's just do a few more just to give ourselves some to pick from. Wait for that shoe to kind of move around a bit. Sorry. I'm waiting for the shoe there. So area Okay? Ready? Now It's good. Now it's going the right direction. There we go. Perfect hand for Jen. And her gymnastics was doing there. Okay, so that looks pretty good. So we'll take your shoe factual. You can have it back again. Yeah, So you can take a break for a minute. And by the way, I didn't say this up front, but I deliberately there. There were plenty of people here that said, I can help you move this or move that And I said, Actually, no, thanks. But I know a lot of people out there viewing are one person operations. They don't have an assistant that says, Can you move that? Can you have that? So while there lots of people who could have done that here, This is how I work every day as I am by myself in my studio, and I'm walking over going just that light move that C stand. And I wanted to do it that way because that's a little more realistic and also shows you can do it. If you think out kind of thought process, you don't have to have someone says Quick, move that over there. I mean, that's a nice thing to have if you do have someone to help you. But the point is, you don't need someone for that purpose. So the one last thing that I see I need to do the chair has little bits of wood underneath that we help a little bit tilted. So far, every shot has that in it so I need to take that out of the picture. Wait. This is where an assistant wouldn't be a bad idea. Oh, that's a lot heavier than it looks. Okay, this is great. I'm showing all my great sides. I'm sure as I'm standing from the Cameron bending over, we're bearing it all on Created live today. Now we're doing this here in the studio and taking all these shots, so I have things to work with. But here's a thought for you in any situation. And I think I mentioned this in one of the other days. But just to make sure go over this again, talking to a wedding photographer that was have this problem. I took a group portrait, the family formal portrait. And now Uncle Jim on the end is just out of favor. Can you just take him out? And his problem was taking someone out of a photograph, which is not easy, because again, you've gotta have photoshopped somehow estimate with content, aware there's a building here and there's a tree there. And I said not just for the take Uncle Jim part out, but I suggest anyone doing outdoor portrait's take a photo that's empty before anyone standing there. So just like this principle now, you have a photograph with the actual building in trees. So then when Later on you decide I need to remove someone. You're not really removing them. You're replacing them with the background. This really there, So you can kind of see the progression. So each of those is going to be a layer, and then within that will have other layers that has jet in there. Although I think that bottom left one is pretty much keeper. That looks pretty darn good to me. That's pretty cool. Um, yeah. So that's the thought process. Now, the only other thing that I might consider doing if I was worried about it. And I'm not in this case and I just knocked my tribe on, which is great. Anyway, Jan, if you could come back for one more second again. Big collapse for you in the in the rooms here. There just lots of collapse for you, for both you guys. Now, I didn't in anyway, measure if that's in the right place because my thought at this point is she has got great expressions. I have no worry that I need to change that. But this would be the one place where I might consider zooming in. So I got more detailed just in case that when I'm putting the layers together, I'm like, I wish I had a shot of her face or something. So I'm thinking there's very little chance will actually really used these in this situation just because she looks been looking so good. But I don't mind. And I'm changing up my focus and chairs, not in the same angle, but doesn't really matter, cause all I'm doing is kind of looking at so just really looking at your face at this point. So just a couple. Yeah, that's fine. And just a couple of expressions, the same kind of ones you were doing before, and one more for good luck. Here we go. Now that's more of a backup planks. I really don't think we'll need them, But if you're working with someone who is having a harder time expressing themselves and getting into character, that's not a bad theory. Is toe have some of those, and plus it makes for great blackmail later on. If you really want to say remember I have this photo of you making that face. So now it's payback is there's some of me doing that, and now there's some of her as well. So that's in a nutshell. That's kind of the idea things he really didn't take that long. What took longer was thinking it out, setting it up and kind of planning it so that everything would be gradually removable, like take out the C stands, then take out the table with the little pieces of wood All and my might even get to the point of having well. I did really have nothing else except just the bookshelf, because that's the one part that staying constant. It's a really good idea when you're doing this, toe have at least one element that never changes like the bookshelf, because even though I'm on a tripod and in this case I know I nudged it at one point by mistake. If there's even a subtle change by having one thing that stays consistent, you can use that as your element a line things up. So by having something that never changes, even if it's like just the corner of the wall, you at least know that's a frame of reference you can always use to make sure when it comes to pulling these things together, that it's gonna work.
Class Materials
bonus material with purchase
Ratings and Reviews
a Creativelive Student
Dave is an incredible and entertaining Instructor! Easy to learn from, yet so knowledgeable about the needs of small business and creative artists. I've gained invaluable workflow and productivity knowledge that will bring extra hours back into my life. I'm all about efficiency, quality and ease in work practices, while maximizing the capabilities of Photoshop in a whole new way I never thought was possible with this software. Dave's course is an absolute "must have" in one's arsenal of photography and business tools! Information in this course is well worth the price of the course compared to what you'll gain back 10-folds on your ROI! I hope to see him back to CreativeLive again soon! What a joy to learn from him! That's some fancy footwork in Photoshop Dave! ;-)