Lessons
Day 1
1Day 1 Pre-Show
10:04 29:00 am - Why Does this Class Matter?
39:15 3What Do You Want From This Class?
29:46 4Getting the Word Out
29:31 5Aggressive Marketing
25:49 6Marketing on a Budget
20:34 7My Pricing Strategy
30:19Pricing Catalogs
34:35 9Pricing Q&A
18:27 10Radical Pricing and Most Successful Advertising
20:26 11Pricing Phone Call Example
32:59 12The $2000 Average
23:04 13Day 1 Wrap-Up
04:21Day 2
14Day 2 Pre-Show
10:58 15Equipment and Indoor Lighting
30:27 16Outdoor Lighting
14:52 17Posing Indoors and Outdoors
33:51 18Indoor Shoot: Senior Girl, Lexi
27:31 19Indoor Shoot: Senior Boy, Shawn
18:37 20Indoor Shoot: Senior Girl, Raven
19:53 21Shoot: Outdoor Rooftop
34:49 22Scratching Things off the Board
28:56 23Underwater Photography
52:57 24Review of the Day
07:09 25Day 2 Wrap-Up
04:17Day 3
26Day 3 Pre-Show
10:17 27What's Left on the Board
15:06 28Speeding up Your Workflow
35:13 29Workflow Q&A
23:38 30Overview of Adobe Bridge
45:05 31Camera RAW Workflow
30:22 32Perfecting the Eyes and Proof Building
45:54 33Sharpening, Album, and Action Building
35:20 34Thanks + Credits
03:29 35Colors and Backgrounds
34:13 36Liquify Tricks
21:59 37Day 3 Wrap-Up
08:39Lesson Info
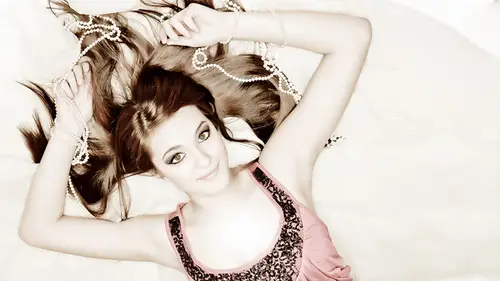
Outdoor Lighting
I use the Canon 600 flash literally on top of my camera. All right. Right on top. The camera on the hot shoe. No, diffusion. That's probably a question that you about. Wait, what diffusion do you use? No diffusion. Internet world. There is a little pullout thing. I do not pull that thing out. There is another little flappy thing. I do not pull that flappy thing out. None of that stuff is pulled out. Its raw light pointed directly at the subject. Okay, the camera set up is the camera is set on a aperture priority, Meaning? I'm going to choose the f stop. The camera's gonna automatically choose the shutter speed for me. Okay? Because in the portrait world, I'm more concerned about the blurry or lack that lat More burl, blurry or lack or less blurry backgrounds. Then I am what shutter speed I'm firing at now. Depending on you and your way of photographing, you may be not on a tripod, and thus you may be concerned about your show to speed because it's getting dusky. The sun's going down. M...
y goodness, you looked through the camera and your eighth of a second and you like, Uh, what am I gonna do? You know what I do? I take the picture, man. I'm on a drive by. Okay, But I promise you, I promise you anything less than 1/60 of a second hand held. Even if you have an image to Billy Lenz, you're getting blurry pictures. I don't care if you're like this. You know, Mr Super Stable, you cannot be a stable as that dry pod. It simply cannot happen when people complain to me and say, Oh, I bought that lens. You said Kirk and I'm getting nothing but blurry pictures. My first question is, are you on a tripod? 90% of the time? The answer is no. And then I'll say Okay, no problem. I don't mind you being upset. Put it on a tripod, do the same thing you just did. And now ask, Do I get blurry pictures? It's only about 10% of the time I get an email reply and back to me that says, Yeah, I'm still getting blurry pictures. Well, no, not necessarily. Because that also depends on how wiggly you are. I'm real wiggly, so mind stays on all the time. Okay. Okay. So yeah, that's Ah, just at the pens. Sometimes this has been things wrong with the camera. There's been things wrong with the lenses, so there's all kinds of things that could be going wrong. But for the most part, Tripod solves all your problems before itself focus. But the camera set to the A average priority mode. I primarily start at F 5.6, went outside, and I either go up or down from there, depending on how blurry do I want the background? I want more blurry background. I start going F four F 28 If I want a less blurry background, I go. 63718 that kind of thing. So I go up and down before the most part. I'm hanging out at 5.6. All right, The Matrix fall the super techies out there. The matrix is the default matrix. It's the way the camera ships, which is the dot with the circle in it. Okay, that's it. The color My color setting is at 5400 k Everything I shoot whether I shoot a wedding. If I'm inside outside natural life, I mean fluorescence. It doesn't matter. Everything is shot at 5400 k I literally have it set. Kelvin Setting 5400 k Where does that come from? Let me tell you in the studio my lights, my situation, my soft box, my colored walls, my floor, My everything all adds up to a long series of testing that I found that when I shoot in the studio at 5400 k I get perfect, perfect, perfect color. There's a whole bunch of tests I did when I first went digital, and every time I get a new camera, I go through that same Siri sequence of tests to find out if 5400 k is still the magic number. Now when I go outside, 5400 K is not always the magic number, however, I'm shooting raw, so thus in the software. When I do my raw conversion, I know that there are some parts of my studio that a warmer outside than other cooler areas like for example, the front of my studio is very blue, very blue. I literally get to the point where you start seeing it. I work outside. I'll go. Oh, wait, is blue today, you know, and I don't know if you can literally train yourself to see it after a while there. Certain areas behind my studio have a big, giant oak tree back there, and it is green. All the light come filtering through those green leaves, and it is very green back there. But because I'm always at 5400 K I always know exactly a starting point. So when I'm outside, I need the trees. I know how much Kelvin slide inside the software to make to get me to proper exposure. When I'm outside in the front of my studio and it's super blue, I know how much to slide my Calvin slider to get perfect exposure whenever I'm inside of a Catholic church. I don't know. I must be a rule about a Catholic church. They all got the same color. I know exactly how far to adjust the three Kelvin slider to get a perfectly exposed image and color inside of the church, so it just depending on the situation that I'm in by shooting everything at 5400 K in raw, it allows me to have a starting point that I'm able to adjust from there. If you're on a Internet world, stop. No. Take your camera off A. When it comes to your your color setting, take it off auto color. And that is because your brain is way more powerful than the camera blood brain. All right, the camera brain takes into the entire average. Seen while it may see we this is blue and want to make an adjustment. It's not going to make the adjustment the way you can. You will get much more consistent images and much more consistent results if you always have a the same setting as opposed to let the camera constantly move that color all around. So that's just thought for the day. I bet you have a question or common. Yeah, we just got a question from the Internet. And Kirk, how do I should I use a on my camera? Unclear. Okay, just reiterate has an aperture priority. Yes. Okay. I mean, maybe you're gonna send f stop. The camera's gonna shoes color Now. I almost think I really don't. I just know I can hear you talking out. I e not saying that to not use it. The White Balance Day It's like when you came from the manufacturer like a WB. No automatic balance. No. A WB. Yes, no auto white balance. I don't know what you're setting is take it off the A W B auto white balance. That's what I'm saying. But the A is for his aperture priority. That's how I shoot outside. Did I clear things up? Hope? Yes. All right. Good. Now the flash itself is set to the e t T L Mode came. That's the setting on the flash. E t t l has motive is t. T l. This manual. There's all sorts of different settings. The one that I haven't said to his e t t l and I physically, manually, that little dial in the back side of the camera. Excuse me, Flash. I have that flash dial manually set to minus one and 1/3 minus one and 1/3. And that is before I get to the very last point that that's all my settings on the on the flash and the camera when I'm outside. Now here's what is happening here. The Internet. It's gonna be funny. I know the exact next question. I just I just heard it is I have a chat room in the head syndrome anyway. I know it happens when you teach that creativelive measure. If they told you so. First of all, all this, what's happening is this. The camera is making the exposure setting. What happens is what the Flash is doing is just providing me a little bit of Phil to the shadow areas. That's all it's really doing. And more importantly, it's evening out my color because it's only spitting out of flash that's minus one in the third. Now the unique thing about the canon system is that the flash is talking to the camera and the camera is talking to the flash. And so when kaboom, it all goes off, those two guys talk to each other and the flash while manually set to minus one. The third is adding a slight amount to the exposure, and the camera is setting a little bit with the flash anyway. The bottom line is, what you get is a properly exposed image. If if if you look for good directional light, another weird thing is like if I was to take your picture right now, click black man black shirt. You would freak out my camera, okay? And I would have to make an exposure adjustment right here with my thumb. I'd have to add a little bit of light because you take away a little light because he would confuse the meter. The meter is going to try to turn everything gray. Okay, Same thing. I get a white guy with a white shirt, it's gonna be just the opposite. Okay? It's gonna be this. It s so thus I do have to along the process. It's never, ever perfectly nailed exposure. But after a while, you get the way you see this happening in front of you and you make the exposure adjustment before you ever pull the trigger. So that is a few little adjustments that you're gonna have to do. And what I sit mean when I say look for good directional light is that you cannot Now that you have your flash and camera all set up just willy nilly, walk around outside and go. Oh, I'm gonna take a picture right here. Click. Oh, take picture right here. No, you've gotta look for nice overhangs like we would talk like way went to dinner last night. There was this overhang and the light was coming in nice and directional like this. That's what you're looking for. You looking for overhangs like this where the light comes in and one particular angle? With this flash set up, you're gonna get fantastic. Absolutely fantastic results. Now there there are ways to adjust that. And when we go outside in the third segment today, I'm going to show you that because we're going on the roof, there is no overhangs on the roof. And so, as a result, I'm gonna have to fake it, and I'll show you how you can fake it. So that's what I mean when I say look for very good directional life and I'll show you my finger trick. Um, this is what you're gonna have to dio outside. You hold up your finger like this, and you go all the way around, you're gonna find the light direction, and I will show you the squint trick and all them other cool tricks wouldn't do that. Segment two and Segment three. Okay, here's what the Internet just asked can hear, you know, that's all great, Kurt, but I have a Nikon. Oh, yeah. Actually, I did. Just rolling E. I hear that. And the answer to that question is first, mostly, I don't know. I don't shoot a Nikon, Okay? It But a bunch of buddies of mine do, and almost every one of them says Kirk, It works with a Nikon, except you have to add one more, minus two, the exposure. So instead of minus one and 1/3 you have to go to and 1/3 and do it the same Mote. That's about 60% of the Nikon people. I know there are a few out there who go. I've tried that and it don't work for me. And that could be the flash, the camera. I mean, there's so many different combinations. They don't have it set right. I don't have a Nikon to test this, but if Nikon wants to send me a camera, I'll be happy. Oh, God is a shameless, shameless plug anyway. Outdoor lighting. So it's the same basic concept. I want you to take note of a few things. The red line on both both girls. The arrow is a from the sun. The sun is lighting the hair in both scenarios. So whenever I'm looking for good directional light in both these images, I have a nice overhang that sticks out of the building on the left and on the right. This is all right around my studio. This is in the front yard that's in the backyard. The left is the front. The right is the back OK, and the sun at certain times of the day will peak around that overhang. And what it does is it lights up the hair, so you can you see the highlights in the hair on both those images. That's what the red is. Then in the blue line on the left, showing you again that I'm still trying to hit the five points of the face. Noticed that their highlights on the forehead highlights on the cheeks. Highlights down the nose and highlights on the chin. Now is it a little bit more random, if you will? Is it not quite as directional outside? The answer is yes. It's a little bit flatter. I have noticed whenever I'm photographing outside now, would that win any contest? I don't know, But do the seniors like it? The answer is absolutely yes, they love it. They love it, love it, love it on the right. I want you to notice that there is a strong directional life with the green line that is on the right, coming to the right. Notice how the right side of her nose is much lighter than the left side of her nose. That's because of the time of day where that particular thing is notice on the shoulder that there's a big directional. It's a brighter on the shoulder. Look at the green line on her, the middle of her belly. Down there, it's hot, though green. The Green Line shows that it's a big highlight right there, and then it gets shadowed around the outside on her shoulder. Same thing. Shadows. Look on the left side, the shadows. So with this lighting set up, if you have good directional light, you get nice highlight transitions again from highlight to shadow. And that's what we're all looking for will. Looking for direction, we look for roundness to the face and the subjects, and thus less. I like things that are less complicated so that I can then really, really focus on the posing
Class Materials
bonus material with purchase
Ratings and Reviews
a Creativelive Student
Enjoyed the course from start to finish especially all the marketing, advertising opportunities and pricing ideas. My wife and I spent Labor Day re-watching the marketing and pricing section and came away again with so many great ideas. Workflow and shooting the pics is more my responsibility of my business and his posing, lighting and workflow is awesome...In the beginning of the course I was disappointed in the actions as freebies but the more I got into the course and especially the last day with workflow, I broke down and used the Pro4um coupon from the swag bag and joined. That's what really made the actions more valuable because when you join the Pro4um, you get the entire setup for Kirk's workflow. The bridge setup, the scripts etc...I greatly appreciate what Kirk taught in this course and his passion for this line of business because it's helping WHP in every area from start to finish with our buisness!...Thanks Kirk and Thanks creativeLIVE for having Kirk do this Senior Photography course!
Leroy Tademydandp
If you want to take you photography to the next level you need to buy this course. Great content with an experienced passionate instructor who is also quite entertaining. Kirk's knowledge of marketing, cameras, and workflow are second to none. I urge you to do yourself and your photography a huge favor go to the top click the green button that says BUY! If you don't your missing out.
a Creativelive Student
His work is amazing and he has been a big font of inspiration for me... I wish I could be there to be part of it, live... :-)
Student Work
Related Classes
Portrait Photography