As photographers, we know that the decisions we make while shooting on location can have a dramatic effect on the outcome of our images. From the lenses we choose to the light we make, our choices determine the look, feel, and success of the photographs we create, which, if all goes well, ultimately leads to a happy client.
I want to talk about two of the most important choices you have as a photographer when it comes to equipment: the focal length of the lens you choose and the aperture camera setting you use with it. For the purposes of this article, I’m going to talk about a recent portrait shoot I did in a local bar. It was a dark, dark room with one medium-sized skylight, and tons of shiny bottles and mirrors in the background. It wasn’t the easiest location I’ve ever shot in, but it was nice to have a challenge! Even though I had been to this bar many times in the past, I didn’t know there was a skylight there because I had never been in the daytime. It’s normally a black hole, a place where light disappears… and, were it not for the soft glow of the few hanging lights, you’d be running into everyone and everything and spilling your fancy cocktail all over the place!

When it comes to focal length – the property of the lens that determines the field of view you can see with it, either a wide view (about 40mm [35mm equivalent] or less), a “normal” view (approximately 50mm), or a zoomed in (telephoto) view (anything over 60mm or so) – there are a few things to consider.
For shooting portraits, generally it’s recommended to use a normal or telephoto lens, and frowned upon to use a wide-angle lens. The longer the focal length of the lens, the more “compressed,” or not distorted/stretched out, the image looks. This is why it’s generally a no-no to shoot portraits with a wide-angle lens, especially if you’re shooting a portrait that’s even relatively close-up. If you’re shooting a wider landscape/environment shot with a person in it, it’s more acceptable to use a wider lens depending on your motives. I generally prefer shooting portraits anywhere between 85mm and 150mm.
The images below were taken using the same camera settings, with the only difference being the lens I used. For this test, I used a 35mm (wide angle) lens and an 85mm (telephoto) lens. Neither of these lenses are too wide or telephoto, respectively, so if you can tell the difference in these photos, imagine how more pronounced the differences would be using, for example, an 18mm lens vs a 200mm lens!

Nikon D810, Nikon 35mm f/1.4 @ f/2.5, 1/100, ISO125
The wider field of view of this 35mm lens gives the appearance of a small amount of distortion.

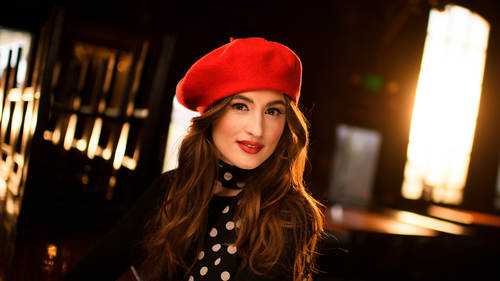
Nikon D810, Nikon 85mm f/1.4 @ f/2.5, 1/100, ISO125
The focal length of the 85mm lens compresses the subject and makes his features and body appear more true-to-life than the 35mm lens did. The longer focal length also adds some separation between the subject and the background.
Hungry for more? Our largest Photo event is just around the corner. Photo Week 2017 begins next week with 40 incredible classes and 20 world class instructors, including Joe McNally. Learn More here.

The other important aspect of the lens you use, and how you use it, is the aperture you choose to shoot with. If you aren’t controlling your aperture with purpose, you’re not making the most out of the creative capacity of your camera. While the aperture is one of the three settings that controls how much light the camera can see, it also plays a very important role in how the image looks and feels.
Apertures can, in a way, be divided up into groups in a similar way to how lenses can be categorized by focal lengths (wide, normal, and telephoto). They’re usually referred to as being “wide” or “stopped down.”
A wide aperture, or anything at about f/3.5 or below, lets in more light and increases the exposure, but also adds separation between your subject and the background. When a lens is shot “wide open,” it’s being used at its maximum aperture; a 70-200mm f/2.8 lens, for example, is “wide open” at f/2.8.
A “stopped down” aperture, I would wager, is anything at about f/5.6 or higher, especially once you get past f/8. When you stop down to these higher numbers (smaller openings), not only does the lens let in less light, which decreases the exposure, but it brings more of the image into focus, and diminishes the separation between the subject and background.
So, here comes the decision. When shooting portraits, should you use a wide aperture or a stopped down aperture? Most photographers will tell you that the choice is obvious, and that you should be using a wider aperture. Nine times out of ten, I would agree with this. I don’t know what it is, but there is something about using a wider aperture, and thereby creating more separation between your subject and her/his surroundings, that is pleasing to the eye. But sometimes, especially when creating an environmental portrait, it’s useful to stop down the lens and bring more of the image into focus, and into your attention as well. You have to really think about the purpose of the image. Is it just about the person? Or is there something important about the location that should be conveyed in the image?

Nikon D810, Nikon 85mm f/1.4 @ f/2.5, 1/80, ISO125
This image, shot with an 85mm lens at f/2.5, blurs out most of the background of the bar. The combination of the longer focal length and the extra-wide aperture leaves very little of the background in focus. This is useful if you really want to isolate your subject, and creates a portrait that’s very centered around the person.

Nikon D810, Nikon 85mm f/1.4 @ f/6.3, 1/80, ISO800.
When stopped down to f/6.3, you can see that a lot more of the background is in focus. This image focuses a little more on the bar itself, rather than just the bartender, because more of the environment around her is visible.
In these two examples, shot at f/2.5 and f/6.3, there’s a very visible difference in how the subject is separated from her surroundings. Imagine if the images had been shot at f/1.4 and f/11, and you’ll see that the choice you make when choosing the aperture to use plays a vital role in the outcome of your images.
Here’s one more example. Both of the images below were taken with the 85mm lens, but at different apertures, as well as different distances from the subject.

Nikon D810, Nikon 85mm f/1.4 @ f/2.5, 1/80, ISO160

Nikon D810, Nikon 85mm f/1.4 @ f/6.3, 1/80, ISO800
These two images, taken with the same lens but at different distances from the subject, really show how the position of the photographer is also vitally important to an image. When you get close to the person, she becomes the main focus of the image. But when you step back a little, and get more of the surroundings in focus, the image goes from being at “any” bar to being at a particular bar. The environment becomes more important to the image. So, depending on what you (or your client) want, you have some choices to make. To the untrained eye, none of them by themselves are vital, but when they’re all put together, they help determine if your image will be good, bad, or just mediocre.
Hungry for more? Our largest Photo event is just around the corner. Photo Week 2017 begins next week with 40 incredible classes and 20 world class instructors, including Joe McNally. Learn More here.
For this shoot, I kept it pretty simple. I used four speedlights: one in a Westcott Rapid Box as my main light; one in another small, older softbox as fill, and two in the back of the bar to light up the background so it wasn’t a black hole. I put two in the background, both at about half-power, instead of one at full-power, so that my recycle times between shots would be cut down, and I could also point them in slightly different directions to make the light a little more even. They were all triggered with Pocketwizard Plus III transceivers.
Instead of changing powers between shots when I was testing out different apertures, I just adjusted my ISO accordingly to compensate for the change in exposure, hopping from f/2.5 @ ISO125 to f/6.3 @ ISO800.

So, in a nutshell, by indulging in just a little forethought to your choices on set – even with things as seemingly inconsequential as the focal length of the lens you choose and the aperture you shoot with it – you’ll have more creative control over the outcome of your images. Take some time to practice and get a feel for these “rules” so that you can break them when you want or need to.
[If you were thrown off by any of this information, don’t worry. It takes time to learn your gear, learn off-camera lighting, and learn to shoot in challenging locations on a time crunch. If you’d like to learn more about figuring out lighting, equipment choices, and dealing with odd locations, I’d suggest referring to Joe McNally’s CreativeLive class Lighting, Logistics, and Strategies for a Life in Photography.
“The most important piece of equipment in your bag is your attitude.” – Joe McNally
Looking to take these Photography tips and other lighting and gear information to the next level? Check out our Lighting, logistics, and strategies class taught by world-renowned photographer, Joe McNally.
Hungry for more? Our largest Photo event is just around the corner. Photo Week 2017 begins next week with 40 incredible classes and 20 world class instructors, including Joe McNally. Learn More here.