[gallery size="large" columns="2" ids="34847,34848"]
Photoshop and Lightroom are both players on the same team, one with more speed, another with more finesse but both with a similar goal. When it comes to retouching skin, the traditional industry standard, Photoshop, offers a number of advanced editing techniques, while Lightroom offers speed, simplicity — and a few hidden tools. So when you're looking to retouch skin the next time you're retouching photos, whats the best option, Photoshop or Lightroom? Take a look at what each platform delivers and how to use the retouching tools inside both Lightroom and Photoshop.
 Its here - Photoshop Week 2017 is on live right now. Today we're featuring a number of great courses including: From Lightroom to Photoshop — The Professional's Workflow, with world renowned photographer Jason Hoppe. Tune in and watch live classes now
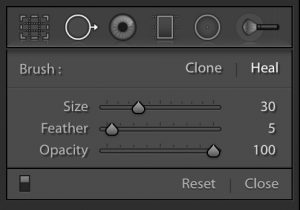 The cloning and healing tool is a quick fix for acne, small scars and other unwanted blemishes. Located under the histogram as a circle icon with an arrow, tapping this tool on the photo will replace that area by referencing a second area from the image. Clone will replace those pixels exactly, while heal is a smarter variation that considers the surrounding pixels for a more natural fix. Sliders change the size, feather and opacity of the brush, while laptop users can quickly increase or decrease the brush size using the touchpad.
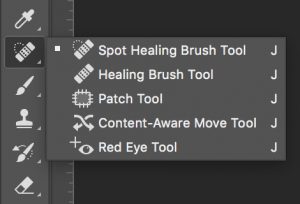 While Lightroom’s heal tool is often sufficient (and quick) for zapping a few zits, Photoshop’s clone and heal tools tend to offer more accuracy for retouching photos and a few more options. The heal tool here allows you to select a clean area to reference by holding control while clicking on the area, instead of dragging a reference area like in Lightroom, and tends to do better in areas that aren’t surrounded by similar colors. The similar spot healing brush allows you to skip the reference point, while the patch tool makes it easier to remove odd shapes.
For a handful of zits, Lightroom is often sufficient but for more prominent acne, Photoshop is often better and occasionally even faster when retouching photos, since you can set one reference point for several adjustments, instead of setting a new area to copy from each time.
 Its here - Photoshop Week 2017 is on live right now. Today we're featuring a number of great courses including: From Lightroom to Photoshop — The Professional's Workflow, with world renowned photographer Jason Hoppe. Tune in and watch live classes now
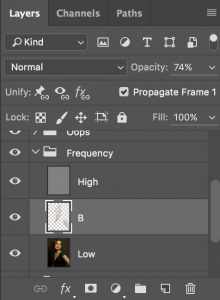 The problem with the skin softening tool in Lightroom is that it effects everything uniformly. In Photoshop, the frequency separation technique allows you to adjust only color to correct discolorations or only texture to soften skin. The technique is a bit more advanced, but once you follow the steps to separate the colors and textures, it’s painting with a brush. Photoshop also has other simpler tools for softening skin too — including the blur tool and blur filters with layer masks as well as third party tools like (now free) Nik collection.
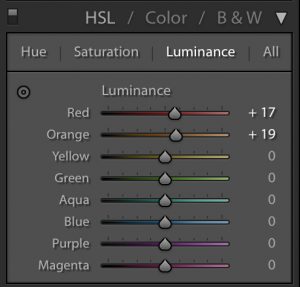 Lightroom’s Luminance sliders in the HSL panel make quick work of brightening underexposed skin or removing redness — but they also affect the entire image. Dragging the red and orange sliders tend to affect multiple skin tones the most, and minor adjustments retain a natural look. But for bigger problems like sunburns, the tool won’t work without making the rest of the image appear rather wonky.
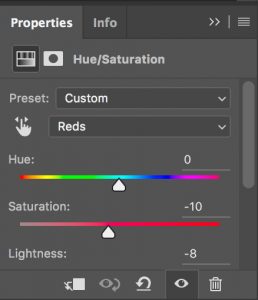 Fixing a sunburn is a job for Photoshop — and it doesn’t take too many more steps than a slider adjustment either. By making an adjustment layer for hue and saturation and selecting the red channel, you can pull down those reds similar to in Lightroom. But, then you can add a layer mask and paint over only the areas that you want to correct, which means the rest of the reds in the photo can stay true to color.
 Its here - Photoshop Week 2017 is on live right now. Join us for all your photo retouching needs including: From Lightroom to Photoshop — The Professional's Workflow, with world renowned photographer Jason Hoppe. Tune in and watch live classes now
 Its here - Photoshop Week 2017 is on live right now. Today we're featuring a number of great courses including: From Lightroom to Photoshop — The Professional's Workflow, with world renowned photographer Jason Hoppe. Tune in and watch live classes now
Clone and Heal tool
Lightroom
 The cloning and healing tool is a quick fix for acne, small scars and other unwanted blemishes. Located under the histogram as a circle icon with an arrow, tapping this tool on the photo will replace that area by referencing a second area from the image. Clone will replace those pixels exactly, while heal is a smarter variation that considers the surrounding pixels for a more natural fix. Sliders change the size, feather and opacity of the brush, while laptop users can quickly increase or decrease the brush size using the touchpad.
Photoshop
 While Lightroom’s heal tool is often sufficient (and quick) for zapping a few zits, Photoshop’s clone and heal tools tend to offer more accuracy for retouching photos and a few more options. The heal tool here allows you to select a clean area to reference by holding control while clicking on the area, instead of dragging a reference area like in Lightroom, and tends to do better in areas that aren’t surrounded by similar colors. The similar spot healing brush allows you to skip the reference point, while the patch tool makes it easier to remove odd shapes.
For a handful of zits, Lightroom is often sufficient but for more prominent acne, Photoshop is often better and occasionally even faster when retouching photos, since you can set one reference point for several adjustments, instead of setting a new area to copy from each time.
 Its here - Photoshop Week 2017 is on live right now. Today we're featuring a number of great courses including: From Lightroom to Photoshop — The Professional's Workflow, with world renowned photographer Jason Hoppe. Tune in and watch live classes now
Skin Softening
Lightroom
[gallery size="medium" columns="2" ids="34845,34844"] Lightroom’s skin softening tool is rather hidden, but if you select the brush tool (the last icon under the histogram) and tap the arrow next to “custom” at the top, you’ll get a drop down menu of presets, including (ta-da!) one for skin softening. You can customize the effect by dragging the clarity and sharpness sliders, or if you tap the black arrow underneath “Edit” the sliders instead change to a single percentage slider. Then, you just brush over the skin — and if you want to edit quickly you can select the auto mask under the brush options and the program will automatically detect the edges.Photoshop
 The problem with the skin softening tool in Lightroom is that it effects everything uniformly. In Photoshop, the frequency separation technique allows you to adjust only color to correct discolorations or only texture to soften skin. The technique is a bit more advanced, but once you follow the steps to separate the colors and textures, it’s painting with a brush. Photoshop also has other simpler tools for softening skin too — including the blur tool and blur filters with layer masks as well as third party tools like (now free) Nik collection.
Skin Color
Lightroom
 Lightroom’s Luminance sliders in the HSL panel make quick work of brightening underexposed skin or removing redness — but they also affect the entire image. Dragging the red and orange sliders tend to affect multiple skin tones the most, and minor adjustments retain a natural look. But for bigger problems like sunburns, the tool won’t work without making the rest of the image appear rather wonky.
Photoshop
 Fixing a sunburn is a job for Photoshop — and it doesn’t take too many more steps than a slider adjustment either. By making an adjustment layer for hue and saturation and selecting the red channel, you can pull down those reds similar to in Lightroom. But, then you can add a layer mask and paint over only the areas that you want to correct, which means the rest of the reds in the photo can stay true to color.
So which program is best for skin retouching, Lightroom or Photoshop?
Lightroom and Photoshop can both correct a number of skin flaws when retouching photos — but both in very different ways. Lightroom is the speed champ, with a number of quick fixes that work great for correcting a large volume of photos. Photoshop may be slower, but the older program offers a wider number of advanced tools and techniques that Lightroom simply can’t achieve. Lightroom and Photoshop are on the same team — they are designed to be better together, and with the Creative Cloud, once you’re paying for one, you’re getting both anyways. For quick zit zaps, the rookie Lightroom gets the job done fast, but for close-ups that require more detail-oriented edits or high-end retouching photos, the long-time pro Photoshop offers more finesse. A majority of photos may be adjusted in Lightroom for speed and simplicity, but for trickier issues, like fixing a sunburn or using frequency separation to correct skin tones, the tools in Photoshop are well worth the extra time. Its here - Photoshop Week 2017 is on live right now. Join us for all your photo retouching needs including: From Lightroom to Photoshop — The Professional's Workflow, with world renowned photographer Jason Hoppe. Tune in and watch live classes now