Photoshop’s selection tools make it possible to isolate a single object or remove a photo’s background — but if you mess up using the lasso tool, the only option is to go back to start outlining all over again. That’s why, when it comes to making specific, detailed selections, many Photoshop pros don’t use any of the selection tools at all. Instead they look a few icons further down in the toolbox — and are rewarded with the pen tool.
Unlike the lasso tool, the pen tool pays no attention to the pixels underneath it, giving you full control over exactly what is selected, from simple geometric shapes to delicate curves. By creating permanent paths instead of temporary selections, the pen tool makes it possible to go back and edit the selection, no matter how many steps you’ve taken in between. While the pen tool is often more time-intensive than other options, when it comes to advanced, accurate selections, the pen is mightier than the sword — err, selection. Here’s how to master the pen tool inside Photoshop.
 Its here - Photoshop Week 2017 is on live right now. 42 classes covering everything you need to know about Photoshop — and its free — watch live classes now
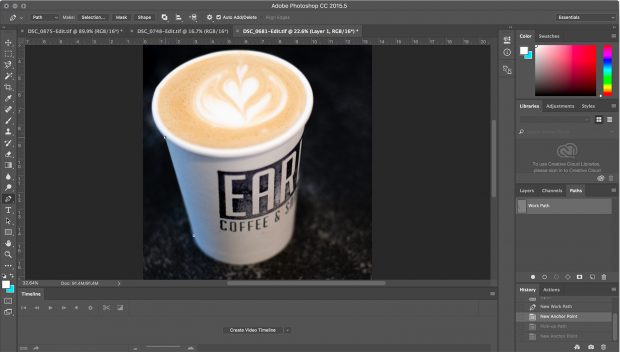 Tip: Tapping P on the keyboard will also select the pen tool.
While a simple click is great for selecting geometric selections with straight lines, what about objects following a curve? Instead of clicking for that next point, clicking and dragging the mouse creates a curved line. Dragging up and down changes the height of the curve, while dragging left to right will change the intensity of the curve, from straight to a tall curve.
When you click and drag to create a curve, you’ll see handles or a straight line pop up. As you drag the point, the handles will indicate the direction and intensity of that curve. To create a smooth curve, leave those handles about 1/3 the length of the distance between the next point — too long, and your curve will swoop back in the other direction first.
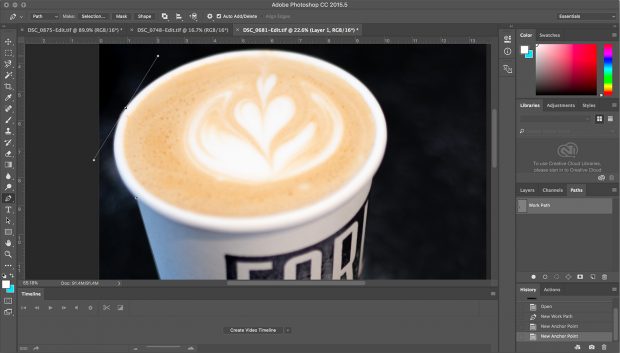 Continue making points around the object, using a new point every time you need to change the direction, clicking for straight lines or clicking and dragging for curves. Once you’ve gone all the way around the object, complete the path by clicking on that very first pen point — you’ll see a circle when you hoover over the first point.
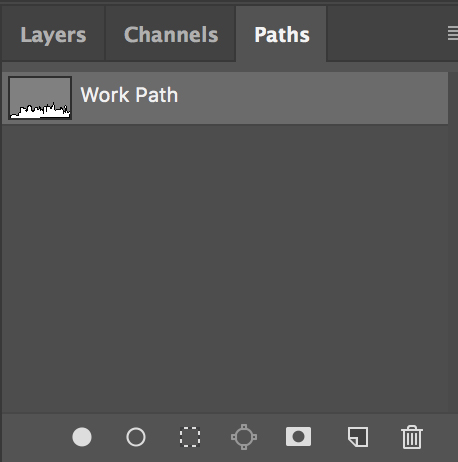
With the path completed, go to the Paths panel (it’s by default a tab with the layers panel) and rename your path to save it. If you don’t rename the path, it will disappear if you start creating a second path.
 If you need to add additional anchor points between existing points, or need to remove points, click and hold on the pen tool in the toolbar and select the add or delete anchor point tools.
To move the entire path at once, go back to the arrow tool, only this time use the black Path Selection Tool option. Clicking and dragging on a line will move the entire path.
 Tune in now to Photoshop Week 2017 . Free, live classes covering everything you need to know about Photoshop.
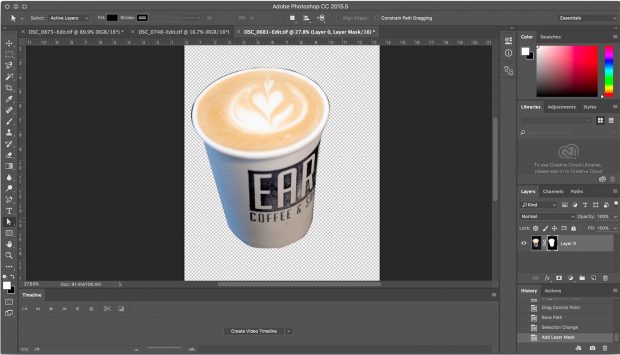 If you need to go back and edit the path after you’ve already applied the selection to a layer, you’ll simply need to make sure that layer is highlighted before going back into the Paths panel and selecting the path for further fine-tuning.
With the pen tool, you have complete, editable control over any selection inside Photoshop. And while it may not be the fastest selection tool in the Photoshop toolbox, when it comes to accuracy, the pen tool upstages the rest.
 Tune in to Photoshop Week 2017 and watch live classes now.
 Its here - Photoshop Week 2017 is on live right now. 42 classes covering everything you need to know about Photoshop — and its free — watch live classes now
Photoshop Pen Tool: The Basics
The pen tool creates paths across the image by connecting multiple points together. While you can use it to draw shapes, for photographers, the tool is ideal for clipping out objects. After selecting the pen tool from the side toolbox — the one that looks like the tip of an old fashioned inkwell pen — a simple click creates the first point. A second click adds another point, connecting the two with a straight line. Adding points all the way around the object until clicking on that first point again makes a complete selection. Tip: Tapping P on the keyboard will also select the pen tool.
While a simple click is great for selecting geometric selections with straight lines, what about objects following a curve? Instead of clicking for that next point, clicking and dragging the mouse creates a curved line. Dragging up and down changes the height of the curve, while dragging left to right will change the intensity of the curve, from straight to a tall curve.
When you click and drag to create a curve, you’ll see handles or a straight line pop up. As you drag the point, the handles will indicate the direction and intensity of that curve. To create a smooth curve, leave those handles about 1/3 the length of the distance between the next point — too long, and your curve will swoop back in the other direction first.
 Continue making points around the object, using a new point every time you need to change the direction, clicking for straight lines or clicking and dragging for curves. Once you’ve gone all the way around the object, complete the path by clicking on that very first pen point — you’ll see a circle when you hoover over the first point.
With the path completed, go to the Paths panel (it’s by default a tab with the layers panel) and rename your path to save it. If you don’t rename the path, it will disappear if you start creating a second path.

Editing Paths with the Pen Tool
The biggest advantage to using the pen tool is that you can go back and edit the selection point-by-point — so if you see you missed a little piece, you don’t have to redo the entire selection like you would with the lasso tool. To edit a path, make sure the correct path is highlighted in the Paths panel. If you need to move a point to adjust either a straight line or a curve, use the Direct Selection Tool — it’s the arrow cursor that’s white, not black. To adjust a straight line, click that point and drag it to the new location; to adjust a curve, grab one of the handles or straight lines coming off the curve. If you need to add additional anchor points between existing points, or need to remove points, click and hold on the pen tool in the toolbar and select the add or delete anchor point tools.
To move the entire path at once, go back to the arrow tool, only this time use the black Path Selection Tool option. Clicking and dragging on a line will move the entire path.
 Tune in now to Photoshop Week 2017 . Free, live classes covering everything you need to know about Photoshop.
Creating a Selection from a Path
So far, all you’ve done is create an invisible path inside your photo. Next, you need to convert it into a selection. Back inside the Paths window, right click (or option click on a Mac) on the path you made and choose “Make Selection” from the dropdown options that appear. In the pop-up window, choose the feather radius, or how soft to make the edge. If you’re cutting out an object that has some edges out-of-focus, use a higher feather. Now, your path turns into a dotted line — the object you clipped out is now selected. From here, you can copy the selection to paste it into another file, or, you can add a mask for tasks such as removing the background. With the selection still highlighted, click on the layer that contains the object (simply called Background if you haven’t touched the layers yet), then click on the “Add Mask” icon in the bottom of the Layers panel, which looks like a rectangle with a dark circle inside. The mask will automatically be applied with the layer selection, removing the background. From here you can continue to edit the photo, adding a different background or continuing to refine the edge using layer mask tools. If you need to go back and edit the path after you’ve already applied the selection to a layer, you’ll simply need to make sure that layer is highlighted before going back into the Paths panel and selecting the path for further fine-tuning.
With the pen tool, you have complete, editable control over any selection inside Photoshop. And while it may not be the fastest selection tool in the Photoshop toolbox, when it comes to accuracy, the pen tool upstages the rest.
 Tune in to Photoshop Week 2017 and watch live classes now.