Any producer or engineer that’s visited another studio or worked with someone new has had the moment where you glance out of the corner of your eye as someone else sits down in front of the console and whips out some super-slick Pro Tools shortcut you’ve never seen before. You either calmly pretend you know exactly what they’re doing to save face (while trying to glance over their shoulder next time they aren’t looking) or blurt out “WHOA! What did you do just there??”
To save you the time and embarrassment, here are a list of the top five somewhat hidden keyboard shortcuts for Pro Tools that will save you time, energy, and frustration. But first, a few ground rules. If you have already been using some of these commands, congratulations, you’re an expert, but NO eye rolling or subtle “Duh, everyone knows that one...” Instead, share your favorite keyboard shortcuts are in our Music & Audio Facebook page. If, on the other hand, you’re totally lost and have no idea what I’m talking about, don’t be afraid! Shoot me an email zach.varnell@creativelive.com and I’d be happy to explain in more detail.
So without further ado, it’s time to geek out.
1. Cascading inputs and outputs.
One of the coolest automated features of Pro Tools is the fact that when starting a new session, if you add a multitude of tracks at once to your session, Pro Tools automatically sets the output of each channel to the default monitor path and cascades the inputs based on your I/O settings. However, what happens if you import tracks from another session, or switch I/O settings in a new studio, or even want to cascade the outputs to bounce printed stems? This is a newer one for me and I’ll also give you a couple of example of scenarios in which I’ve used this.
Shortcut:
First of all make sure you have a cascading input or output set as the FIRST in the series of IO busses in your IO setup dialogue.
Select the group of tracks you want to cascade inputs or outputs
Hold down SHIFT + OPTION + COMMAND
While holding, click on the first track and assign the input or output to the first of the series of IO busses and viola! the remaining selected channels will be assigned in sequential order.
Situations:
--You’ve set up a 32 channel session with tempo maps and are ready to track drums basics! But when you get to the studio you’ve booked to record and you set up your IO settings, every track defaults to no input path.
--You need to print stems with EFX and VIs and you have Pro Tools 11. Simply add specific output busses, select the stem channels you want to bus and cascade away! Then go to ‘bounce to disk’ and in Pro Tools 11HD, you can bounce up to 16 stems all at once! MAJOR time saver.
--You’ve finished tracking an entire song and are ready to mix back through an analog console. You want to send all tracks back through their respective channels on the board, but don’t want to spend 10 minutes clicking on each channels IO path.
Modifications:
SHIFT + CTRL - ADDS a duplicate path assignment (output only)
OPTION - assigns all the channels in the session to the same input/output.
 2. The "Big Session Overview Key" Command
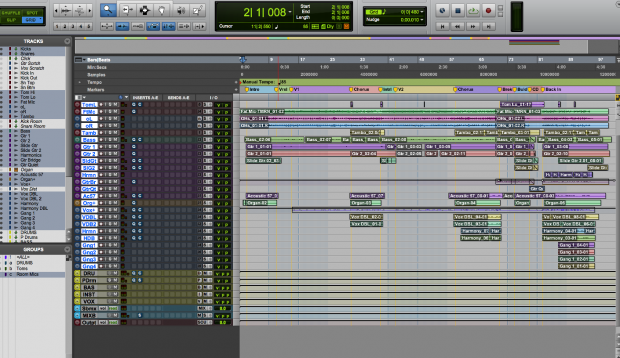
This one is actually a combination of a few moves. Have you ever opened up a session from another studio, spent forever diving deep into a specific track or simply just gotten lost in the pile of tracks in your own session? Here’s a fast way to fit everything on screen and reset your bearings.
Shortcut:
First OPTION+A - resets the zoom view to fit the entire song on screen
Second, CTRL+OPTION+DOWN ARROW - tap a couple of times until all of the track heights all reset to the smallest of all track heights, allowing you to see everything on screen.
Modifications:
You can also zoom back in by tapping CTRL+OPTION+UP ARROW a few times<
OPTION+F - zoom to fit just the selected region in the window.
 3. Add plug-in automation parameter
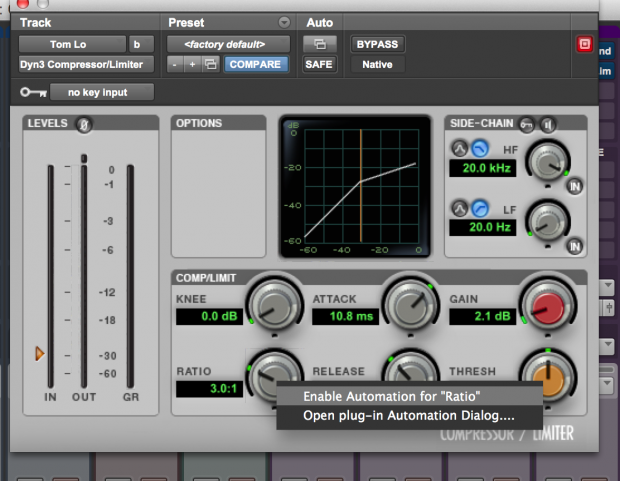
This one is super simple, but a life saver when you’re mixing. Imagine you’ve got a plugin window up and you’re slowly adjusting the decay time on a reverb plugin, when you realize it would be WAY cooler if you automated this towards the end of the song. To begin this process it gets a little clunky. First you have to stop what you’re doing and note the exact name of the parameter. Then you click on the AUTO window at the top of the plugin, spend minutes scrolling through the massive list of parameters, add the parameter to the automation window and head on over to edit to start drawing. Yikes.
Shortcut: COMMAND+OPTION+CONTROL+CLICK on parameter
Right there in the plug in window you can just click on the parameter you want to automate and add it to the automation list. Now, you can automate in real time by switching the track to auto latch mode, or go straight to edit and draw in the curve by hand. You’re welcome.
4. Jump to Memory Location
This is another really simple and deceptively quirky keyboard shortcut, but stay with me, because there are some unique scenarios in which I’ve used this a lot, surprisingly and saved time.
Shortcut: PERIOD + MEMORY LOCATION # + PERIOD
Again, this seems deceptively simple, but let me give you a few scenarios in which it could be really useful.
Situations:
I do a lot of live concert recording, with multiple songs in the same session. I also often work with video editors, and a seamless integration and workflow to handle mix changes was super important. If I made a change to a mix for a client and sent a new stereo file over to our editing team and it was even slightly different in length or start/stop time, they had to resync in Pluralize. So the first thing I would do before mixing is put track markers in the session. When it came time to bounce, I would use this shortcut to jump to the beginning, then hold down SHIFT and jump to the next track, selecting the entire song exactly the same length every time. If there’s a mix change later, I’d do the same thing and the editors would get the exact same region to swap out.
 5. Compositing Tracks in Pro Tools 11HD
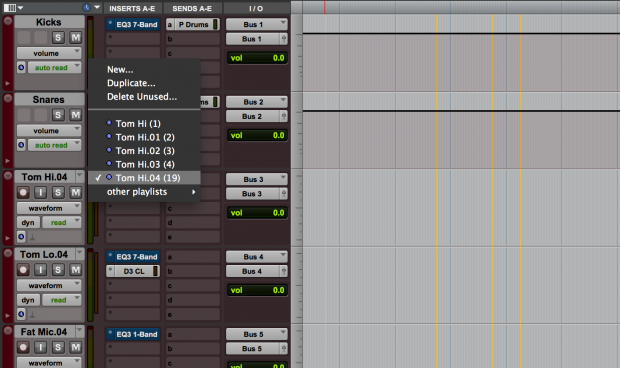
Finally, these are a series of keyboard shortcuts for tracking and editing comps with playlists, new with Pro Tools 11HD. SUPER helpful.
Shortcuts:
CTRL+OPTION+\ adds a new playlist for every track in the session - very fast for setting up another take of basics.
SHIFT+CONTROL+OPTION+\ adds a new playlist for every SELECTED track in the session - perfect for overdubs
CNTRL+p cycle cursor through playlist lanes
CNTRL+OPTION+v copies selected region back to main playlist
This last one is SO much time saving in long edits between multiple takes. Don’t go back to another playlist and Command+V anymore, just send it there and keep listening. These take some practicing, but once you get them down, editing comps becomes a million times easier.
And just for good measure, here’s a few really simple ones too in case you missed them from the manual.
--tab - jump to next region
--control+return - go to song start
--control+click - temporary adjust channel independently from edit/mix group
--option+click - reset controller value to default
--command+adjust - fine tune adjust any parameter in the mixer or plugin (or clip gain)
So happy shortcutting! Again, if you find these useful, confusing, helpful or have more to add speak up!
 2. The "Big Session Overview Key" Command
This one is actually a combination of a few moves. Have you ever opened up a session from another studio, spent forever diving deep into a specific track or simply just gotten lost in the pile of tracks in your own session? Here’s a fast way to fit everything on screen and reset your bearings.
Shortcut:
First OPTION+A - resets the zoom view to fit the entire song on screen
Second, CTRL+OPTION+DOWN ARROW - tap a couple of times until all of the track heights all reset to the smallest of all track heights, allowing you to see everything on screen.
Modifications:
You can also zoom back in by tapping CTRL+OPTION+UP ARROW a few times<
OPTION+F - zoom to fit just the selected region in the window.
 3. Add plug-in automation parameter
This one is super simple, but a life saver when you’re mixing. Imagine you’ve got a plugin window up and you’re slowly adjusting the decay time on a reverb plugin, when you realize it would be WAY cooler if you automated this towards the end of the song. To begin this process it gets a little clunky. First you have to stop what you’re doing and note the exact name of the parameter. Then you click on the AUTO window at the top of the plugin, spend minutes scrolling through the massive list of parameters, add the parameter to the automation window and head on over to edit to start drawing. Yikes.
Shortcut: COMMAND+OPTION+CONTROL+CLICK on parameter
Right there in the plug in window you can just click on the parameter you want to automate and add it to the automation list. Now, you can automate in real time by switching the track to auto latch mode, or go straight to edit and draw in the curve by hand. You’re welcome.
4. Jump to Memory Location
This is another really simple and deceptively quirky keyboard shortcut, but stay with me, because there are some unique scenarios in which I’ve used this a lot, surprisingly and saved time.
Shortcut: PERIOD + MEMORY LOCATION # + PERIOD
Again, this seems deceptively simple, but let me give you a few scenarios in which it could be really useful.
Situations:
I do a lot of live concert recording, with multiple songs in the same session. I also often work with video editors, and a seamless integration and workflow to handle mix changes was super important. If I made a change to a mix for a client and sent a new stereo file over to our editing team and it was even slightly different in length or start/stop time, they had to resync in Pluralize. So the first thing I would do before mixing is put track markers in the session. When it came time to bounce, I would use this shortcut to jump to the beginning, then hold down SHIFT and jump to the next track, selecting the entire song exactly the same length every time. If there’s a mix change later, I’d do the same thing and the editors would get the exact same region to swap out.
 5. Compositing Tracks in Pro Tools 11HD
Finally, these are a series of keyboard shortcuts for tracking and editing comps with playlists, new with Pro Tools 11HD. SUPER helpful.
Shortcuts:
CTRL+OPTION+\ adds a new playlist for every track in the session - very fast for setting up another take of basics.
SHIFT+CONTROL+OPTION+\ adds a new playlist for every SELECTED track in the session - perfect for overdubs
CNTRL+p cycle cursor through playlist lanes
CNTRL+OPTION+v copies selected region back to main playlist
This last one is SO much time saving in long edits between multiple takes. Don’t go back to another playlist and Command+V anymore, just send it there and keep listening. These take some practicing, but once you get them down, editing comps becomes a million times easier.
And just for good measure, here’s a few really simple ones too in case you missed them from the manual.
--tab - jump to next region
--control+return - go to song start
--control+click - temporary adjust channel independently from edit/mix group
--option+click - reset controller value to default
--command+adjust - fine tune adjust any parameter in the mixer or plugin (or clip gain)
So happy shortcutting! Again, if you find these useful, confusing, helpful or have more to add speak up!