We love it when CreativeLive community members get inspired by what they see in our courses, so when we spied this incredible DIY light reflector by
photographer Lisa Berry, we had to reach out and find out how she made it.
Lisa says that Lou Freedman's course,
Iconic Headshots, where it all started.
"I really liked that Lou worked with something so simple and ended up with outstanding results. I've seen other collapsible reflectors like this for as much as $185, so when I saw this I jumped all over it," she says. "Plus, I love DIY items like this -- if I can save money and it works, why not?"
Here are Lisa's instructions for a DIY light reflector:
Materials:
-
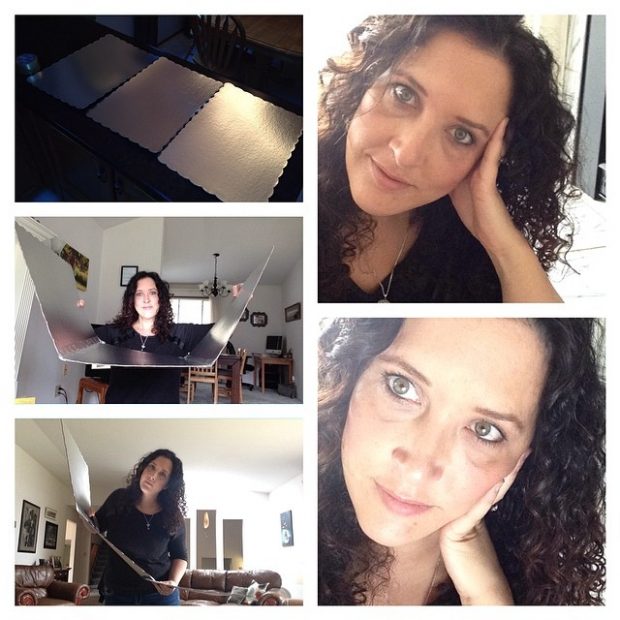
3 silver 14in x 21in cardboard platters (used for serving cakes). "I ordered them online because I don't have a Party City near me," says Lisa, but most party supply stores should have something similar.
-
Tape. Lisa used clear packing tape, but says she'd use silver duct tape in the future
- Scissors.
Instructions:
- On a clean counter top or table, lay all three cardboard platters face-down (brown side up).
- Leave a small gap in between the cardboard so the reflector will fold nicely. Start with the boards face-down to ensure your spacing is right.
- Consider calling for help. "I had my son hold the boards in place so they didn't slip while taping them together," says Lisa.
- Tape the front and back of the boards to create a flexible joint.
And you're done!
"The whole project took about 5 minutes," she says.
Got a great DIY tutorial inspired by a CreativeLive course? Share it in the comments and we might feature it on the blog!

 We love it when CreativeLive community members get inspired by what they see in our courses, so when we spied this incredible DIY light reflector by photographer Lisa Berry, we had to reach out and find out how she made it.
Lisa says that Lou Freedman's course, Iconic Headshots, where it all started.
"I really liked that Lou worked with something so simple and ended up with outstanding results. I've seen other collapsible reflectors like this for as much as $185, so when I saw this I jumped all over it," she says. "Plus, I love DIY items like this -- if I can save money and it works, why not?"
Here are Lisa's instructions for a DIY light reflector:
Materials:
We love it when CreativeLive community members get inspired by what they see in our courses, so when we spied this incredible DIY light reflector by photographer Lisa Berry, we had to reach out and find out how she made it.
Lisa says that Lou Freedman's course, Iconic Headshots, where it all started.
"I really liked that Lou worked with something so simple and ended up with outstanding results. I've seen other collapsible reflectors like this for as much as $185, so when I saw this I jumped all over it," she says. "Plus, I love DIY items like this -- if I can save money and it works, why not?"
Here are Lisa's instructions for a DIY light reflector:
Materials: