
Running a handmade business tends to ebb and flow around the needs for inspiration, product creation and of course maintaining originality. Which is why it is so important to make sure your merchandising (i.e. how your products are packaged) showcases your products so that they will strike an emotional cord with your customers. If you struggle in this area, don’t lose heart because by the end of this post you are going to have three fabulous ideas to bag, tag, and display your products using ordinary things from around your home.
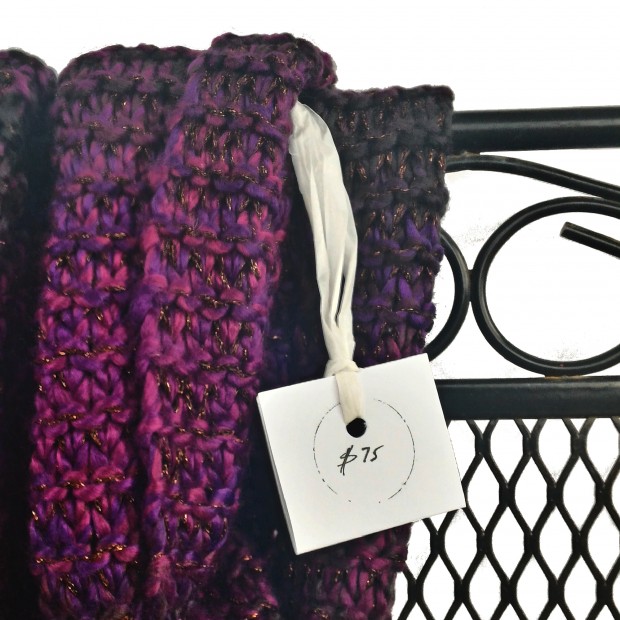
Fancy Plastic Bags Tags for Fashions
 What You’ll Need:
Standard Business Card with a blank back
Plastic bag, any color
Scissors
Hole Punch
Ink Pad, Black
Lid to a Two Liter Soda Bottle or Twist-Off Glass Bottle
Fine Point Marker
How to Make Them
Step 1: Cut your plastic bag so it lays flat. Once you smooth it out, cut it into strips. You will only need one strip per tag.
Step 2: Now take your business card and fold it in half long ways so it looks like a square. Grab your ink pad and soda bottle lid. Take your lid and like a stamp, ink the rim of the cap well. You will only have one opportunity to do this so make sure you get plenty of ink on the rim. Then carefully stamp the ink circle onto the blank side of your folded card. Set aside to dry.
Step 3: Once the ink is dry, use your hole-punch and punch a single hole directly above the stamped circle along the edge opposite the fold.
Step 4: Lastly thread your strip of plastic bag through the hole of the business card using a slip knot or other method of your choice. Then add a price by hand with a black ink pen or other color ink.
If you crave something recycled and unusual, there is
more out there than just plastic bags. If you look, you’ll find that there are merchandising ideas using newspaper, used holiday ribbon, seat belts, carpet fibers, fabric leftovers and more!
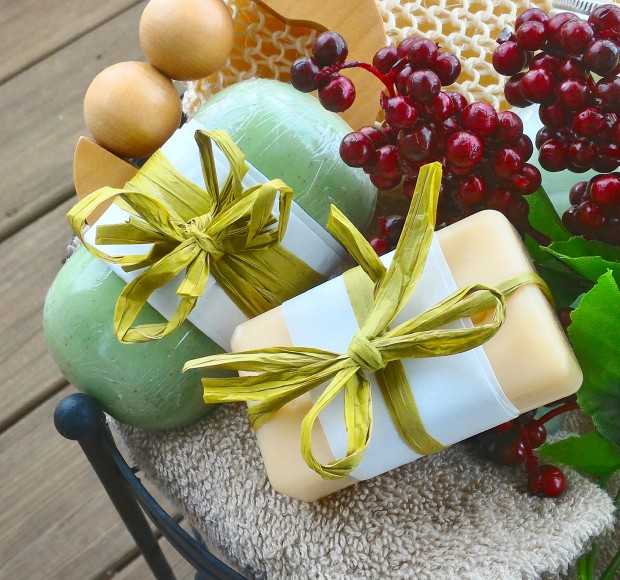
Pretty Parchment Paper Packaging for Soap
 What You’ll Need:
Parchment paper
Bar of soap
Raffia ribbon, any color
Scissors
How to Make Them
Step 1: Cut a strip of parchment paper that is 3 inches wide. Fold it so you have a 1 inch wide but 12 inch long strip of parchment with folded, clean edges similar to what you get when you are wrapping gifts.
Step 2: Set your soap on the strip of parchment you just folded and roll the soap in it slowly wrapping the parchment around the soap as you go. When you get to the end, roll the parchment wrapped soap over so the parchment doesn’t unravel and grab your raffia ribbon.
Step 3: Cut 2 pieces of raffia ribbon. The first should be about 12 inches in length. The second should be about 16 inches in length. Take the longer of the two and start wrapping it in the same direction until you have about 3 inches left on each tail. Then tie off your ribbon in a knot – do not trim your ribbon yet.
Step 4: The last step is to use the second piece of raffia ribbon and thread it under the knot you just tied on your soap. Carefully tie a bow; when doing so, do not to pull too hard, as raffia ribbon is well known for easily tearing. When you are done adjusting your bow, trim the tails to the desired length.
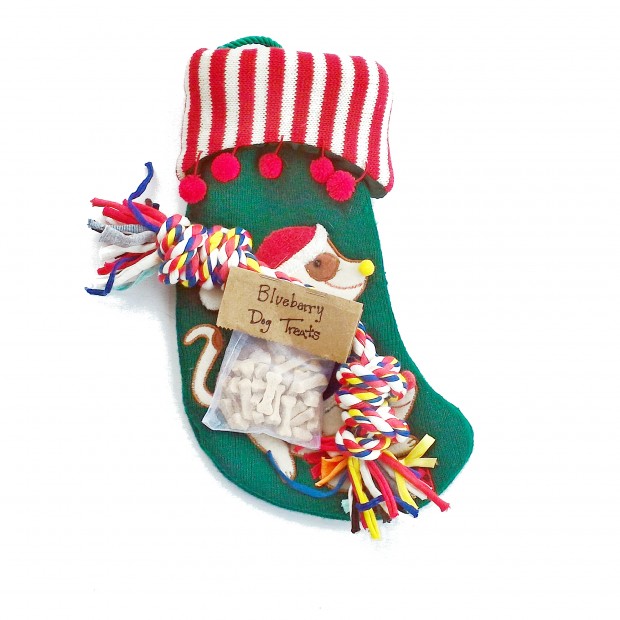
Simple Paper Bag Labels for Packaged Treats
 What You’ll Need:
Paper, Grocery bag
Organza bag, 2.5 x 2.5 inches
Stapler
Scissors
Ruler and Pencil
Black Ink Pen
How to Make Them
Step 1: Once your organza bag is filled with delicious treats, synch it down about half way and then tape the tails to the back of the bag, (this keeps them out of the way for packaging).
Step 2: Cut a 3 x 5 inch rectangle from your paper grocery bag. Make sure that your edges are clean and straight. OPTIONAL: Use fun edge scissors to make your labels frilly, if you decide to do this, cut a slightly larger rectangle so you can trim as needed.
Step 3: Fold your 3 x 5 inch rectangle of paper bag in half once long ways and then again. TIP:
Fold your paper like a book. Both times you will fold it the same direction so that when you unfold it and hold it in front of you, it will have 4, vertical sections.
Step 4: Run your ruler over the crease of your final fold to make sure your fold is very crisp.
Using your fine tip black ink pen, in nice handwriting write what it is on the label. Finally, wrap the label over the top of your organza bag and staple your bag label twice, once on each side.
OPTIONAL: Pre-print clear labels that are 1 x 2.5 inches and stick them on before you staple them.
If you like
paper bags, there are a ton of ways you can use them and you don’t have to limit yourself to the grocery store variety. If paper is what you love, look for alternatives from the grocery store, recycle bin, consignment stores and beyond.
Don’t reinvent the wheel when it comes to merchandising handmade products, if you are stuck, it will be more important to make a good impression by adapting something you like. In time you’ll make it your own and that is what handmade packaging is about.
Remember, that if you approach packaging with originality and imagination, the rest will fall into place, just like your creativity does.

 Running a handmade business tends to ebb and flow around the needs for inspiration, product creation and of course maintaining originality. Which is why it is so important to make sure your merchandising (i.e. how your products are packaged) showcases your products so that they will strike an emotional cord with your customers. If you struggle in this area, don’t lose heart because by the end of this post you are going to have three fabulous ideas to bag, tag, and display your products using ordinary things from around your home.
Fancy Plastic Bags Tags for Fashions
Running a handmade business tends to ebb and flow around the needs for inspiration, product creation and of course maintaining originality. Which is why it is so important to make sure your merchandising (i.e. how your products are packaged) showcases your products so that they will strike an emotional cord with your customers. If you struggle in this area, don’t lose heart because by the end of this post you are going to have three fabulous ideas to bag, tag, and display your products using ordinary things from around your home.
Fancy Plastic Bags Tags for Fashions
 What You’ll Need:
Standard Business Card with a blank back
Plastic bag, any color
Scissors
Hole Punch
Ink Pad, Black
Lid to a Two Liter Soda Bottle or Twist-Off Glass Bottle
Fine Point Marker
How to Make Them
Step 1: Cut your plastic bag so it lays flat. Once you smooth it out, cut it into strips. You will only need one strip per tag.
Step 2: Now take your business card and fold it in half long ways so it looks like a square. Grab your ink pad and soda bottle lid. Take your lid and like a stamp, ink the rim of the cap well. You will only have one opportunity to do this so make sure you get plenty of ink on the rim. Then carefully stamp the ink circle onto the blank side of your folded card. Set aside to dry.
Step 3: Once the ink is dry, use your hole-punch and punch a single hole directly above the stamped circle along the edge opposite the fold.
Step 4: Lastly thread your strip of plastic bag through the hole of the business card using a slip knot or other method of your choice. Then add a price by hand with a black ink pen or other color ink.
If you crave something recycled and unusual, there is more out there than just plastic bags. If you look, you’ll find that there are merchandising ideas using newspaper, used holiday ribbon, seat belts, carpet fibers, fabric leftovers and more!
Pretty Parchment Paper Packaging for Soap
What You’ll Need:
Standard Business Card with a blank back
Plastic bag, any color
Scissors
Hole Punch
Ink Pad, Black
Lid to a Two Liter Soda Bottle or Twist-Off Glass Bottle
Fine Point Marker
How to Make Them
Step 1: Cut your plastic bag so it lays flat. Once you smooth it out, cut it into strips. You will only need one strip per tag.
Step 2: Now take your business card and fold it in half long ways so it looks like a square. Grab your ink pad and soda bottle lid. Take your lid and like a stamp, ink the rim of the cap well. You will only have one opportunity to do this so make sure you get plenty of ink on the rim. Then carefully stamp the ink circle onto the blank side of your folded card. Set aside to dry.
Step 3: Once the ink is dry, use your hole-punch and punch a single hole directly above the stamped circle along the edge opposite the fold.
Step 4: Lastly thread your strip of plastic bag through the hole of the business card using a slip knot or other method of your choice. Then add a price by hand with a black ink pen or other color ink.
If you crave something recycled and unusual, there is more out there than just plastic bags. If you look, you’ll find that there are merchandising ideas using newspaper, used holiday ribbon, seat belts, carpet fibers, fabric leftovers and more!
Pretty Parchment Paper Packaging for Soap
 What You’ll Need:
Parchment paper
Bar of soap
Raffia ribbon, any color
Scissors
How to Make Them
Step 1: Cut a strip of parchment paper that is 3 inches wide. Fold it so you have a 1 inch wide but 12 inch long strip of parchment with folded, clean edges similar to what you get when you are wrapping gifts.
Step 2: Set your soap on the strip of parchment you just folded and roll the soap in it slowly wrapping the parchment around the soap as you go. When you get to the end, roll the parchment wrapped soap over so the parchment doesn’t unravel and grab your raffia ribbon.
Step 3: Cut 2 pieces of raffia ribbon. The first should be about 12 inches in length. The second should be about 16 inches in length. Take the longer of the two and start wrapping it in the same direction until you have about 3 inches left on each tail. Then tie off your ribbon in a knot – do not trim your ribbon yet.
Step 4: The last step is to use the second piece of raffia ribbon and thread it under the knot you just tied on your soap. Carefully tie a bow; when doing so, do not to pull too hard, as raffia ribbon is well known for easily tearing. When you are done adjusting your bow, trim the tails to the desired length.
Simple Paper Bag Labels for Packaged Treats
What You’ll Need:
Parchment paper
Bar of soap
Raffia ribbon, any color
Scissors
How to Make Them
Step 1: Cut a strip of parchment paper that is 3 inches wide. Fold it so you have a 1 inch wide but 12 inch long strip of parchment with folded, clean edges similar to what you get when you are wrapping gifts.
Step 2: Set your soap on the strip of parchment you just folded and roll the soap in it slowly wrapping the parchment around the soap as you go. When you get to the end, roll the parchment wrapped soap over so the parchment doesn’t unravel and grab your raffia ribbon.
Step 3: Cut 2 pieces of raffia ribbon. The first should be about 12 inches in length. The second should be about 16 inches in length. Take the longer of the two and start wrapping it in the same direction until you have about 3 inches left on each tail. Then tie off your ribbon in a knot – do not trim your ribbon yet.
Step 4: The last step is to use the second piece of raffia ribbon and thread it under the knot you just tied on your soap. Carefully tie a bow; when doing so, do not to pull too hard, as raffia ribbon is well known for easily tearing. When you are done adjusting your bow, trim the tails to the desired length.
Simple Paper Bag Labels for Packaged Treats
 What You’ll Need:
Paper, Grocery bag
Organza bag, 2.5 x 2.5 inches
Stapler
Scissors
Ruler and Pencil
Black Ink Pen
How to Make Them
Step 1: Once your organza bag is filled with delicious treats, synch it down about half way and then tape the tails to the back of the bag, (this keeps them out of the way for packaging).
Step 2: Cut a 3 x 5 inch rectangle from your paper grocery bag. Make sure that your edges are clean and straight. OPTIONAL: Use fun edge scissors to make your labels frilly, if you decide to do this, cut a slightly larger rectangle so you can trim as needed.
Step 3: Fold your 3 x 5 inch rectangle of paper bag in half once long ways and then again. TIP:
Fold your paper like a book. Both times you will fold it the same direction so that when you unfold it and hold it in front of you, it will have 4, vertical sections.
Step 4: Run your ruler over the crease of your final fold to make sure your fold is very crisp.
Using your fine tip black ink pen, in nice handwriting write what it is on the label. Finally, wrap the label over the top of your organza bag and staple your bag label twice, once on each side.
OPTIONAL: Pre-print clear labels that are 1 x 2.5 inches and stick them on before you staple them.
If you like paper bags, there are a ton of ways you can use them and you don’t have to limit yourself to the grocery store variety. If paper is what you love, look for alternatives from the grocery store, recycle bin, consignment stores and beyond.
Don’t reinvent the wheel when it comes to merchandising handmade products, if you are stuck, it will be more important to make a good impression by adapting something you like. In time you’ll make it your own and that is what handmade packaging is about.
Remember, that if you approach packaging with originality and imagination, the rest will fall into place, just like your creativity does.
What You’ll Need:
Paper, Grocery bag
Organza bag, 2.5 x 2.5 inches
Stapler
Scissors
Ruler and Pencil
Black Ink Pen
How to Make Them
Step 1: Once your organza bag is filled with delicious treats, synch it down about half way and then tape the tails to the back of the bag, (this keeps them out of the way for packaging).
Step 2: Cut a 3 x 5 inch rectangle from your paper grocery bag. Make sure that your edges are clean and straight. OPTIONAL: Use fun edge scissors to make your labels frilly, if you decide to do this, cut a slightly larger rectangle so you can trim as needed.
Step 3: Fold your 3 x 5 inch rectangle of paper bag in half once long ways and then again. TIP:
Fold your paper like a book. Both times you will fold it the same direction so that when you unfold it and hold it in front of you, it will have 4, vertical sections.
Step 4: Run your ruler over the crease of your final fold to make sure your fold is very crisp.
Using your fine tip black ink pen, in nice handwriting write what it is on the label. Finally, wrap the label over the top of your organza bag and staple your bag label twice, once on each side.
OPTIONAL: Pre-print clear labels that are 1 x 2.5 inches and stick them on before you staple them.
If you like paper bags, there are a ton of ways you can use them and you don’t have to limit yourself to the grocery store variety. If paper is what you love, look for alternatives from the grocery store, recycle bin, consignment stores and beyond.
Don’t reinvent the wheel when it comes to merchandising handmade products, if you are stuck, it will be more important to make a good impression by adapting something you like. In time you’ll make it your own and that is what handmade packaging is about.
Remember, that if you approach packaging with originality and imagination, the rest will fall into place, just like your creativity does.