
While discussing my new book with someone recently I was asked what i thought was the most mis-understood aspect of photography. It wasn’t hard for me to answer that. Distance! Distance plays an important role in many areas of photography, especially in lighting and in perspective. And once you have a grasp of one of these the other is very similar.
 Inverse square — doubling the distance the light needs to cover 4 times the area[/caption]
This is one of the reasons that it is difficult to simulate an outdoor scene in the studio. Artificial light sources, be it a speed light, a studio strobe, a fluorescent tube, an LED panel, etc. all fall off in intensity within relatively short distances. We can’t usually back up the artificial light far enough for its rays to become parallel.
However, we can use this to our advantage in the studio. The distance between the light and the subject determines the depth of spread of the light. If we want a dark background we can bring the light in closer. If we want a brighter, more open and airy "light up the entire room" look we can back the light away from the subject. The light distance is helping determine the key of the photo. For low key the light is in close. For high key the light is moved back. Low key does not mean underexposed. The subject should be properly exposed, but with the light falling off quickly into darkness. High key is not overexposed, it is also properly exposed but with wider and more even coverage.
[caption id="attachment_41366" align="alignnone" width="1200"]
Inverse square — doubling the distance the light needs to cover 4 times the area[/caption]
This is one of the reasons that it is difficult to simulate an outdoor scene in the studio. Artificial light sources, be it a speed light, a studio strobe, a fluorescent tube, an LED panel, etc. all fall off in intensity within relatively short distances. We can’t usually back up the artificial light far enough for its rays to become parallel.
However, we can use this to our advantage in the studio. The distance between the light and the subject determines the depth of spread of the light. If we want a dark background we can bring the light in closer. If we want a brighter, more open and airy "light up the entire room" look we can back the light away from the subject. The light distance is helping determine the key of the photo. For low key the light is in close. For high key the light is moved back. Low key does not mean underexposed. The subject should be properly exposed, but with the light falling off quickly into darkness. High key is not overexposed, it is also properly exposed but with wider and more even coverage.
[caption id="attachment_41366" align="alignnone" width="1200"]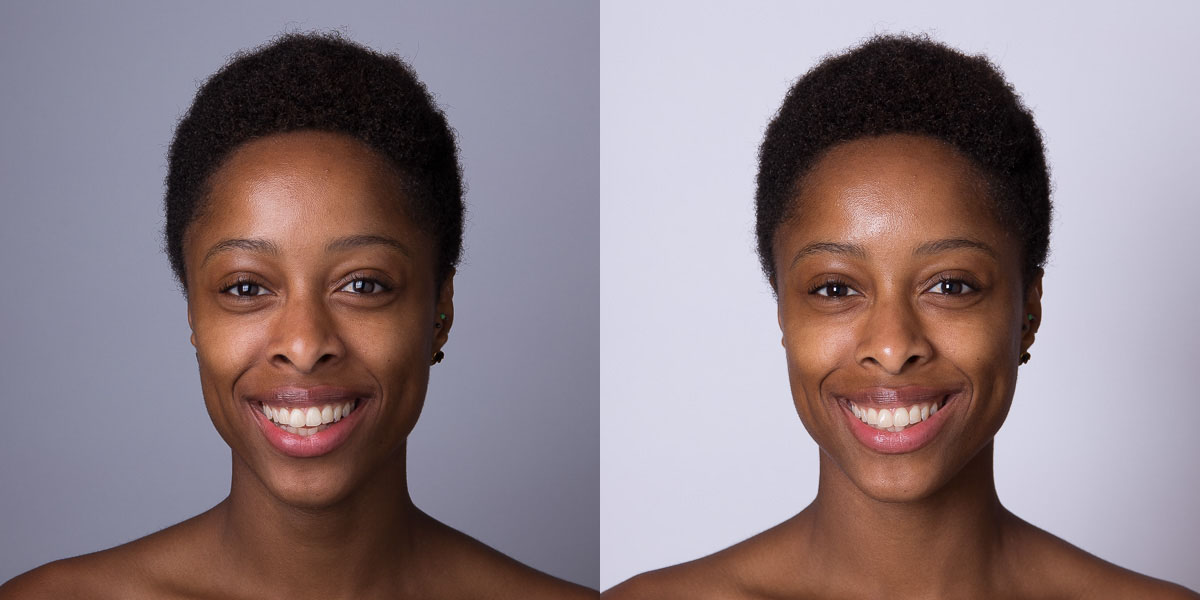 With the light in closer the background gets darker. Moving the light back lightens the background and makes hot spots smaller and brighter[/caption]
This is also the reason that light modifiers come in so many sizes. You set the light to subject distance to give the depth you want and then you select the modifier size to give the quality or character (hard or soft) that you want. You should not be moving your light in or out to control its size or its intensity.
With the light in closer the background gets darker. Moving the light back lightens the background and makes hot spots smaller and brighter[/caption]
This is also the reason that light modifiers come in so many sizes. You set the light to subject distance to give the depth you want and then you select the modifier size to give the quality or character (hard or soft) that you want. You should not be moving your light in or out to control its size or its intensity.
Give the gift of learning - check out our curated holiday gifts.
This also lets us more easily work in multiple light setups giving us the opportunity to light a background separately from the subject. This is how you can take a gray seamless paper background and make it look white, gray, or black. It also lets us use color gels to change the color of the background without affecting the subject. [caption id="attachment_41367" align="alignnone" width="1620"]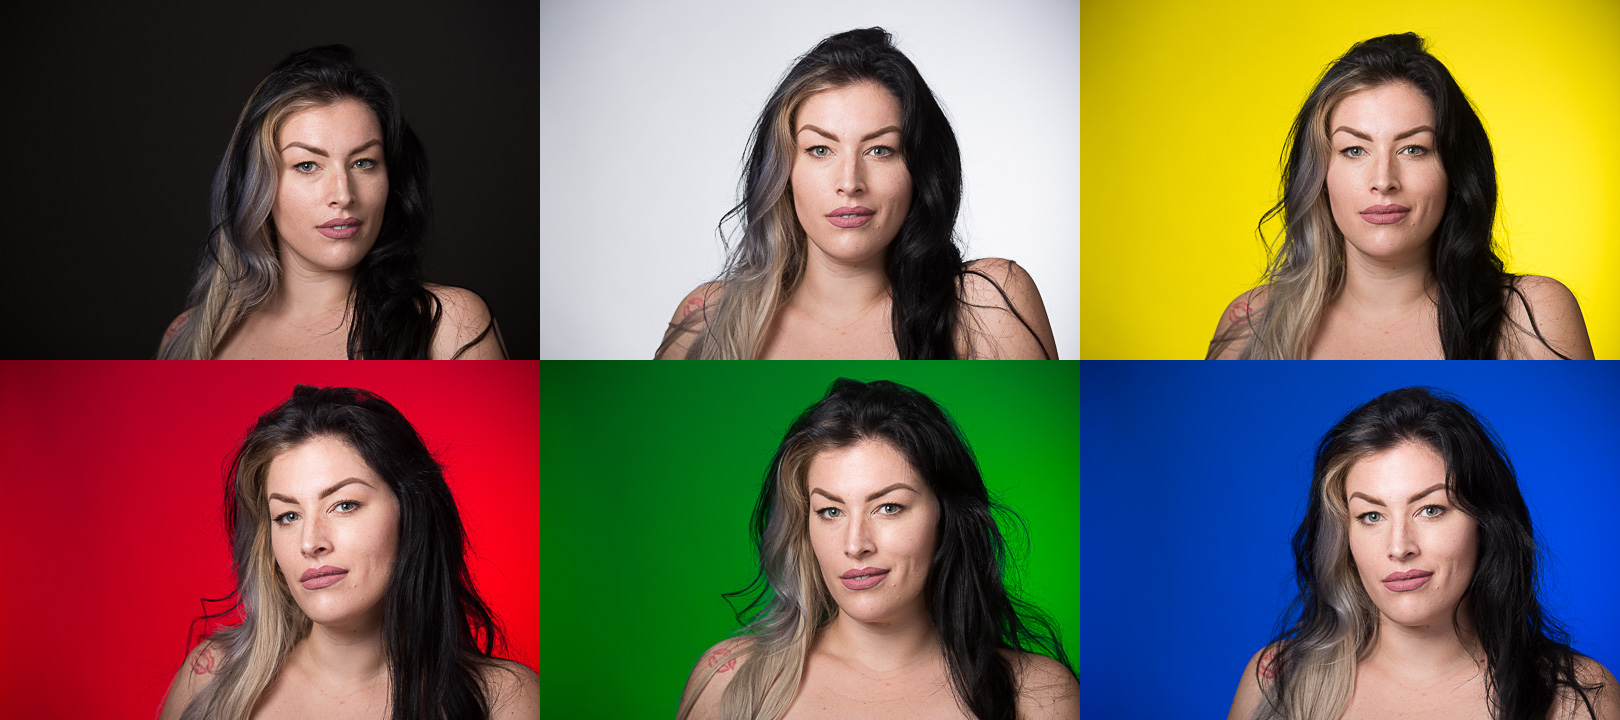 The background is the same in all of these images (the dark gray in the upper left), but by adding light and color gels we can create different backgrounds[/caption]
 One scene, one camera position, four focal lengths. The area common to each image has the exact same perspective[/caption]
 One camera to subject distance with eight different focal lengths[/caption]
[caption id="attachment_41364" align="alignnone" width="900"]
One camera to subject distance with eight different focal lengths[/caption]
[caption id="attachment_41364" align="alignnone" width="900"]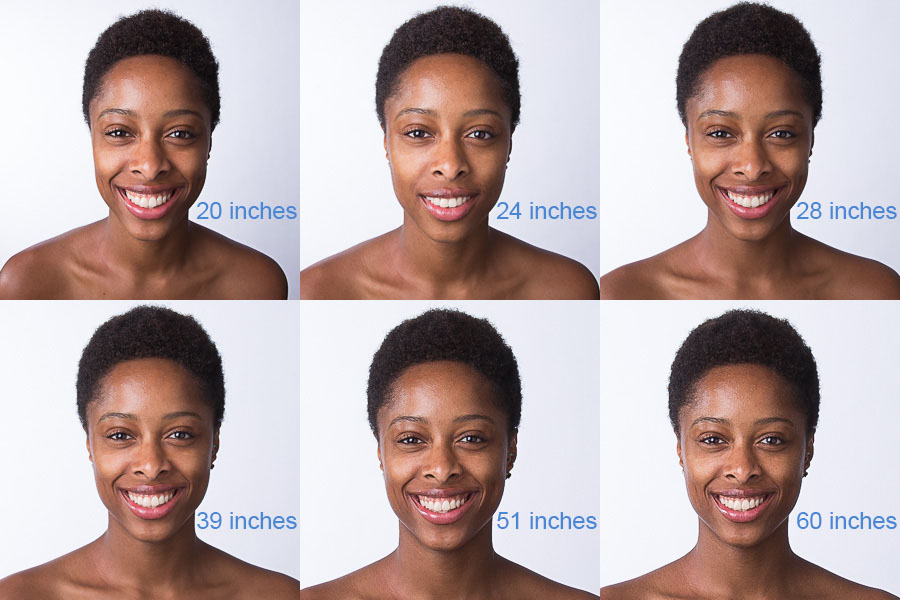 One lens at six different distances[/caption]
I hope this encourages you to go out and do some experimentation on your own so you can get a real feel of how your lights and lenses work. These are just two of the subjects I cover in my new book Anatomy of a Studio Portrait that is available for purchase on Amazon. Other topics include Aspect Ratio (or knowing where your image is going to be used), backgrounds, depth of field, white balance, eyeglasses, catch lights, and more.
If you enjoy seeing me moving lights around on set and anticipating what the CreativeLive instructors are going to need I think you will enjoy this book. I’ve tried to pack it with solid information, including an extensive glossary of photographic terms and a chapter about accessories to make your life easier in the studio.
One lens at six different distances[/caption]
I hope this encourages you to go out and do some experimentation on your own so you can get a real feel of how your lights and lenses work. These are just two of the subjects I cover in my new book Anatomy of a Studio Portrait that is available for purchase on Amazon. Other topics include Aspect Ratio (or knowing where your image is going to be used), backgrounds, depth of field, white balance, eyeglasses, catch lights, and more.
If you enjoy seeing me moving lights around on set and anticipating what the CreativeLive instructors are going to need I think you will enjoy this book. I’ve tried to pack it with solid information, including an extensive glossary of photographic terms and a chapter about accessories to make your life easier in the studio.
Give the gift of learning - check out our curated holiday gifts.
LIGHT
Let’s start with light. You have probably heard of the Inverse Square Law. I am not going to go into a technical discussion of it. Instead I want to simplify it down to knowing that the closer your light is to your subject, the darker the background will be. A major difference between sunlight and artificial light is that we cannot control the distance between the sun and out subject. While the sun is massive in size, it is very far away from us. So far that the light from the sun is the same intensity across the planet. The rays of light from the sun are virtually parallel. The same light reaches the top of Mt. Everest as reaches the floor of Death Valley. Sure there may be atmospheric conditions that change the amount of light. But absent the clouds, the light intensity is the same. [caption id="attachment_41369" align="alignnone" width="1013"] Inverse square — doubling the distance the light needs to cover 4 times the area[/caption]
This is one of the reasons that it is difficult to simulate an outdoor scene in the studio. Artificial light sources, be it a speed light, a studio strobe, a fluorescent tube, an LED panel, etc. all fall off in intensity within relatively short distances. We can’t usually back up the artificial light far enough for its rays to become parallel.
However, we can use this to our advantage in the studio. The distance between the light and the subject determines the depth of spread of the light. If we want a dark background we can bring the light in closer. If we want a brighter, more open and airy "light up the entire room" look we can back the light away from the subject. The light distance is helping determine the key of the photo. For low key the light is in close. For high key the light is moved back. Low key does not mean underexposed. The subject should be properly exposed, but with the light falling off quickly into darkness. High key is not overexposed, it is also properly exposed but with wider and more even coverage.
[caption id="attachment_41366" align="alignnone" width="1200"] With the light in closer the background gets darker. Moving the light back lightens the background and makes hot spots smaller and brighter[/caption]
This is also the reason that light modifiers come in so many sizes. You set the light to subject distance to give the depth you want and then you select the modifier size to give the quality or character (hard or soft) that you want. You should not be moving your light in or out to control its size or its intensity.
Give the gift of learning - check out our curated holiday gifts.
This also lets us more easily work in multiple light setups giving us the opportunity to light a background separately from the subject. This is how you can take a gray seamless paper background and make it look white, gray, or black. It also lets us use color gels to change the color of the background without affecting the subject. [caption id="attachment_41367" align="alignnone" width="1620"]
The background is the same in all of these images (the dark gray in the upper left), but by adding light and color gels we can create different backgrounds[/caption]
PERSPECTIVE
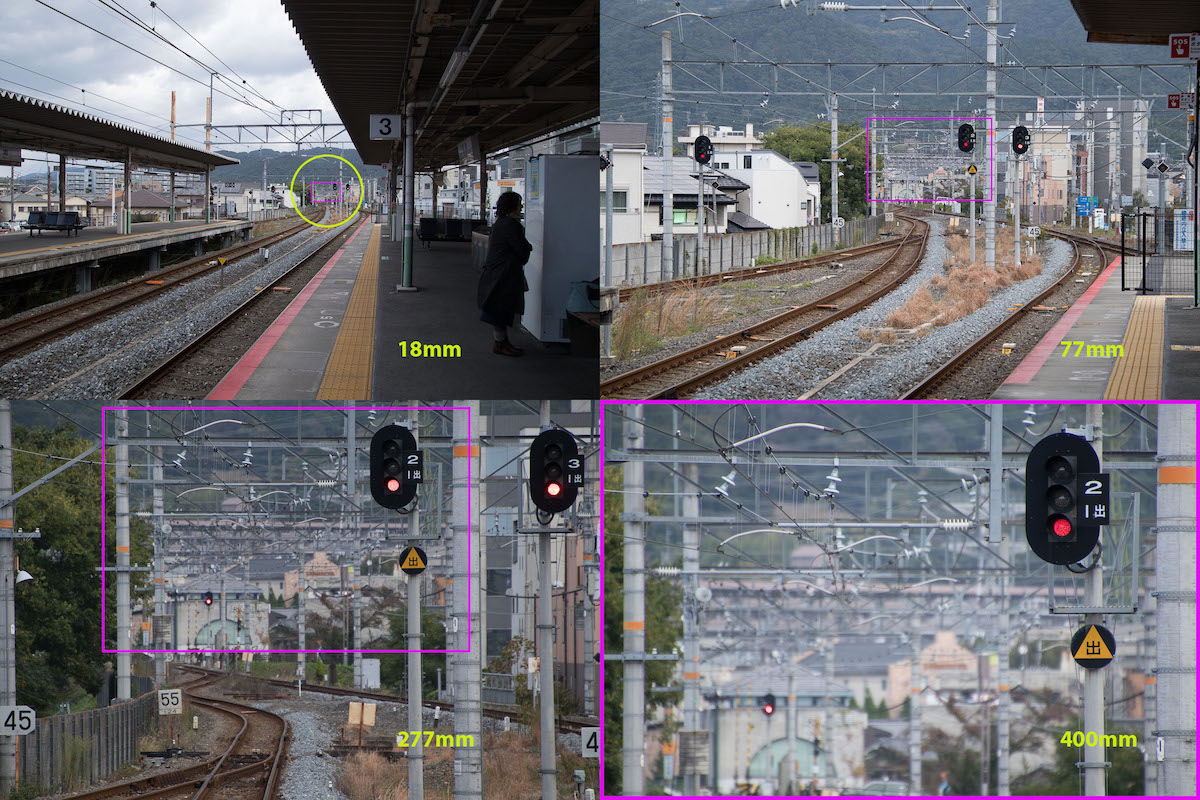
OK, so that covers light. What about perspective? We just need to change a couple of words from my earlier description. From "the closer your light is to your subject, the darker the background will be” to "the closer your camera is to your subject, the smaller the background will be.” There is a pervasive mis-conception in the photo world that the focal length of a lens determines perspective (the size relationship between objects a photograph). We are all familiar with so-called telephoto compression. In truth, that compression doesn’t come from the lens, it comes from the distance you are working at. It just so happens that when we use longer lenses we tend to photograph objects from further away. Similarly, when using shorter lenses we are tempted to move in closer to our subjects, making the scene look more expanded. It is the camera to subject distance that sets the size relationships of objects in the photograph. The focal length of the lens then determines the magnification. If your camera remains stationary and you change to a longer lens or zoom in everything in the scene enlarges at the same rate. This is as opposed to picking up the camera and moving it closer to your subject. When you physically move in with the camera your subject gets larger rapidly while objects in the distance remain at relatively the same size. This is also the reason that lenses come in so many sizes (focal lengths). You set the camera to subject distance to give the perspective you want and then you select the focal length to fill the frame the way you want. Changing to or zooming to a longer focal length without moving the camera is analogous to cropping your image, but without the loss of resolution that you get from cropping. You can test this out for yourself with a camera and a mid-range zoom lens, such as 24-105mm zoom. Mount the camera on a tripod and photograph a scene with some depth to it at 24mm. Then, without moving the camera, zoom to 105mm and make another photo of the scene. Bring both images into your post-processing software of choice and crop the 24mm image to match the 105mm image. You will see that the compressed perspective is there and the same in both images. An extreme example is shown here using an 18mm-400mm lens. You can see the same “compression” in the area of the scene that is common to each focal length, be is 18, 77, 277, or 400mm. [caption id="attachment_41363" align="alignnone" width="1200"] One scene, one camera position, four focal lengths. The area common to each image has the exact same perspective[/caption]
This also applies to our portrait work. We need to pick a camera to subject distance that flatters the features (nose, eyes, ears) of our subject and then pick the focal length lens that fills the frame appropriately. On a full-frame 35mm equivalent dSLR that working distance is often around 6 feet and the focal length that fills the frame for a standard headshot will be in the 85-105mm range. Working at the same distance (for the same look) with an APS-C camera (1.5x or 1.6x crop) you would use a lens in the 50-65mm range. Using a 4/3 camera with a 2x crop factor you would be using a lens in the 42-50mm range. Have a compact camera with a tiny sensor, you might be using a 20mm or shorter lens for the same perspective.
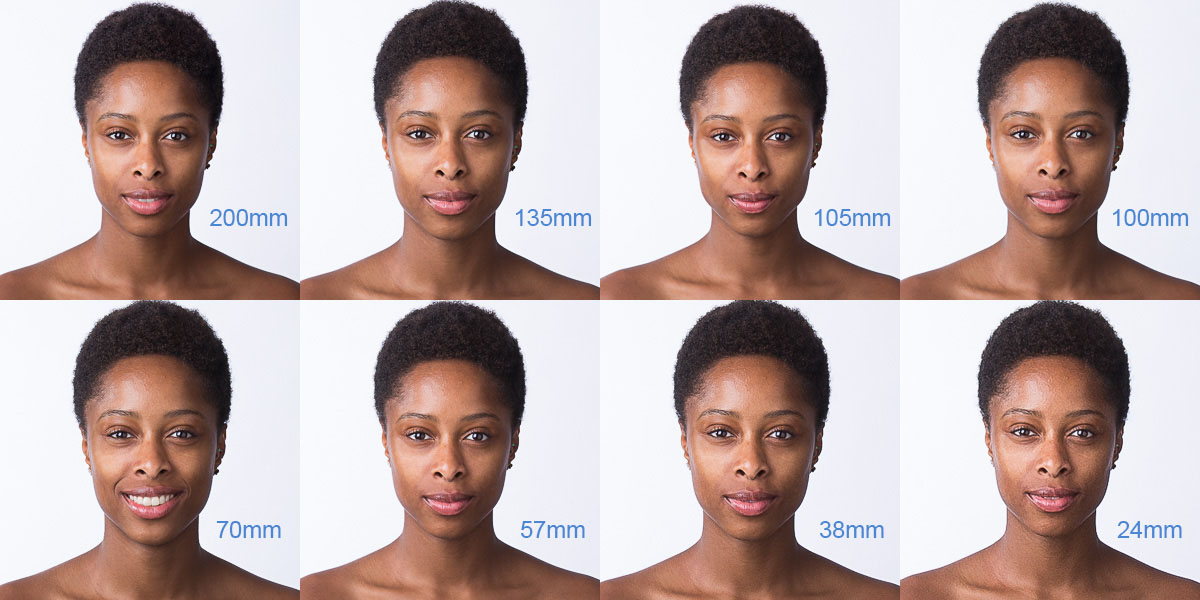
We often see focal length comparisons online purporting to show the differences between a portrait taken with a short lens and with a long lens. These are usually very misleading because the person testing this changed both the focal length and the distance from image to image. For a true comparison just the focal length should be changed. In that case you will see that the look of the face remains the same. What changes is the magnification and the field of view—how much space surrounds the subject. And the series should be complemented by a second series of photos of the subject taken from different distances with the same lens. In this series you will see that at further distances the subject is smaller and the perspective is flattened out. And when you move in closer the face changes, even though the same lens is being used. In close the nose gets bigger and the cheeks, eyes, and ears get smaller. In close enough and the ears won’t even show in the photograph. There are two sets of examples here. In the first, we have eight photos taken from the same distance with different focal length lenses. The look of the face is exactly the same in each of these because the camera wasn’t moved. The next set shows six photos taken with the same lens, but from a variety of distances. Here we can see how the camera to subject distance, especially when in close, less so at greater distances, has a dramatic effect on the drawing of the face, even though the lens is the same. [caption id="attachment_41368" align="alignnone" width="1200"] One camera to subject distance with eight different focal lengths[/caption]
[caption id="attachment_41364" align="alignnone" width="900"] One lens at six different distances[/caption]
I hope this encourages you to go out and do some experimentation on your own so you can get a real feel of how your lights and lenses work. These are just two of the subjects I cover in my new book Anatomy of a Studio Portrait that is available for purchase on Amazon. Other topics include Aspect Ratio (or knowing where your image is going to be used), backgrounds, depth of field, white balance, eyeglasses, catch lights, and more.
If you enjoy seeing me moving lights around on set and anticipating what the CreativeLive instructors are going to need I think you will enjoy this book. I’ve tried to pack it with solid information, including an extensive glossary of photographic terms and a chapter about accessories to make your life easier in the studio.
Give the gift of learning - check out our curated holiday gifts.