
 Creating beautiful panoramas that stand up to discerning viewers takes a lot of effort. Post-processing is often just as important as excellent field technique when you are trying to create an image worthy of displaying on the wall. I want to show you three less-frequently used local adjustment tools in Lightroom CC; the brush tool, graduated filter, and the radial filter.
After you’ve merged your images together into a panorama and developed the image using the Basic Panel sliders, the next step is to use selective tools to fine tune regions of the image. Mastering the brush tool, graduated filter and the radial filter will help elevate your image from good, to great.
Creating beautiful panoramas that stand up to discerning viewers takes a lot of effort. Post-processing is often just as important as excellent field technique when you are trying to create an image worthy of displaying on the wall. I want to show you three less-frequently used local adjustment tools in Lightroom CC; the brush tool, graduated filter, and the radial filter.
After you’ve merged your images together into a panorama and developed the image using the Basic Panel sliders, the next step is to use selective tools to fine tune regions of the image. Mastering the brush tool, graduated filter and the radial filter will help elevate your image from good, to great.
Brush tool
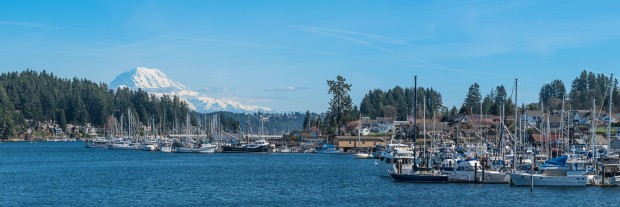
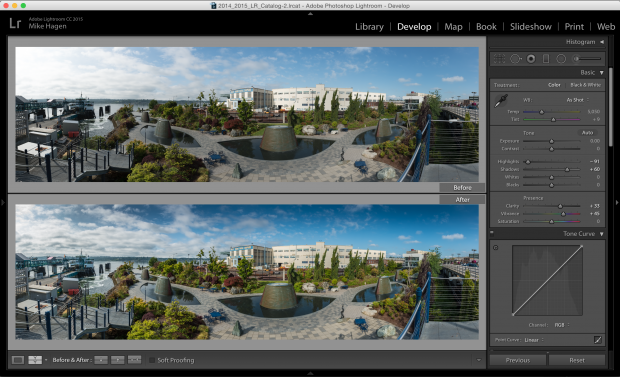
This is one of the most versatile tools in all of Lightroom and everyone should become familiar with its operation. The cool thing about it is it can be used to “paint” just about any Lightroom adjustment onto specific areas of an image.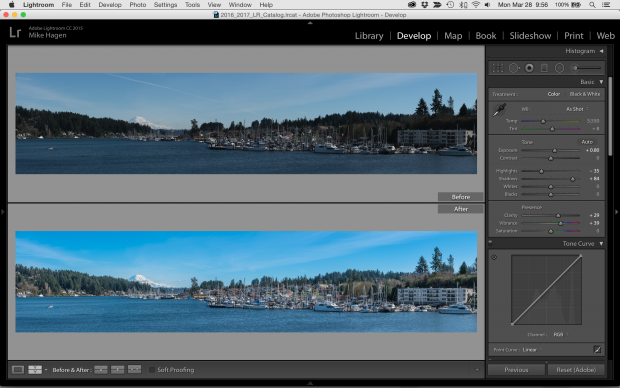 I’ll use this panorama of Gig Harbor, Washington to illustrate the use of the brush tool. In the example screen shot here, the “before” image is shown above and the “after” image is below. The before image has no adjustments and is straight out of the camera while the after image is the result of a combination of global adjustments and local adjustments.
My first steps were to make all my Basic Panel adjustments including exposure, highlights, shadows, clarity and vibrance. After I was happy with the overall brightness, contrast and color, I decided that three regions of the image needed to be further developed using the brush tool:
I’ll use this panorama of Gig Harbor, Washington to illustrate the use of the brush tool. In the example screen shot here, the “before” image is shown above and the “after” image is below. The before image has no adjustments and is straight out of the camera while the after image is the result of a combination of global adjustments and local adjustments.
My first steps were to make all my Basic Panel adjustments including exposure, highlights, shadows, clarity and vibrance. After I was happy with the overall brightness, contrast and color, I decided that three regions of the image needed to be further developed using the brush tool:
- Adding clarity to the mountain
- Deepening the blue in the sky
- Returning detail to white boats and mountain snow
Don’t want to break the bank buying lighting gear? Search your couch cushions and join us for Mike Hagen’s class, Build A DIY Home Studio.
Mountain Clarity
Since the mountain is an important part of the scene, I wanted to make sure it had adequate definition. To do this, I painted over the mountain with the brush tool and increased the clarity slider to adjust mid-tone contrast. For this image, +51 seemed to do the trick.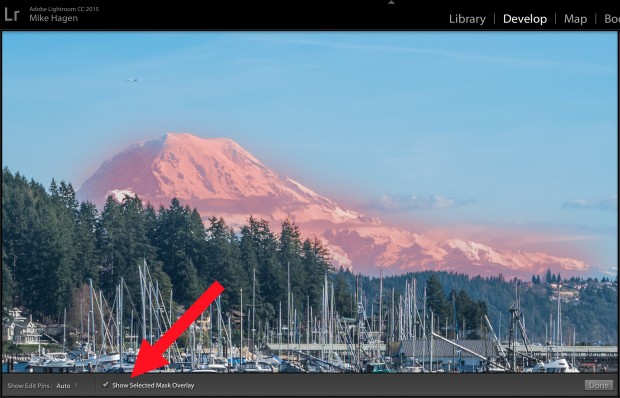
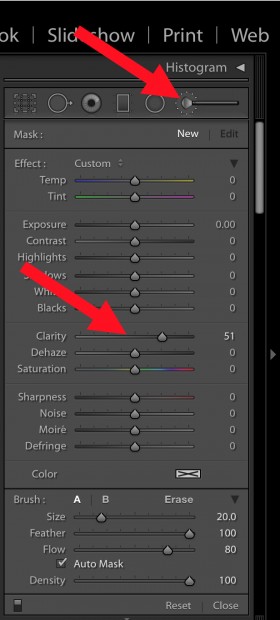 When painting over an area in a scene like this, I recommend turning on the Mask Overlay check box (keyboard shortcut O). This will show the region in your image that you’ve adjusted with a red overlay. If you make a mistake, then hold down the alt key while you “unpaint” the areas where you’ve accidentally gone into the sky.
Adding Blue to the Sky
The next step in my local adjustments approach was to use the brush tool to add blue to the sky. For this scenario, I turned on the Auto Mask feature, which helps limit the brush to the blue portions of the sky while simultaneously protecting everything else from the adjustment.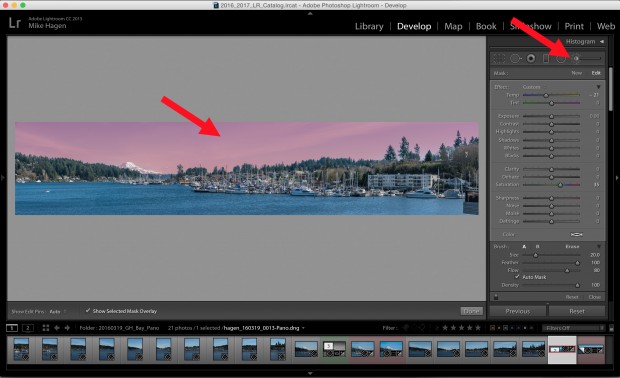 For this image, I added a little bit of saturation and changed the temperature towards the blue spectrum. Using a large brush allowed me to quickly paint in the change and the Auto Mask feature prevented the blue from spilling over onto the trees and the mountains.
Want to find a challenge for yourself? Join the Creative Photography Challenge for FREE to get them sent to you each week.
Returning Detail
Another excellent use for the brush tool is using it to push details back details in white areas of the photograph like boats or snow on a mountain. The fix for this is to reduce the highlights slider, then paint over the areas that are washed out. Again, using the Auto Mask feature will prevent the adjustment from spilling out beyond your intended area.Graduated Filter
The next most useful local adjustment tool in Lightroom is the graduated filter. I recommend using it when you need to adjust large, linear regions of the photo. Common examples where it makes sense to use the graduated filter are, darkening the sky, increasing saturation in the foreground, or opening up shadows below a mountain ridge.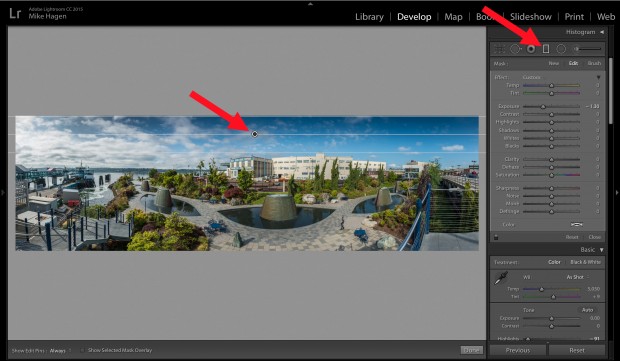
 Here’s an example where I used the graduated filter to darken the sky. This is a common approach in fine-art printing and is used to draw the viewer’s eyes towards the lower, more interesting portion of the photograph.
Radial Filter
The radial filter is a very specialized local adjustment tool with limited application for panoramas. It is designed to make adjustments inside or outside of a circular-shaped selection. For most panoramas, there aren’t many regions in a scene where it makes sense use the radial filter over the brush tool or the graduated filter. I think the best use for the radial tool is when you want to draw the viewer’s eyes to a small region of the photo by brightening that area. In these cases, you’ll fundamentally be using the radial filter as a localized vignette tool.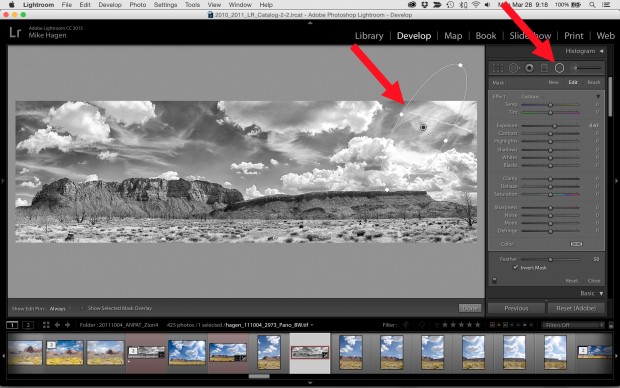 You’ll find the radial tool between the graduated filter and the brush tool. After selecting the radial filter, click on the photograph in the region you want to adjust, and then drag outwards to create the circle. Once you’ve set the general size of the circle, you can manipulate the shape by clicking and dragging the anchor points on the perimeter of the circle.
When you begin adjusting sliders, you’ll find that they initially affect regions outside the circle. If you want make image adjustments inside the circle, then click on the check box next to Invert Mask at the bottom of the tool in the right panel.
In the case of the example I’m showing here, I’m using the radial tool to locally brighten up the sky with the exposure slider. My goal was to enhance the perception of the sun shining through the clouds in that region.
You’ll find the radial tool between the graduated filter and the brush tool. After selecting the radial filter, click on the photograph in the region you want to adjust, and then drag outwards to create the circle. Once you’ve set the general size of the circle, you can manipulate the shape by clicking and dragging the anchor points on the perimeter of the circle.
When you begin adjusting sliders, you’ll find that they initially affect regions outside the circle. If you want make image adjustments inside the circle, then click on the check box next to Invert Mask at the bottom of the tool in the right panel.
In the case of the example I’m showing here, I’m using the radial tool to locally brighten up the sky with the exposure slider. My goal was to enhance the perception of the sun shining through the clouds in that region.
That’s It
Ok, you now have everything you need to get started using Lightroom’s local adjustment tools on panoramas. Get busy making some edits and share your results with us on Instagram @creativelive.Dont forget to RSVP NOW and watch Mike Hagen’s class, Build A DIY Home Studio LIVE!