
 Digital photography seems so easy, and in some respects it is. Point, shoot, view the result, correct issues and shoot again.
But for those who want to take their digital photography up a notch, capturing the image is just the start of the workflow process. Exposing an image, setting up the camera, and creating a post-production environment (among other things) all have an effect on the final outcome.
In the early 2000s, my transformation to digital photography was a challenging one. At that time, the sophisticated software options that exist today were unavailable and very few photographers had a handle on color management, This made digital photography a complicated and frustrating feat. All of the photographers and photo editors I knew were struggling to figure it all out and get their images to look as good as they did with film. It took me a few years to get my images looking the way I really wanted them to with digital.
Fast forward to today, there are more tools than ever at our disposal to help make the digital workflow easier and much more efficient. In spite of this, there are still digital workflow issues that every photographer needs to know about in order to output top-notch images. Here are four guidelines for any amateur or pro photographers.
Digital photography seems so easy, and in some respects it is. Point, shoot, view the result, correct issues and shoot again.
But for those who want to take their digital photography up a notch, capturing the image is just the start of the workflow process. Exposing an image, setting up the camera, and creating a post-production environment (among other things) all have an effect on the final outcome.
In the early 2000s, my transformation to digital photography was a challenging one. At that time, the sophisticated software options that exist today were unavailable and very few photographers had a handle on color management, This made digital photography a complicated and frustrating feat. All of the photographers and photo editors I knew were struggling to figure it all out and get their images to look as good as they did with film. It took me a few years to get my images looking the way I really wanted them to with digital.
Fast forward to today, there are more tools than ever at our disposal to help make the digital workflow easier and much more efficient. In spite of this, there are still digital workflow issues that every photographer needs to know about in order to output top-notch images. Here are four guidelines for any amateur or pro photographers.
Exposing for Digital
Image exposure is a huge issue and one that many photographers are not aware of. When shooting in digital photography (and ideally in raw), be sure to focus on two major things: not blowing out the highlights or underexposing the image drastically. Blowing out the highlights means that parts of the image are pure white and those highlights cannot be recaptured in the post processing. Be sure to expose to the right, setting the exposure so that the histogram is as far to the right as possible without blowing out important highlights. If the sun is in the image or there are reflections off metal objects, be sure to blow them out. Otherwise, aim to avoid blowing out important parts of the image. Underexposing can also add huge amounts of noise to the image. Tread carefully.Want to set up a practical and efficient workflow? Learn more from Michael Clark here.

In this modern era, we often expose for the highlights, like the bright sky, and then let everything else fall into shadow, knowing we can pull up the Shadows slider later in post. That is perfectly fine, but it’s imperative to know your camera and what it is capable of. Dialing in the perfect exposure with digital can be difficult, but with experience you can optimize the exposure to ensure the best final image.
Color Management
“Color management” is one of those phrases photographers either love or hate. Regardless, it is a necessity. Back in the film days, Kodak and Fuji spent billions with a “B” on color management for their films so it was only an after-thought for the photographer. Today, photographers are the processing lab and our monitor and the software we use dictate the colors we see in our images. If you don’t have full control over the colors you see on your monitor, then working up your images is a waste of time. A good quality monitor that shows all the colors contained in your image, along with a monitor calibration device, are two of the critical steps in good color management. Once you get control of the colors you are seeing, you can be assured that what you see on the monitor is indeed what the image will ultimately look like.Organization
One of the biggest issues I see when I teach workshops is students who have a rat’s nest of an image archive and struggle to find their images easily. Learning how to build an organized image catalog is key to finding and working with your images. At the heart of any organization scheme is having all of your images in one place and using unique folder and file names to make sure images aren’t accidentally overwritten. It’s simple to get organized, but it is time-consuming and frustrating to re-organize. The earlier you start, the better.Knowing how to work up images
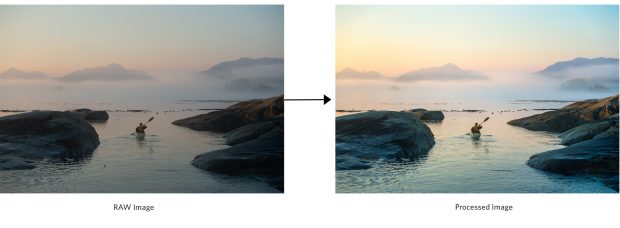 While this might seem like an easy step, knowing how to squeak the most out of your raw digital image files is not as easy as it might seem. Learning how to work up your images will make you a much better photographer. With my own images, it takes anywhere from twenty minutes to a few hours to really make them shine.
The best way to improve your photography is to learn how to work up images better.
While this might seem like an easy step, knowing how to squeak the most out of your raw digital image files is not as easy as it might seem. Learning how to work up your images will make you a much better photographer. With my own images, it takes anywhere from twenty minutes to a few hours to really make them shine.
The best way to improve your photography is to learn how to work up images better.
Want to set up a practical and efficient workflow? Learn more from Michael Clark here.