Lesson Info
12. Adding A Logo
Lessons
Class Introduction
01:43 2Software You'll Need
00:36 3A Brief Intro To After Effects
01:54 4Class Materials
00:56 5Isolating The Tripod Area
07:17 6Seamless Tripod Removal
02:04 7Replacing Tripod From Bottom Of Sphere
03:37 8Retouch And Reset The Panorama Center Point
03:39Lesson Info
Adding A Logo
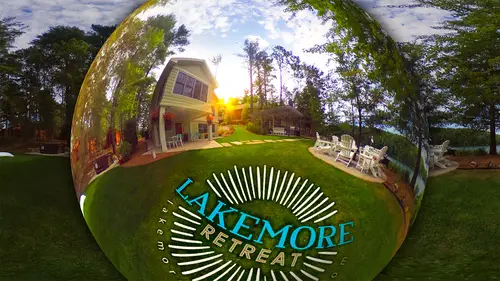
So now we're ready to add a logo into our spherical panorama. So let's switch back to our project panel. Next let's go to the file menu. Let's come down to import choose file and from the exercise files. Let's go into folder A and let's choose logo dot PNG. Now, as I mentioned before, we're not including the lake more retreat logo in this particular course we have a sample logo instead. However, I would encourage you to use your own logo so you can see how your branding looks inside of the sphere. So once you have a logo selected, let's come down and choose. Open. Yeah, next let's go to the window menu. Let's come down and activate DVR competitor. Let's click add to the edit for the composition. Let's choose Blakemore retreat, modified for the comp with Let's bring this up to about pixels and then click add to the edit. And just like before if you get the Gpu effects error, click ignore. Change your resolution in both the edit and the output to half switch over to output, click ignore...
. I'll set this one to half as well. Now I can click between the two. Let's close the VR competitor And in the edit one composition. Let's come up and click the unified camera tool. Let's click in pan. I want to view the bottom of the sphere where we remove the tripod. Next I'll switch to my selection tool, then back to the project panel. Let's grab logo dot ping, drag and drop this into place. We want to make sure that the logo doesn't touch any of the edges so I come in here and just scale us a little bit. Also going to rotate this down in the timeline panel. Let's toggle open the properties for logo topping. Let's toggle open transform. Let's find rotation. Let's click and drag on the numbers. Just rotate this a little bit. Somewhere around 21°.. Close up transform. Next let's add an outer glow just to make this a little bit more visible against the grass. So let's right click on logo dot ping. Let's choose layer styles, choose outer glow and this works just like outer glow inside Photoshop. So let's toggle open the properties for outer glow down in the timeline panel. For the blending mode let's come up and choose linear burn, scroll down For the size. Let's set this to about 20 hit tab for the spread. We'll set this to 10%. Yeah, a tab again, Scroll up a little bit, but the opacity, we're gonna set this to 10 and then for color, let's click on the color swatch. Next, we'll select the eyedropper inside of this dialog box. Let's go my parents select a medium green, just like this a little bit. Then she was okay then. I'll just come in here and toggle these properties closed. Mhm. Let's go back to the composition. I'm just gonna scale this up just a little bit and then with that in place, let's go back to the lake, more retreat, output composition. And now we can see our logo distorted to fit into our unwrapped panorama. And now at this point to save out our final panorama, we're going to need to use the render queue regardless of whether you can see the full resolution or not. This is because we applied an effect to an adjustment layer and that's a technique that's not supported inside of Photoshop. And besides, we can render out the final jpeg from the render queue. So from inside of the output composition, let's go up to the composition menu. Come down to say frame as choose file. For output module, click on Photoshop. Let's change this to jpeg sequence. Then inside of the video output section, click on format options. Let's bring this up to about equality of nine click OK, click OK again. Next click on the output file. Let's choose the desktop and we're going to save this as like more retreat dot jpeg. Mhm. Then she's safe and then we'll come down here and click render and now with our final jpeg on the desktop. Next, we'll make sure that we have the proper metadata inside so we can share this on social media.
Class Materials
Bonus Materials with Purchase
Ratings and Reviews
Rex Maximilian
In Lesson 8 I would highly recommend grouping the layers into a folder named "Components," then duplicate it and turn the duplicate into a smart layer. Then rename the smart layer "Composite," or something like that. Then turn off the group of layers leaving only the composite layer displayed. This way the files remains editable for future lawn/image cleaning. The way the instructor did it would delete all of the layers for potential future editing.