Lesson Info
1. Lightroom Output and Export
Lessons
Lightroom Output and Export
1:25:59Lesson Info
Lightroom Output and Export
Mr jared platt he's a wedding in lifestyle photographer based out of arizona he's an educator he's been teaching for twelve years speaking for seventeen or I might have had those numbers reversed, but he is one of our favorites here he knows the light room inside and out and he is here to teach us all about output and exports you we've figured out how to actually make our images look the way we want him and now we need to get them to everyone else, so take it away. All right? So our goal for this segment today is to discuss output export, which are kind of the same thing but it's just a matter of getting what you've done inside of light room out of light room, it doesn't matter whether you're a beginner, intermediate or advanced user you're going to find something in the next hour and a half that's going toe help you illuminate you on a better way of doing something or maybe an excellent explanation on how to do something that you didn't quite understand. I will talk a lot about color ...
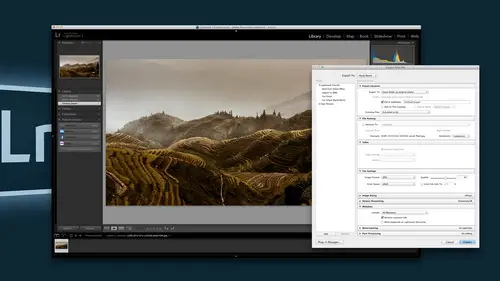
profiles will talk about exports, export presets andi will even talk about round tripping to photo shop, so if you're tired of me talking about light room well actually talk a little bit about photoshopped as well, so that's where we're going and let's get started tow understand exporting and output in light room the first thing that we have to do is do a little quick discussion about what light room is actually doing to images light room is a database which means that the images are actually inside of light room they're just referenced by light room and we alluded to this in the last segment that light room doesn't actually do anything to your photographs it treats them as sacred basically they are untouchables whether they're raw or j peg or tips or photoshopped documents light arms not actually doing anything to those photographs when you import into light room which is kind of a misnomer because you're not actually importing the photos in tow light room what you're doing is you're ref rinsing them so you're pointing to a folder and saying light room I want you to look at these photos and then when it does it takes a snapshot of what those photos look like and it brings in a j peg version of that photo and shows you so this this image we're looking at here inside of light room right now we're not actually looking at that image we're looking at a j peg a preview of it so it's just saying this is what the image looks like on the image it knows is over in this folder and so when I adjust this image of work on this image is just working on what it knows about the image and it's showing you a preview of what that image would look like if I'd did this that or the other thing to it but it doesn't ever actually do anything to the image the image is still sitting in its original form inside of a folder somewhere it is only when you output by printing making a slide show making a web uh paige uh sending it photo shopped any of those export options that you haven't like it's only when you do that that it looks at that image takes the original data applies the adjustments that it's made to that and then it sends out a copy j peg tiff photo shop whatever style of file you want it sends that out and that's the copy and that's the on ly copy that has been affected kind of baked in a change to the file and the original file still sits untouched where it was originally um and that's a fantastic model which light room follows but you have to understand that that's what's happening to your images that so the original images air untouched in order for those images changes that you've made to become permanent to the file you actually have to export those images as a file so now how do we get those images out what's the best way it depends on what you're doing if we are just editing one image at a time then we want to use the edit in photoshopped command if we're trying to work on us a bunch of images at the same time on we're trying to export, say, five hundred images, then we want to use the export dialog box to work on that. Um, if we air trying to print to a printer, we're going to use the print dialogue are the print module inside of live from if we're trying to make a web page on his web module, if you're trying to make a slide show he's a slideshow module, they were trying to make a book, we'll make the book module. All of those modules are output modules, so book slideshow, print and weber. All the purpose of them is to send something out to share it with the world in whatever form you want to share it, and then there's the export dialog box, which is just to share images themselves, and then there's the edit in command, which is to round trip it or send it to photo shop and bring it back, and then there's one last export option, which is in your kind of buy in the collections area, and that is down here in the published services, so published services also an export option for working inside of light room and getting images. Out so we need to talk about all of those. Some of them will spend a little bit more time on, and someone will spend a little less time on because some are just so simple that they don't want a lot of discussion. Okay, so the first thing I want to do is I want to go into the edit in photoshopped command that's, the most direct route to get something into photo shop. So let's, take this image itself and let's say that I had taken as far as I possibly can inside of photos are inside of light room, and I felt like I needed to go into photo shopped for some reason. Maybe I wanted tio remove something that's out there. Maybe I wanted to do some work on some kind of a plug in that I have inside of photo shop, or maybe there's an action that I want to run inside of photo shop. So there's some reason that I want to go into photo shop, I can't finish it in light room. I think I could probably call quits on this image as it is, but we'll go to photo shop just so that we can play with it. In that case, we simply right click the photo that we want to go into photo shop in, and we add it in and now you're going to see at the top of the list is photoshopped, cc and then there's a whole bunch of other options that's because I've installed those other options and told it I have other things I could edit this in I could add a nick software I could add it in the perfect photo suite a I could add actually add it in rad labs I can edit it in snap seed I can edit it in vase a dx oh there's so many different places I can edit this photo in andi all of them are basically the same concept as sending atf osha what it's going to do it's going to make a tiff or a j peg or psd? Whatever it is you tell it to make and then it's going to once it's made that copy it's going to send that copy over to the application that you've chosen open that and you can add it in there when you when you close that application it's going to save that file and that files going to be back inside of light room for you to use inside of light room. Um the reason that ed in or this round tripping concept is so powerful is that light room it's it shines an organization and in basic manipulation of photographs, but there are certain things that you can't do in it like for instance, if I have a senior portrait and I'm doing a lot of retouching on that senior where I'm warping things or, you know, nipping and talking and changing something like that, those types of things can't be done in light room, you can do a little bit of retouching inside a lighter but not much and so I'm going to go to photo shop for that there are certain things that I could do in photo shop I could do in light room, but they're just more powerful and say the nick silver effects pro that are better than any other place and so I might go to that for that specific purpose, so there are other programs out there that have better file manipulation capabilities than light room on dh, so we want to go to those for that, but once we're done, we should return to light room because light room should be considered the center of the universe for photo people, right? Um so if you consider light room as the center of your universe and that's where all of your images stay and then you simply send them out two different plug ins and different tools as needed, then you'll always be operating in a very organized fashion that's very easy to share images with the world um I consider photoshopped to be a plug in for like room so light room is my primary, um, software and then all other things are appendages to light room, including photo shop and photoshopped, then becomes a route through which I can use all of my plug ins that aaron photoshopped like, for instance, I can use nick software, I can use rad labs, I can use perfect photo suite inside of photo shop and through actions, aiken command those things so that the work that I do and photoshopped doesn't need to take very long because I have it pre programmed with actions inside of photo shop. All right, so let's, go in to photo shop and watch what happens. This is a raw image that we're working with right now, so this is a c r to image file, and when I right, click it and I read it in photo shops, sisi it is currently making a duplicate and sending that duplicate too photoshopped that photoshopped duplicate is what I'm going to add it once it gets there, my my goal is then to go to the actions area and use actions on lee to get done with this, or maybe I might want to use some kind of a in effect that's on ly available or on lee I mean, you can pretty much make effects inside a photo shop without plug ins. But it will take you a while to do them, so you might as well use plug ins that will automatically do those things for you. So, for instance, if I wanted to take this image and really work out some, you know, some film effects to it, then I could go to my filter area and just open up, say, uh, hdr effects pro, or I'm sorry, not hr silver effects pro click on that, and I'm just going to run it through silver effects pro, and I'm going to create I'm going to zoom in a one hundred percent so that we can see what this is going to look like, and I'm going to create an effect, and aiken, you know, I can just click click on some kind of, ah, a preset or I can make my own, and so I'm going to go back to neutral, and all I really want to do in this effect here is I just want to add some really nice crane and light room adds grain. I can add grain inside of light room, but there's something special about the way nick adds grain it's very different light room tends to treat grain as the way you would see it in film, where when you get tow white there's no grain whatsoever, because the white doesn't actually have any grain in it because it's clear film and so you wouldn't have any I'm sorry, it's, it's blocked up film so you wouldn't have any of the whites just don't if nothing gets exposed on the piece of paper, then it just shows paper, right? And so the more blocked up the negative gets the less light gets onto the paper, and so the paper doesn't record anything, so there is no grain in it, whereas knit tends to actually allow the grain to enter into the whites a little bit more, which makes the transition smoother and nicer. So when I have someone like with facial shine here and I want that and it's so it's, so bright that it just blows out, we've ever had that you have a face and then part of the faces blown out. If you add green inside of nick, plug in instead of inside of light room, you'll find that the grain will actually go over the top of that. And when that happens, it nullifies that shine, and it suddenly doesn't look as though you over exposed the face. And so it's actually a good fix. Kind of a polish a turd type of situation when you have a problem you can kind of polish that with silver effects pro so it's just a different mentality of grain but in this case will use it so I'm gonna you know play a round of the grain make it a little harder and then the other thing I like to use is the structure inside of silver effects and I'm just going to add a little bit more structure to it so those trees pop a little bit better and hit okay now what happens here is it's creating a a layer of of grain over the top but it's black and white and remember we wanted this to be a color image so now I can come in and grab onto this normal here instead of a normal layer type so here's the player of the black and white I'm going to click on normal and come down here to luminosity and now it's on ly a luminosity still has the grain so if we zoom in here we see the grain and the structure that's been created by that but because it's only luminosity it's allowing the color to flow through it so now I have a really beautiful grain effect over the top of my normal exposure um and so the color comes from the background and then the grain and the structure comes from this luminosity layer okay so we've done something inside of photo shop and now we're going to close this so if I just hit w command w to close this is going to ask me if I want to save it yes I do want to save it and it's saving me a tiff file and it's returning that tip file to light room so once once it's done saving we'll see another photo is going to come in to see how we've got number one of two and two of two and if you zoom in here these air important these little stacked things one of two two of two this is the original file this is the c r two in fact you can see the name right there see our two and then when I pointed this one that's the edited tiff file now where do you set up the settings for your preferences do I want a tip file do on a psd do I wanted to stack it what do I want to do with the file that all happens inside of your light room preferences and then inside of your life and preferences external editing is where you're going to set that up inside of here you can choose whether you want to have tiffs whether you want to have photoshopped documents what what color space do you want to put it into and we'll talk a little bit more about color spaces in a minute what kind of bit depth do you want? As well as what kind of resolution do you want? So three hundred is your is your typical resolution for photo printers to forty is more of an inch that resolution. So depending on what you you know constantly are printing too then that's what you would export to and then whether you want zip, file compression or none of those are the things that you would set up inside of here. Now notice that there's also a secondary additional external editor in this area you can set up presets and remember last segment we talked all about presets here's, another place where we have presets and you can set those pre sets up so that all of those in that drop down menu of the edit in this is where all of them are set up. So all I have to do is choose a file type so I can choose j peg srg a bit three hundred d p I if there's something that I want to send a j peg of this nature too then what I do is I choose here's the application right here I choose the application that I want to send it to so let's say that I wanted to edit this in um well, let's just say that I want to read it in say, uh alien skin or something alien skin boca if that's what I wanted to do I would choose that and now there's the application so when I choose that preset it's going to send it to that application for edit it's going to use these parameters to send it and then it's and then but what I need to do now is save that as a pre set so that it's always available in the drop down menu so I write all right click on this and go down to the bottom and save this setting is a new preset and I'm going to say j peg hopes j peg to boca there and then if I hit create now I've got a preset so that when I come back here and right click this image at it in aiken go j p hate to boca and it will automatically send based on the parameters I put in it'll send it to that specific one so that's how you set up your set of editors most of the time you're going to photo shop but sometimes you're going somewhere else and if you're going somewhere else you don't want to have to keep trying to get it there just set up that specific export option inside of your edit two options in the preferences here inside of light room ok now the other thing that you can add down at the bottom is stack with original I love the stacking because it keeps everything organized, it sends it out at its and it puts it on the top of the stack so that you know which one is the new one in which one is the old one. And then if you collapse the stacks on ly, the top of the stack gets exported. And this is important because we're talking about export situation here, right? That's the name of our course here right now is export. So exporting when we export something we have to collapse are stacks because if we have a bunch of raw images under and then we have a final edited image on top, we don't want all of the random raw images to be exported. All we want is the final image that's on top of that stack that's the one we want to export. So if you collapse the stack, then on lee, the top of the stack will be exported and all other things will be ignored if you open the stack and highlight everything than every version gets exported. So when I'm sending it out to the client, the only one that they get to see is the top of the stack. Ok and you can stack a lot more than just unedited one you can you can grab a bunch of raw images there separate in a different raw images and stack them in together as one so you can just choose the best one put the best one on top and that one khun b the the export of document so you can stack with the original and then you can also rename so you can either rename the the image that's going toe light room I mean to photo shop you can edit it so that it says the number dash edit or you could rename it so on lee has the number or you could in any way you want to rename it any renaming structure that you've added into your remaining templates you can add so at the bottom there you can edit and you can change the structure for your naming here so we only wanted it to be the actual name of the file then we would just simply say file name insert and then hit done and now now it's just going to be file name and that's it it won't say edit on it'll just whatever the file name is that's what is going to be if you allowed to say ed it afterwards than the client will know this one's been edited this one hasn't this one has this one has because it was they would see that so those are your options there now let's talk quickly about stacking stacking is simply done by clicking on this one of two if I click on the one of two it will close the stack do you see how that closed and then if I click on the two now now has that little symbol that tells you that there's more than one image in this area if I click on it, it opens the stack close the stack open the stack if I want this one to become number one the top of the stack I click on it and it now this one is the cr two and this one is the tiff, so I've changed the primary top of the stack photo I want the tiff to be the final one, so I click on two of two and it switches the position. Now this one is here and the raws below close the stack by clicking on the one of two and closes the stack. Now if you're the type of person that uses stacks intensely so you have lots of stacks and you don't know where they are, what you want to do is you want to click on your entire set of images, highlight all your images and go up to photo menu if you click the photo menu, go to stacking you khun collapse all of the stacks at one time it'll find anywhere there's a stack and collapse it. I always do that right before I export that way, all images air collapsed. I'm only going to deal with the top. I don't have to remember how many stacks I need to close. I just need to highlight all my images, go up to the photo menu, stacking and collapse all stacks that way, when I export on lee, the top of the stack goes out as a really important thing. If you have a note pad, write that down always collapse your stacks before you export because you don't want to be surprised that you got like fifteen different versions of the same thing, so always collapse your stacks before and that's in the photo menu. Okay, so now that we have done our round trip every got the round trip now what if I'm working on multiple images and I don't want to sit and wait for the image to be opened? I don't want to produce a new photograph, go in, edit it and then save it, close it, and then I have to go to the next one and click on that one because there's a time frame where it has to open it, create a new coffee of it and then open it and photoshopped if I'm gonna work on, say, you know, all of my two star and above so I'm in a sort by to start above so these are all my two star images and I'm gonna work on all of them in photo shopped at one point but I don't wanna wait for those to be produced the other way that I can work and photo shop is simply highlight all of those images and we won't we won't highlight this one because I've already done it so and by the way I d selected those by holding the command key down um I think in pc its control key but if you hold that down it will add or subtract images from the selection discontinuous lee so I can take all of these images that I want to go into photo shop with and I can go into the export dialog box so the export button is right here, but the key stroke for the export is command e um I'm sorry shift command e there go eso shift command e or shift control? He I believe um is the export dialog box ad it in is command e that's that's it in a shift command? He is the dialog box and in your dialogue box you're going and we're going to talk about this intensely in a minute but just so you understand there's another way to do the edit in which is to do all build all the files first and then do the evidence so you're not waiting for those files to be produced each time you go to edit in photo shop so this is what I do when I'm making an album for a client um I'm or or when I have, say, fifteen images I retouch for a client, I'll go to the export dialog box and I will choose the following settings so just watch me as I go down here, the first setting is I'm going to tell it to be in the same folder is the original so that's going toe produce a photoshopped document or a tiff document is going to put it right next to the original wrong, then I'm going to tell it to add it back to the catalog and this is a really important part of the export process. If you're exporting images toe work in photo shop or some other of image editing software, you still want to work on him inside of light room afterwards because light room is where you're going to export all the final j pegs that's we're gonna make books that's where you're going to make all of your prints all of that kind of stuff happens inside of light room and so to stay organized what you want to do is you want light room to make the j peg make the the photo shop and then put it back in its catalog so you can see it again because you could just export it without doing that and then it would just be somewhere else and you have no reference inside of the light from catalog, so we're gonna add it to the catalog and we can choose to stack it above the original, so now it will come back and put itself on top of the original images that you're working on. And if there is an existing file, we can tell it ask us what to do. We can choose a new name for the export of file, override it without warning or skip it. Generally speaking, I don't need I'll have it asked me what to do because this doesn't occur very often because I I'm not constantly exporting the same thing over and over again. S o that's the settings for the location where we're sending the photo, the custom naming I'm not going to rename it at all I'm just going to leave it as it is, whatever that name is, so you'll have a d n g or ah si r two or in any of file and then when it makes a photoshopped document it's going to be number one o six dot psd so it's not going to change the name it's just the final file type that's changing that little extension so then we're going to go past that I can choose to include video files I don't necessarily it's not part of what we're doing here on dh then I'm going to choose the image format, so I I like p s d s but when I'm dealing with random, um possible editors, I'm going to go with a tiff because some editors don't work in a psd they only work with a tiff so a tiff is a much more universal file type so that's a better place to go if you if you're sending it all sorts of different places, however tiffs have one problem and that is that when you save them they always pop up that annoying little dialog box that says, do you want to save this with compression? Do you want to save it for mac or pc? And so then all of a sudden you've got this tricky when you're dealing with trying to command from light room and we'll talk about this commanding light room are photoshopped from light room and you're using actions then when you make the save as action inside of that action to try and commanded it still wants to pop that little annoying that and you'd have to sit there and say ok, ok, ok, ok every time it did it or you'd have to program the action to get rid of that dialogue box a little more complicated a psd doesn't have that issue it just saves it because it's photoshopped it just saves it doesn't have the dialog box that pops up so I prefer the psd if I can get away with it but if I'm making the action for you any possible editor than a tiff is amore that is a better place to go so you choose but I'm always going to be editing in pro photo rgb and this is a good place to talk about color spaces since we're in this area right now color spaces are a lot it's a bugaboo for a lot of people because people are so used to dealing with color spaces and so then they get there in photoshopped they've got their color spaces and they're really comfortable with their color spaces and they like, you know, talking about color spaces and then they get to white room and there's no color space and then they freak out because they just don't know what to do without a color space and so you have to you have to think of light room as a raw photo color space it's it's working on raw images it's working on whatever gamut exists in the photo it's very it's raw it just doesn't color spaces is uh I don't want to say it's unimportant but it's it's invisible in light room it doesn't exist for you and we exist to behind the scenes, but they're doing it for you, so don't worry about it. Um the thing that you need to understand is that if you're going from light room, then to photo shop, a lot of people see the colors change and most of those people see the colors change because they're using a working color spaces with photo shop of s rgb or nineteen ninety eight adobe rgb you're appropriate color working space and photo shop if you want to match what's going on in light room is pro photo rgb it's the most color that you can get, and so light room is working with the most amount of color you khun get. So when you're in photo shop and you wanted to match, you need to make sure that you're working in the largest color space possible, which is the pro photo rgb that is the most approximate close color space that you can work on tow what's being worked on inside of light room if you set your working color space inside of photo shop too that the two will match better okay, all right on I'll show you where that is in a minute, so we want to work in pro photo rgb, which means that you have the most color it's like working with the really big crayon box with the sharpener on the back that's, the one you want to work with, like you went to school and you had, like the eight crayons and then the kid next to you had one hundred twenty eight crowns with the sharpener and you like my mom doesn't even love me, you know? But this is what pro photo r g v is it's that huge crayon box it's got all the bells and whistles. Okay, so you can make more out of it on dh. Then sixteen bit is much better than in a bet. It's exponentially better because it's got mohr bit depth means you can kind of shift the pixels around and work on images. Eight the images of the ones that you typically see banding in the skies and in shadows on people's faces you see it kind of stair stepping that's because you're in eight the s r g b those are all very limited color space is limited. Bit depth means that it can't describe the difference between blue and light blue and lighter blue. It just goes from blue toe, lighter blue and it has no definition in between those. And so because of that, it can't you end up getting those bands, so you want to be in the best color bit. Are the best bit depth in the best color space possible, and that gives you the most abilities when you're in light room are photoshopped to be working on images and not destroying those images as you're working on. Yeah, are they went to thirty two bit presumed dean or keep it in sixteen? I don't know the answer to that, but the more bit that they can give us, the better off. Now, in the in light room, you can work on er hdr type stuff. You can make a thirty two bit file and it can read it inside of vote inside of light room and you can work on that file. All right, is it thirty to twenty for anyone but it's it's more hdr it's, not sixteen that you can actually take it back into. So what you do is you you export two or three exposures into photo shop and photoshopped creates it is thirty two is it creates the thirty two bit file that you would work in the hd are pro inside of photo shop, and then instead of working on it and photoshopped, send it back to light room and the controls you'll just work on as a normal light room image, but it will be in that thirty two bit space and it's. It's pretty impressive what it can do so there's a whole thing in fact, julian cost has a new entire segment on adobe tv about it it's really fantastic and it's it's simple to do so check that out. Okay um all right, so we choose the file type we don't need to change the image size because whatever it happens to exist that's what we want to work on um, and then we could do all sorts of other things like sharpening and water marking stuff. But if we're editing an image that stuff we don't want to do right now we do that later and then we're going to hit export. And when we do that when we hit export it's going to send those files out so it's actually sporting photoshopped documents right now as we speak and as it does that it's going to be adding those photoshopped documents back in tow light room so that we can use them inside of light room and that's stacking him to the original. So if I go if I right, click on this image and I show it inside of the library folder where it exists, you're going to see that there's a photoshopped document here and a c r to document here and they're stacked on top of each other then when I go and I look at these photoshopped documents and and the way I work on it as I go into the metadata and I search in the metadata, aiken, any of these columns can be changed, and I'll change that to file type photoshopped documents and now there's all my photo shopped documents that need to be edited, click on one of them and I'll hit command e and it's going to ask me, do I want to add the original or a copy? I want to edit the original and it just opens up that fast so there's no conversion process. So from here on out, it's just a matter of edit. Then close this one. Go to the next one, edit that one work on it. Close it, go to the next one, open it, close it, it's just it's a very fast way of working so lau you light room to do all the work on creating all those photos show documents rather than you waiting for the process whenever you do edit in photo shop there's a little lag time between when you push that button and when it opens in light room that lag time is a waste of your time, and so if I'm working on multiple images five, ten, fifteen, twenty something like that, I'm going to export them ahead of time. And then I'll go, you know, shuffle some papers or whatever while it's doing it and then come back and start editing those cause there's no lag time if I'm just working on one, then I'll go at it in and work on it if I'm working on a set of images, so if I'm working on a set of images and I want to do the right, click at it in I can also open imus smart objects and photo shop I can actually merge them in panorama if they happen to be panoramic ce, I can merge them as hdr and photoshopped, or I can open them is layers and photoshopped to which incidently opening in layers and photo shop is a great way are do any of you do like senior portrait or family portrait? Surround christmas or whatever, and you have christmas cards or senior cards that you're making. Take the photo, shopped documents that air your templates for your senior portrait and put them into your main catalog, and this is another. We talked about the catalogs yesterday, and in our session we does someone asked, you know, what's the difference between having a catalog for everything or one catalog for job? Another reason toe have one catalog for everything is that you can have an entire folder of templates in that catalog, and so as jobs come in and out of that catalog you khun still utilize all of your temple it's. So then if you highlight a template and you highlight the photo that you want to go into the template and open them as layers and photoshopped, they will merge together for you at the time and then you just place the image where it needs to be and save the template and you're done. Does that make sense? It's? Just it's it's a faster way to get those images together in tow. One image in photo shop so there's a lot of great reasons to have your temple it's inside of a working catalog and then just bring your jobs into the working catalog. Ok, um, there are questions uh, just one that's sort of on this topic. Memories by elisa has a question about exporting and using catalog since you did bring up multiple, she said, if you have one big catalog for everything and then later split it by clients so you can export the catalogs and when you open the new catalog and import images and work on them, the database you exported previously is what's being added to write, you know, for re export any part of the catalogue correct that that's correct. That was a long question, so let me restate that room very simply so if you have a catalog that's a working catalog, which is like mine, you come down here, you'll see that there's a whole bunch of different jobs inside of the same catalog at the very end, when you're done with them, then you've got to somehow get this job out. Otherwise it's just going to get so large that you can't deal with it. And so what you do is you right, click that and you export it as a catalog as its own, and then you remove it from this catalog because it's its own catalog now, and so that's a real basic way, and we'll talk next month at that it's, the events like man's light room workshop, it's at the end of march, march twenty fourth to the twenty six. We will be talking very in depth about that process, but that was a quick overview, what you do, but when you do that, then that catalog has everything to do with the images that you just sent out to it, and all of that is kind of autonomous in its own catalog. Then when you start opening up that little catalog and working on it than every change you make, stays in that archive version of catalog and that's, where you would go to find any changes that you made later on so that's a concise website when you mentioned using exporting the multiple files into layers and using it as a template and you do the same thing with exporting them I smart objects into a template um you know I've never actually tried to highlight two and open and a smart objects I'm thinking it will open them both is smart objects in different files not together and so you would have smart objects but then you could just grab the smart object and drag it over to the other document that you have opened and it will be a smart object in that document so that's one way that you could do that it is just open up your template and your other one and then open the picture going to bring into a smart object and then move it but the other way to do that is open them as um layers and then just turn the one layer to a smart object before you start messing around with it and it really will accomplish the same thing okay all right so we have now talked about the process of doing an export to photo shop through the round tripping which is edit in we've also talked about exporting files that then we will later open up inside of photo shop or some other editing program but now let's talk about the process of the export dialog box itself eso we're going to just take an image and hit export this dialog box is is a gold mine of of options. And because it has so many options. It's so imperative that you make presets because you could end up spending, you know, half a day worth of time just setting up your options every single time that you want to export something here, which is why you have presets over here. So what we did here and every time you open the export dialog box it's always going to be exactly the same way you left it last time. And interestingly enough, it will be exactly the same time you. Same way you left it last time, even if you opened a different catalog system wide, if you if I was in catalog, eh? And I changed my settings inside the export dialog box, and then I close catalog and open catalog be and I hit export. Whatever I was exporting last time will literally come up, and he'll show me the same export options so I could set my export options and go from catalog to catalog catalog and everything I export would be exactly the same to the same place with the same settings, everything and so actually is very convenient when I, for instance, when I was working on grabbing photos for that thing we're doing this afternoon, the panel which is super fund? I've got some new photos and some old photos, so I was in the portfolio and I was exporting stuff, and then I went to the, uh, my new catalog and opened up my working catalog and grabbed a couple new shots that I thought would work well, and I didn't have to change the export settings. I just export and push this. I just export pushed the export button, and it was done because the settings were exactly the same, because their their system wide, they're not per catalog. So inside of your export dialog box, you have all of the the export location, the file naming the video, whether or not you want, include videos, file settings themselves, the image size, output sharpening metadata, and this is a really important one. I just want youto pay special close attention to this remove location information when you're making a tiff or a psd that you're going to go at it, do not remove them location information, because if you happen to have gps on the photo and you've already tagged it as a map and you know you can do a whole section on just maps, but if you have already tagged it, and you've got a gps location on it's, very useful to you finding image for yourself, but you want to keep that so that it's the raw image has the gps, and the tiff has the gps, so that no matter what you can find where that photo was taken. However, once you start exporting j pegs and p ngs and stuff like that that you want to go tio to the web facebook, you're blogging whatever. Remember that gps location is going to go with it? It so the j peg itself will have gps data in it. If someone takes that, they can find out where it was taken. It's not so bad if they find out where you took a photo when you were at yellowstone national park. That's not a bad thing, but it is a bad thing if it happens to be your kids or your client's kids or whatever and it's the park that your kids are constantly going to, then you're putting a marker on your kids and that's not acceptable. So whenever you have a j peg setting that you're sending out, remove the location information, even if there's no location information on it it's better to be safe and know that every j peg that ever goes out always have the location removed so that there's just no, absolutely plus, if you are like me and you, I spend probably three hours a week location scouting if I go to a job where I'm going to be shooting a job, I will go there early and drive around the location area and find new locations that I'm gonna be shooting at or on the way, if I see something, I will stop and I'll walk around and I'll spend. I had a portrait session that I left two hours early for because I knew I was passing by this weird bird park in the middle of the city, and so I drove past and I stopped at the bird park, and I walked around for a knauer taking iphone pictures with gps location on so that now I've got this whole repertoire of locations. Well, those locations are my bread and butter. I'm not going to tell people where those locations are. It's your job as a photographer to go find your own locations because that's part of your style so I'm not gonna tell you are mine are because then I did all the work you should be paying me for that service. In fact, there are people who get paid the location scout I should be paid the location scout. All right, I got a database, so anyway, it's it's, just something toe pay attention to you, you don't want your clients, kids location. To be out there on the web and you don't want your locations to be out there on the web so just remember that that is there the other thing that I want to make mention of when you're in here is the water marking a lot of people have actions bill inside a photo shot that open their images and then placed their water mark and then give them the option of moving it to the right or the left on dh then saving close it that's a pretty involved process to put a water mark on your images which nobody really pays attention to the watermark anyway and so it's just it's just a little tag that lets people know that if it got strayed somewhere that this is how you find me right that's it well, this could be done inside of light room. Just click on this ad watermark and then this drop down menu allows you to have plenty of presets. If I click on edit watermark, I can choose whether to have a graphic or text style watermark. So if I do, if I do text it's, just type in the text here and it will appear there say that on dyken choose, you know the capacity of it, I can choose the size of it, so here is the size of that I can choose where it's going to actually anchor itself is it going to anchor itself on the top the left the bottom the middle wherever it's going to anchor itself I can choose how far away from the corner it's going to be so usually for is a pretty good number for that and then I like to make sure it's kind of small like that on dh then proportionally if you tell it to do proportionally than if you make a big print it'll size up a little bit and if it's small print it'll size down so that you don't have you know a huge watermark on a little tiny image so it's always going to be in that proportion to the size that you've created on dh then as you go through all these options and set him up then you come up to this custom dropped down and you save current settings with a new preset and you name them and then once you hear untitled three and hit create and now untitled three will always do this and then if you want to save another one on the right hand side, click on the right hand side here and now I'm going to name this one untitled three are for right and then hit create now once you've done that and of course you could do a graphic one so if I click on graphic it just asks me to find a j peg european g a p and g is the better file type for a logo because it includes transparency so if you have all all photographs or square right inside a photo shop but if you have a round logo, if you make it as a p and g and leave the transparency on the png when you save it, then all that will show up is the part that has something in it and the transparency will be included on the png it's just a j peg with with transparency so use the png find the png and install that and then it will show up here as a graphic logo here on this on this uh this corner and then you can anchor wherever you want once you've done that then when you come down in here you simply highlight all of your images so I could, you know, highlight let me let me find you know my two star three star and above their three starring above and I highlight all of my three star and above and then I can go to x I can either just go to the export dialog box and export all of them and then I would choose ok where's my untitled let's just put them all on the right and hit export and I'm going to export them is because let's say we're going out to the web simon export ninety and by the way, this is another important point quality if you're used to photo shop photoshopped has a scale of one to twelve if you use light room and has a scale of one to one hundred which is percentages and I don't know why photoshopped chose twelve I think they chose one to ten and then they said eleven and twelve is even better I think that's what they were trying to say so one to ten ten would be considered ah really great j peg and then twelve goes into like protection mode where it's like super super great quality ninety is probably akin to ten in photo shop, right? So ninety to one hundred percent is that extra eleven and twelve setting and photo shop, so if I were to try and gauge the quality that's what I would say a good file for me would be a thief five on the web that's about where I like to keep it. I hate going lower than eighty five because I really dislike compression I hate it and so I'm willing to deal with a little bit longer load time to make sure I never have liked compression around things so eighty five is about where I stopped but ninety is a pretty good file type, so I would nineties a great place to be s o if I want to export these is ninety on resize himto fit within a one thousand by one thousand pixel at seventy two d p I and then I hit export where we exporting to looks oh let's find a specific folder and let's put them on the desktop so we confined them um in the new folder called test and we're gonna hit export when we do that it's exporting these j pegs I'm going to go to my desktop in this test folder and you can see now that that has been added there and if it was a graphic logo you just show you a graphic right there now that being said, maybe I wanted this logo over on the left so then what you can do is just simply go back in the light room and just click on the ones that need a logo on the left instead, which are these two right here and the rest of them were fine at the right. So export again and this time to scroll down everything set the same, remember? And now this time I'm just going to scroll down and I'm going to say untitled preset left and hit export and it's just going to say, do you want me to overwrite those two files? Yes, and now what I've got is I have ah, a set of files with it on the left and a set of files with it on the right the other way to do that, which is even easier, is to choose the two or the three that needed on the left, so usually there's like in any batch of photographs there's like two or four that needed on the left and then everything else is on the right, so you choose the one that has the least amount to click. You click those two and you do the export, and then as soon as you've done the export, come up to the edit menu and say, inverse this election and now just hit export again and scroll down to the bottom and say, put these on the right and hit export and then you're done so it's just export those than export thes that's much better than that tricky way of sending it, having photo shop, run through inaction, pull it down, then open a dialogue box, you move it to where it needs to be and then no one cares no one cares it did doesn't make your brand any better that you positioned each logo individually for every single photograph that is just a waste of your time. The important thing to realize about your clients you're the relationship you have with your clients is that they care a lot less about the photographs you're giving him, then you care about him and so you can't spend hours upon hours doing minuscule unimportant things to your photographs when your clients can't see the difference and they don't care about it you're just wasting time and burning money me so exporting your images and putting logos on it is very simple and it's very simply done in light room and it's done with enough quality that your clients will never care and it doesn't matter if it's placed an inch to the right or the left. All right, all right, so that is the export dialog box, but once you've created this setting here now you need to put it over here as a preset and notice that I've got them in folders just like I have them in folders in the developed preset area and we talked about develop resets in the last segment, so we're going to put them in a specific folder we're going toe ad and we're gonna create our preset here andan this case, this is a j peg, so we're just going to say one thousand pixel j peg with logo, right? Okay, so uh we go I'm going to do this not for print but for screen so we're inside of our screen folder and this is notice that I put logo and I put right on there, so I know that if I click on this specific preset, it will do this right logo and then I could have another pre set for the left so that I don't have to scroll down and then I hit create and now I have in my screen one thousand pixel j peg logo right? And when I click on it so if I'm here and do something for an emoto it's different than when I click here everything changes and then I could do something for facebook it could do something for show it webb you know I mean whatever things I have in here I can just simply click on him and it changes everything including the location they're going to go to so use your presets wisely on dh then you'll never have to fuss with that export action dialog box again I very rarely do anything in the export action dialog box because I can just choose a preset and go export with that priest any questions dina wants to know about the sharpening options in the export dialog box? Ok well let's talk about him the sharpening in the export dialog box down here sharpen they have you have several options you have glossy matt and screen and those are all very different matte paper deals with images differently than glossy paper does glossy is already somewhat contrast and sharp to begin with and so matt has to kind of keep up with glossy basically so they're going to be different amounts of sharpening for those and then screen is always specific to a seventy do d p I type of screen. I don't know how much that's going to change as we start dealing with these, you know, h d type screens, but usually if you just, they'll keep up with it and they'll probably come a point where there's like screen and then hd screens or something that's what they call the four k's or whatever, you know, we have three d option or something something, but anyway, so you choose that first. So where is it going? Is it going to print isn't going to screen the one thing that you have to be careful of is if you're adding grain to your images and then you're adding sharpening its sharpening the grain itself in the picture and so it starts to look really, really rough. So if I have grain on a picture, I choose not to sharpen on output sharpening it's just not a good idea because it sharpens the grain itself. But any other instance sharpening works great and generally, if you stay at low or standard that's pretty good high goes pretty nuts. It gets pretty sharp, so low is kind of where I would live. Um and then screen sharpening does that screen and low is a pretty good setting for most things but again if you have grain on that photo just turn it off because it will it will make the photo look bad on a screen as for print sharpening I only print on matt paper I don't like glossy paper on dso matte paper low is where I would rest on that but you can't have to decide where you feel is right it's it's not like going to some kind of sharpening program itself you know there's all sorts of plug ins that just to sharpening on dh you can go to those and trick things out to your heart's content but in the end guess what your client can see the difference literally can't see the difference and so unless you're printing a photograph specifically for a photographer who's really, really, really really persnickety they probably won't know the difference between whether you sharpen it in light room or whether you sharpened it in someone else's you know tricky plug in so I tend to if I need to sharpen something the sharpen it light room but again it's adding sharpening to the sharpening that's already there different so if you're in the developed module and you're working on the sharpening here inside of the details that's sharpening the image itself which is actually underneath the grain that you're adding and stuff so that's the image sharpening when you go to the print sharpening area in the export dialog box or in the print module um it's actually just taking the entire image and sharpening it up for that particular printing process or for the screen so just you just gotta send out various versions and see which ones you like better and enroll with those okay um let's go to the print module now in the print module we have the options of printing both to j peg and two actual paper um so this is an output option that I very rarely use because I don't print to my own printer I send it off the white house custom color and let them do everything and so I'm just sending them j pegs straight from the export dialog box and then they're doing all the printing on dh so I'm not really all that worried about the printer that being said I do have a large format printer that I use if I need to make a print today and I can't get it you know, like I'm literally walking in the door and I have to print something and take it out. So if that's the case, then all print on my larger format printer and I can't print up t eleven by fourteen almost a sixteen by twenty but not quite so eleven by fourteen aiken dio on guy use epps in paper and ups and prints but because we want to talk to people who were going to be printing to their ink jet, how many in here print and inject locally anybody a typically most people print to an actual photo printer and then, you know, very few people print most landscapes, and those kind of people use this more often, but that being said inside of the print module, most of this is pretty self explanatory as an export option, but let's talk about the bottom area because that's, what what we're concerned with is the output quality and direction of these files. So at the very bottom in the print job, you have the option of going to a j peg file or to a printer, and the options changes you do that, but in the j peg option, you still have the option of choosing the print sharpening to the j peg. So if I was sending prints to costco or something like that just on automated print service that I'm just handing of files and they're printing them out, and I know that they're not sharpening my images, then I would want to add that print sharpening low and then matt or glossy, depending on what kind of paper so again that's an output option, but I'm sending a j peg. Two apiece to I'm making a j peg out of it that's getting sharpened on its own that I'm taking that j peg and giving it to someone who's goingto run it through a printer relief fast, right? They're not doing their own work on it, they're just sending it through if on the other hand I was sending this to a printer that was actually going to open the file and work on the file like sharpen it or run it through their own process and send it then I wouldn't want to add any imprint sharpening because I know they're doing something on their end to it. So you've got to be aware talked to your printer and say, what do you do to my file when it goes through? And if it's someone that if they do their own sharpening process, turn your sharpening process off if they don't, then turn yours on and that will help toe make the image better. Um, again, you can choose the quality of the file if you're going to a printer choose one hundred percent quality you want it to be the highest quality possible um and then you can also come down to the color management and you can choose a profile, so again we talked about profiles pro photo rgb is the best color space you can get, however no one prince in that they print in srg be so if you're sending a j peg out and you send them a pro photo rgb file and they print and s rgb they're not going to look like what you expect them to look like so you need to then dumb them down to the s rgb now you'll notice when I click on this I've got some other profiles going on in here look at this I've got uh premium glossy I've got velvet fine are I've even got some moab papers in here is well where do we get those? Remember yes last session when we talked about presets we showed you where those presets were if you go to the light room preferences and for peace either in the edit menu if you go here to the preferences and you go to the priest that area and you click on show light room preset folder there's where your presets are and look there's a folder called color profiles I don't have any color profiles in there right now I actually forgot tio close light room so I'm actually going to quit light room right now and then I'm gonna restart light room because I pulled him out so that then I could show you putting him in but light room checks for presets when it opens so now if we go down there and we click on this drop down see how my moab papers disappeared so I now have toe add them so again I would go to light room preferences priests preferences area into the presets area and hit show light room presets folder and inside that folder there is a folder called color profiles any color profiles that I want to add in tow light room I simply go into the that folder and here's my downloaded these from moab papers I highlight those and I dragged them into that folder once they're in that folder if I goto light room and quit and then start light room back up so that it looks at those profiles now when I go down to the bottom area and look at those profiles there there and I can click on whatever profile I want so if I have a very specific profile for a printer that I'm sending jae pegs to, I can export those images to them with the profile attached to it so that I see it and they see it for exactly what exactly what we're expecting now with that is important to also recognize go to the developed module and I'm going to go to uh my favor image here, which is my collections and self here is the image that I want to print and I'm in the developed module and if you go down to the very bottom because we don't want to print this before we see what it's going to look like so we're going to click on soft proofing when I click on soft proofing notice how it turns the background a white that's because paper is white and so I can right click that and tell it to be different types of white right here I'm telling you I could be one hundred percent white and it's really gonna it's brighter if I do paperwhite it gives it a little bit more of a map look then once I go into soft proofing mode, you can see that I have a whole different say I'm going to turn it off and watch right below this history, ma'am, that whole area disappears and then when I turn on soft proofing it comes back up so what's happening now is I've got profile right now we're looking at it as a adobe rgb nineteen ninety eight but watch what happens when I turn this on to some of museum rag see what happened to that photo that's because museum rag is going to feel differently because it sucks up the ink differently than your screen does. Your screen isn't saturate your screen doesn't require extra saturation on the black in orderto fill up the wells of paper fibers basically and so I'm going to have a much more muted look coming out of that museum ragged than I am if I just go to srg b which is going to look like that different so it's really good to know what it's going to look like when it comes out now what do I do? What do I do with that information? So let's say I was going to print this on museum rag, but I don't want it to look like this I want it to look like it originally looked so at this point now I'm going to go into the basic area and I would say, well, I need more blacks when I start to do that it's going to do something, watch this it's going to create a proof copy when I do that now the proof copy is a virtual copy that's what this signifies right here that's a virtual copy so it's now a virtual copy and as I start to play with the blacks, you can see what's going to happen to the image, so bring the shadows down and I can add some more contrast to it and I can take the clarity up a little bit more seats. Now I'm trying to create a much more contrast e version to deal with the fact that there are no blacks now there you're not going to get all the way to pure black because if you try and do that you're the paper itself is not going to accept it's just going to block up and it's going to look like that so you have to recognize that there's a limitation every paper and so you choose your paper if you wanted super dark blacks, you'd be sprinting on glossy paper, but this paper has its own feel to it, but now at least I can I know instead of looking like this, it will now look like that which has a little bit richer black in it and looks a little bit better than that does so but now I know what it looks like and I print from this one not from this one this one's the original and then the proof copy you can always then you know, take these and stack up and put this one on the bottom of the stack and on lee is that when you're printing to your museum rag but then when you go to print too glossy or something like that, you'll use this one and instead of soft proofing it for that, you'll just simply export it and send it to you know wherever you're sending it to be printed quick clarification on how you got too soft proofing is that box just always there ready to be clicked? Uh generally speaking, if you go to the developed module, you'll see that soft proofing and if you don't see it it's because the toolbars collapsed and the tiki will collapse the toolbar and bring the toolbar up so t is toolbar and that always brings up whatever's there's always some kind of little hidden jim it's like it's like it's like finding halloween candy a couple months after halloween like there's always something in that drawer and you open it up and there's something new in the drawer may be hard, but it's it's it's there and every every module has something there for you in the slide show module there's things down there for you a cz well is in the library so there's always something there in fact, one of the greatest halloween candies you'll find is the little spray can tool that we talked about in. When did we talked about yesterday? We talked about that yesterday in our automation segment that that little spray can could do a lot of cool stuff so that's like, you know, finding the heath bar whatever inside of year old halloween candy so we've talked about printing talked about the difference between going well, we we really didn't talk a lot about going to an actual printer, but the j peg file is now not much different than going to a printer in the printer. You're just simply going to choose the output option, by the way, at least if you're printing to a printer that's directly connected to your computer as opposed to sending a j peg off, you can print in sixteen bits, which is always going to be better so if you get a print sixteen bit printer with like a three inks and stuff like that on it then you can print in sixteen bit so all of the color information is going and so you get a far better print out of it and again the color management option is all there for you so you have the ability to choose the profile of the paper that it's going to so that it knows I'm going to this specific paper so I should be treated this way as I spray the ink onto that paper on dh again to find that right there that type of your papers you can either download the profiles and put them into that into the profile area of the light room presets or if you've installed a printer that has its own papers like, say, the eppes in line if I take a printer and install it into this guy peter, if I hit other it shows me a list of all of the possible papers that already installed with the printer driver so the printer driver will throw in all of its standard papers for you you don't have to bring those in those already exist it's on lee when you want to bring in extra papers and stuff like that that you then would bring those profiles in underneath the color management I also saw a printer manage what's the difference between if the printer manage the color first that's a great question. So do you want your printer to manage it? Or do you want your or you want light room to manage it? The printer is always worse, managing things then then adobe will be so I would prefer, because if I go up here and say, managed by the printer, then it like light gets out of the way and just says, ok, I'm going to send the details to the printer and the printer has to make the calculations, and it does. That option is a much easier plug and play, but it doesn't do is good at printing the actual image, so if you really want to get the perfect dialed in print, you really want adobe to be managing the color because that's what it does best, and then once you've got adobe managing it, then you tweak it a little bit and then it'll dial it and perfectly and then you're good, and to tweak it a little bit, you also have these print adjustments down here. If you check those on and you print something it's a little too dark, a little too lighter is not quite as much contrast, then you can dial that in and tweak that a little bit. And once you've done all of this work to set this thing up the way you want it, then you simply come over here and you create a template for that print by clicking on that plus and naming it and putting it in the proper folder. And once you've done that, then you can simply go here and say, absent prints seventeen by twenty two high quality click on it, and now I've got everything that I want. Plus, I've got spaces for the photos to go, so the presets air very are invaluable when it comes that because this is a lot of setup, and once you tweaked a print processed where it's like wow, that perfect it looks just like on my screen. You need to put that as a preset so you never have to do that again. That way all the dialling is done before you do this. Should you have your screen more calibrated? So you know yes, yes, this presupposes that you have always calibrating your screen, your screen can your computer can't give the proper information to the printer if your screen has not been calibrated. So I use the x right system to calibrate my screen I use what's called the one I won, I won pro. I don't know I never know it's like I won per hour one I pry one pro I think it was called the island pro is what I use but the color monkey is just a cz good it just doesn't have as many options in the software on dh then they also have printer calibrate er's so of you I don't do a lot of printing at home so that's not a big concern of mine but they also have printer calibrate er's that then can actually take the paper you're using and calibrate the paper and the print that's coming from the monitor and so once they have all those numbers if you give x right the option of giving all the numbers from the screen itself from the camera using the color checker to the screen looking at the screen and then reading the print it's coming out of your printer or out of the printer that comes from you know white house custom color whatever they can set up a series of profiles that will dial that and so well that you will always know by looking at your screen that you have the absolute most dead on perfect color because they've calibrated all the way through the process from start to finish so if you'll if you'll just make sure your screen is calibrated your cameras calibrated and then your print is calibrated and especially if you're coming from an ink jet then it's dialed in and you know what? You're going to get on that print so there's no test printing as much you know you're not constantly sending out prince that's a big waste of money those paper that ink is really expensive and so is the paper and so if you you could probably save enough in p e ink and paper in a month to pay for the profiling systems that they have just because you constantly sending out test prints and they're no good so those were really good and systems to invest in the last thing I want to go through is I'm not going to touch on the web because the web is kind of it's self explanatory just in fact see this that tells you I've haven't been to the web module since I updated light room so the web module is very unimportant to me because I have my own web systems but that being said it's a great place to make a quick proofing for your clients but it's very self explanatory it's it's just sending out j pegs and html too particular place the thing I wanted to talk about is the slide slide show in the book module the book module runs specifically through blurb so blurb is a great uh cheap inexpensive bookmaker and they make really great proof books for my clients on also little memory books for people and stuff like that they're not they're no they're not by any means albums but they are great bookmakers and by the way, if you're looking for a great album software there's a new product out called smart albums everybody ought to you ought to block their server right now I mean smart albums is the coolest thing I've ever seen it's really really good in fact it's it's amazing but they deal with albums this is books on dh they go directly the blurb so it's very easy for me to make books and order books but you can literally create a book in in a matter of minutes or seconds because it'll auto fill it and that's kind of what I wanted to go over it's just this auto layout idea most of the thing is very self explanatory on how much time do we have by the way five men five minutes right? So most of this is self explanatory, so I'm not going to go over the the bulk of it but I do want to go over the auto layout idea because I'm all about automation and this is a very automated way to create a siri's of of books for people all I have to do is select and I'm going to clear this book layout here so that we have a brand new book so I'm clear the layout so I just have a cover and then some photos and in the back page of the book, and then I could highlight a set of images that I've already chosen. So this is the first image, and this is the last image I'm just doing a little portfolio book here, and if you go to the auto layout section, which is the second section down, the top section just tells what kind of book you want to order and how much it's going to cost you can see right now. The estimated cost of this book with no pages in it right now is thirty six dollars, so it's very inexpensive to create a book I'm going to do auto layout, but before I do that, I want to show you where you create your auto lay out options, you go into the preset area, which is a top, and you can create your own presets here, but I'm an edit that, and this is the auto layout editor you can go in and choose random, so this is going to do random louts or I could do fix louds if I do fix layouts, I'm going to say I want the left page to always be a full bleed, and I want to always fill the entire image to that full bleed and then on the right page, I wanted to be a random assortment from my favorite layouts of either one or two images and I want those to fit to the the image area that it creates and hit save so I'm going to save that save the currents as a left full bleed right to up random okay, so that's that's the way I'm going and I'm gonna hit, create and hit done and now watch the auto layout so I've chosen that is the preset and I've chosen all the images that I want to lay out and I get auto layout and might my book is done and all I have to do now is simply go into you know the photos, grab this and drag it and then grab this one and drag it oh, I want this one to zoom in a little bit, so it's a longer and taller this one, I wanted to zoom in here like that. No, I don't want it to be full on this one. I wanted to be a fool and so now all I'm doing is just changing the way these look in comparison to each other, but I'm not necessarily having to do any lay out options because the layouts have been done for me so that's a really fast way to make books and I just think that there's no there's no better or no worse use of your time to be laying stuff out when there's so many good lay out options available so when I'm creating a little tiny book um I'm going to use the blur the blurb option here and just create a book really quickly I can do the same thing I'm gonna auto layout proof books on dh send them off to the client as well s so it's a very fast way to deal with things so when you're making things and you're trying to get them out clients try and stay inside of light roma's much as you can because by staying inside of light room you have the ability to get things done too much faster when you're trying to use when you're trying to get out of light room and go toe like make major books major albums then it's time to investigate something you know faster like smart albums does a great job laying things out really fast and you can then take the layout and transfer into in design and tweak it so you literally can have something automate the design and then send it to end design to do all of the major you know robust tweaking that you might want to do so that's a pretty impressive option as well but just automate things as much you can in the slide show area there's also the option and I'm going to go umm so inside of our slideshow area if I wanted to create a slideshow on and I've already created a little slide show here of a picnic in the salt flats in utah but this slide show option again has the ability to automate things and also video this is video right here. The very beginning of this slide shows video because light room has the ability to edit videos and weaken we'll talk about that again next month at the full workshop, but editing light room video is very easy to do inside of light room and we can create a slide show in here. So the thing to remember that most of it is self explanatory here is well, but I just wanted to call attention to it because when you're out putting stuff two clients you want to make it as quick as possible and so if you're inside of the light inside of light room, you might as well just make your slide show inside of light room and then you can export that you can either play it right now I'll hit play and you'll be able to see it or I can export the video itself and I will have options to send it out as ten adp seven twenty p for sixty and for eighty different options there and it will just export a dot m ovi for me toe upload tio video or wherever I'm uploading images on dh so it's just azizi is highlighting a bunch of images that you want to play and hitting play and there's there's the title for the picnic and then it's going to fade into some video. And right now, there's audio playing on it. But we don't have audio attached, so you might be able to hear it if I go. Theo. So that's, that's, the slide show, but it's, very easy to create one with video and photographs. And so why not do something very simply, instead of complicating your life and again, everything that we do inside of light room talked about presets a lot we talk about. We talk about using profiles so that we don't have to keep printing things over and over again. But everything inside of light room, when we're sending stuff to people and when working on things, is all built around the concept of saving time and making sure that you're not spinning your wheels, doing things over and over again on dh that's, the purpose of light room.
Class Materials
bonus material with purchase