Lessons
Lesson Info
Localized Adjustments
Localized adjustments. So, so far we've just been moving sliders, and moving everything is known as globally. Globally just means everything moves at once. Localized adjustments means that we can adjust certain areas of the photograph independently. So why don't we find a nice photo to use for that? We're gonna go into here, and we're thinking, what would be something cool for that ♪ would be ♪ this one. That looks good. So we're gonna click here, and we're gonna open this one up, and, wow, that thing is saturated. Let me hit the Option key, hit Reset, there we go. All right, so by the way, when I did that, Option + Reset, it just puts it back to the factory settings. Let me just show you, I'm just gonna click Done, and I wanna show you something quick, just so you know. See under here, you can see that those shows that adjustments have been made to those photos. See that? And that means there's adjustments. If I right-click and I choose Develop Settings, and I choose to clear the sett...
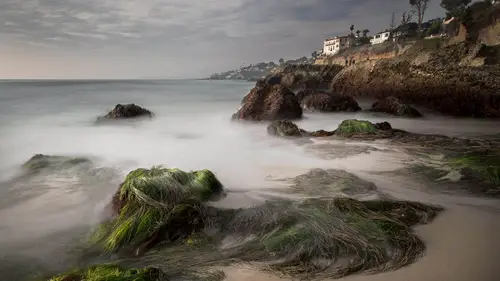
ings, it puts it back to straight out of camera, so it tosses away any of those settings that you made. So it just takes it right back. So you're just like, you know what? I just wanna go right back, get rid of everything as if I'd never touched it, and there it is. All right, so you know what? I'm gonna use this picture instead, 'cause I actually think this is gonna be better for the localized adjustments than the other one. Okay, so here's a photograph, and this is kinda fun. I shot this on, I believe, a 5D Mark III, it tells me up there. I thought it was a IV. Maybe that's a IV, like I literally can't tell at this point if that's III or IV dashes. IV probably does the I-V thing, right? The Roman numerals. All right, so this one's actually kind of an interesting so I've been playing around with Rokinon lenses. The picture that we were using for this particular class was shot on the same gear, actually the same location, and I'm using this Rokinon cinema lens, so it gives a kind of a really cool... It's a cheep lens. It's like a $200, $300 lens, and it just creates a really cool effect. That's the background behind the photo. Moving on, let's make the basic adjustments here. So we go here to brighten it up a little bit. See that? Rocks are looking good. Let's recover our highlights. Let's open up our shadows. Oh look, there's green there? I didn't know there was green there. Now we do, okay. And see, this is what you can do inside of Camera Raw, and normally I work this fast, and be like, all right, maybe bring it back, didn't do a lot there, right? Before, let's hit the P key. Before, after, look at that. So you can start to work very, very quickly in here. Maybe wanna warm it up a little bit, just get all that out of the way. There we go. So we'll look at this, before, after. There's no other adjustment tool inside of Photoshop that can do this. I mean, yes, you can do it in curves, and I love curves, use them all the time, but to be able to do these kind of adjustments this quickly, this is why I think Camera Raw is a great way to start using your adjustments. It's just such a powerful tool. Like the greens there: you wouldn't have even known there was greens in there, that mass. All right, so what are we talking about, localized adjustments? What are localized adjustments? Well, there's a couple of them. One of them is the gradient tool, or it's the graduated filter, and if I click on here, and I wanna make it darker in the foreground, I can hit the Shift key and just drag up. Shift key constrains it, and see what I'm doing? I'm just applying a gradient, and then we can go and See these adjustments? It's all the same adjustments, but now they're just gonna adjust on that gradient. See that? So we could go in here, and we could zero everything out, reset local color correction so it's not doing anything, and now you can adjust things like the exposure, down a little bit. Now you wanna cool it down. See that, we can adjust the color temperature. There's a lot of different kind of things we can do, make all these adjustments, and this, of course, is huge on skies, like darkening the sky, see there? Bum, looks nice. So let me show you Notice I've got two of these, so this is another cool thing about these adjustments. As I roll over these pins, I can select the different ones. So I've got two I'm using right now. If I'm gonna get rid of this one, click it, hit Delete, it's gone. So the gradient's really nice just for kinda bringing in those nice kind of fades. Use them in the skies a ton, sometimes in the foreground, and all you're doing is just drawing the viewer's eye into the photograph. So this is a fantastic tool. But one of the things you might notice, see up here? It's got a little It's all so dark. In fact, why don't we make it darker just to really emphasize this? I'm gonna pull it down darker. Awesome, that's really good. Make it even more. Okay, but see that rock is darkening as well as the sky? So all of these tools have this same feature built in, so there's a couple of ways we could work. One of them is we could try the Range Mask, and if we go into the Range Mask we can choose the Color, and we choose the color eyedropper, and you click in here, and sometimes it'll work, and sometimes it won't work well. Whoops, hang on a sec. That did not do as expected. Ah, I lost the that's what happened: I lost the thing there. So you see we can go into the Range Mask there. We can do Color, we can do Luminance. Luminance is kind of interesting here. Let me show you here. As I slide that, see that? See how those are darker areas? See how they're being protected? If you look up there inside that rock, versus the sky, see how it's brightening up that rock area, and it's not affecting the sky? So what we're saying is, don't apply to the shadows. Or if we go the other side, we say, don't apply to the highlights, and see how that, now it's taking away? So these masks are really good for that. Just do it that way. That works, or the other way to do it is to grab a brush, and I'm gonna make it a little smaller, and with the brush you could also paint it away. So that kinda gives you that control, and once we click away from that gradient, of course, that tool will stop showing. So see how we darken the sky without affecting the rock. All right, so let's look at other things. So if we grab on there, we can click on it, we can select it, we can get rid of it. So there's a couple more of these. This one here's really useful, and let me just drag that one out. See, we're creating this kind of oval there? And it's like a spotlight that we can move around our photo, and so this is really nice if you wanna create a special effect with it. It's kind of like a vignette, but it's a vignette that you can do more to. See, I can warm it up. Now, here's the thing, though. If I turn the exposure down, notice it's on the outside. We can go inside or outside. So we're just gonna go on the outside, and just darken things down. So we can do a lot of things with that. We can change the shape of it. Once again, when you click away it'll just hide it, and that creates a cool effect, like we get a little light there. Now, the other thing is if you Control + double-click it, it will expand it. So what I did is I Control + double-clicked that little spot in the middle. It'll expand it to perfectly fit the frame, so you don't have to stretch out the corners and everything to do that, and we can do different things with that. We can feather it. Here, if I turn the feathering down, you can see what it does. See that? And if we turn the overlay off, by the way, it'll just hide it, and then the feather will soften it, see? So that kind of shows you how it's working, and it's nice because we can move it around. So this is something you can't do with a vignette, is to move it to the different parts of the photo, and it can really just change the whole mood of a photo very quickly. Really nice, particularly if you get a shot, and one area's really exciting, like here, and the rest of the photograph's maybe not so interesting, you can really bring the viewer's eye into that nice part of the photograph. And then, of course, there's the holy grail of all of this, and this is the adjustment brush. Here are the brushes. The adjustment brush enables us to just paint the adjustments on wherever we want them. So why don't we turn off the adjustment brush for a second, just by grabbing the hand tool, and we're gonna go here, and we're gonna drop the exposure down, darken down the whole image just a little bit, and now we're gonna grab our brush, and I wanna brighten up some areas. So this is literally able to do non-destructive dodging and burning inside of Camera Raw. So what I'm gonna do is I'm just gonna go up here, and all I'm gonna do is just turn up the exposure. Notice nothing's happening, 'cause I'm just setting up my brush. So if I set up that brush to here, and I'll make it a little smaller, you can begin to paint on there. Now notice, it's not making a lot of difference. Let's go down here and see why. So under the settings under the brush... Let's go down to the bottom here. There we go. Size, Feather, Flow, and Density. So what happens is the Flow will determine how fast this goes on there. So if I do this, it'll go fast, and let me make that adjustment more pronounced so you guys can see. See that? There we go, much better, and so let me just hit the Alt key, and I can paint it away. See that? So let me just paint that away. Alt will create the eraser. Get rid of that effect. Okay, so now the difference between the Flow and the Density, if we turn the Flow down low, this'll build it up, and then the more times we apply it, it will go till it's ridiculous, right? It's too much. The Density will set a maximum limit, so if we set a limit to 50, it will never go brighter than 50. So if we paint here with our Flow, it will never go above 50, because that's where we've set the Density. Let's even drop it lower, so you can see here. See that, how it's not going higher than that? No matter how many times I apply it, it's not going any higher than 30 now, or close to 30. So same thing here, the area I've already painted, notice it'll darken it down now, because it's now setting it to the maximum density. Does that make sense? Mm-hmm. So Density's like, this is how far it can go, and then Flow is, this is how fast it'll happen. So if you've pushed your densities really high, and then you apply it, and then you drop your Density, instead of lightening, it's gonna darken it, 'cause it's gonna bring it back to that maximum value. So a lot of the time, I like to start with my Density a little higher, the Flow lower, and then just kind of make a smaller brush, left bracket key makes the brush smaller, and we could just go in here now, and we could just... I've got my pen here. I'm gonna use this. I'm gonna go a little extreme just so you guys can see it easier, and then you're just going in here, and you're just painting in these areas. It's like, you know what? I wanna brighten up my rocks here, so just painting in there. See that? Obviously, you're gonna do a much nicer job than this. I'm just rushing to show you the effect, and then we're brightening up these areas. See that? Dodging and burning. Sun's hitting these areas, beautiful. You get smaller up here, up there just kind of adding that, and I wouldn't go over the edge. Once again, I would take a few minutes to do this in real life, and I'm gonna make the size larger, bring the Flow down super-low, and just paint over here like, you know what? The sun's coming through here, so I'm gonna kinda add that, and see what we're doing here? Now we've got localized adjustments, and that's what we're doing right there using our adjustment brush, and we hit our P key, we can see what we're doing, and let me just click away from the brush, turn off these. All right, so that's basically how you do that. So you use that brush to dodge and burn, or you use it to lighten certain areas on the photo, or you'll use it to darken certain areas on the photo. So as you can see, a lot of this stuff that we're doing here, you might not even necessarily even need to go into Photoshop for a lot of this. However, if you were watching the previous session, the selections inside of Photoshop are very superior to the selections inside of Camera Raw, so that's where the weakness comes, if you want very precise selections. However, it is pretty crazy. It does have something like that. If we grab our brush here, and we're gonna do something... Let's do something stupid like just change the colors like mad, so you guys can really see what's going on. This is not gonna look good, but it's gonna show you how it works. We can turn on Auto Mask, and with Auto Mask, let's make that a little bit smaller. Now, see it will detect those edges. Now we've got jewels in here. See that? So it's actually finding the edges, and it's able to automatically mask that for us, so that's another thing that's really great inside of those adjustments there.