
Internationally renowned photographer and CreativeLive instructor Nigel Barker emphasizes that an ability to look at an image and read the light is one of the most crucial skill sets that a photographer can have. Reading the light means being able to distinguish between key and fill lights, the kind of modifiers used, and the position of all these lights. Knowing how to read light for fashion and portrait photography will not only help you decipher work that you admire, but it will help you develop your own light setups with ease.
Successfully reading light will come from a deeper understanding of the various components of light and their properties. Here is a three step process to help decipher light in any portrait photography shoot:
 The first step to decipher the lighting of a particular image is to determine the properties of the key light. The key light is the main and often the brightest light influencing your subject.
Discover how Nigel Barker created a successful photography career and learn to establish your own photography brand for success. Learn more.
When defining the key light you will want to look for these two properties: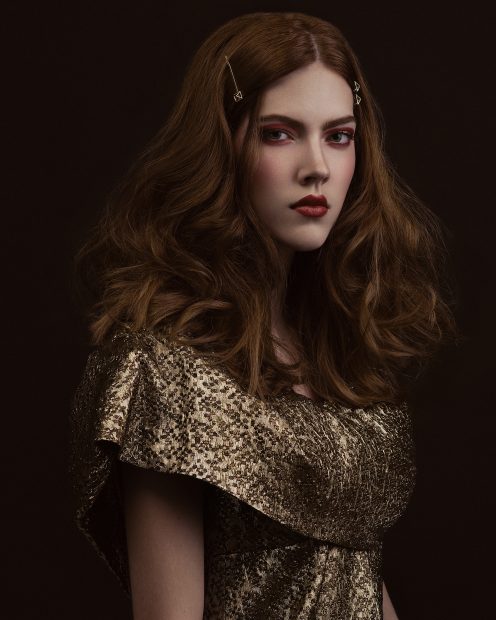 Once the key light has been set in place, there is a tendency for a single light source to cast various shadows across the subject and scene, particularly with smaller and harder light sources. The role of the fill light is to modify the shadow density in those shadow areas.
Identifying fill light can be a little tricky because it is usually quite subtle in nature. Often times it is used to just open up the shadows very slightly in order to balance out any jarring shadows. There can be multiple fill lights all over a scene to help with this balance.
Fill lights, just like seasoning in cooking, are used to taste. It all depends on the mood you are trying to reflect. Something moody and dramatic will generally call for deeper shadows. Fill lights would be kept to a minimum. Whereas something bright and airy might call for a stronger fill to subdue any dramatic shadow.
Fill lights can be global or they can be targeted. A targeted fill light will focus on a concentrated problem area of the image where the shadow density might need to be decreased. Global fill is used in instances where you want the shadow density in the entire image to decrease. Global fill lights usually utilize giant modifiers, scrims, or bounced flash off a large surface area.
Once the key light has been set in place, there is a tendency for a single light source to cast various shadows across the subject and scene, particularly with smaller and harder light sources. The role of the fill light is to modify the shadow density in those shadow areas.
Identifying fill light can be a little tricky because it is usually quite subtle in nature. Often times it is used to just open up the shadows very slightly in order to balance out any jarring shadows. There can be multiple fill lights all over a scene to help with this balance.
Fill lights, just like seasoning in cooking, are used to taste. It all depends on the mood you are trying to reflect. Something moody and dramatic will generally call for deeper shadows. Fill lights would be kept to a minimum. Whereas something bright and airy might call for a stronger fill to subdue any dramatic shadow.
Fill lights can be global or they can be targeted. A targeted fill light will focus on a concentrated problem area of the image where the shadow density might need to be decreased. Global fill is used in instances where you want the shadow density in the entire image to decrease. Global fill lights usually utilize giant modifiers, scrims, or bounced flash off a large surface area.
Understand how to see light and work in any lighting scenario with Nigel Barker. Learn more.
 When the key and fill lights do the heavy lifting, there are typically extra lights and elements used to add further dimension to an image. These extras can help further refine shadow density, help add separation, or bring back some contrast and drama. Understanding what each of these extra elements does will help you identify them and utilize them to your benefit.
Internationally renowned photographer Nigel Barker wants to show you the best methods to connect with your subject and how to bring out the story using lighting and direction. Learn more.
Identify The Key Light
The first step to decipher the lighting of a particular image is to determine the properties of the key light. The key light is the main and often the brightest light influencing your subject.
Discover how Nigel Barker created a successful photography career and learn to establish your own photography brand for success. Learn more.
When defining the key light you will want to look for these two properties:
1. Position
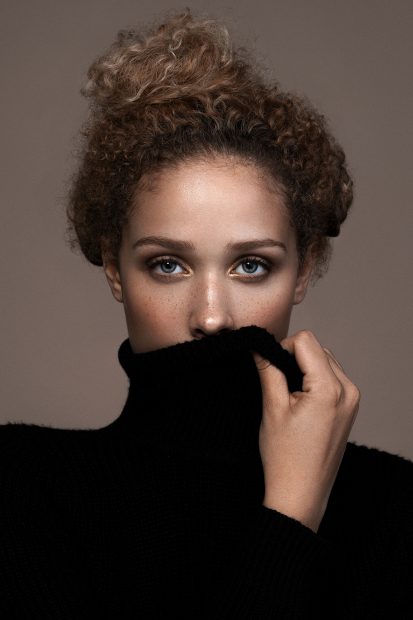
The position of the key light can often be determined using two tell tale signs on the human face. The nose is like a giant sundial and watching which direction the shadow falls from it will give you a massive clue as to where the key light is placed. The other spot you will want to look is in the eyes. The eyes will often reflect most light sources from a decently wide frontal location. Those two resources can help you pinpoint where your key light is coming from. Furthermore, looking at the light fall off on the face and body, as well as the overall environment, can usually give you a pretty good indication of how far away from the model the modifier has been placed. If you have pretty even front to back coverage you likely have a modifier that has been set back at a greater distance. If the light fall-off is more intense and there is a visible difference in brightness front to back, or if you notice vignetting, the light source will be placed closer to the model.2. Shadow Transitions
In order to identify the kind of modifier used on the key light, you simply need to look at the transitions between shadows and highlights. If you see hard transitions between the shadows and highlights you have a hard light source. If the transitions are more gradual, you have a softer light source. Over time, you will learn which modifiers give you the exact shadow transitions you are after, but simply being able to identify the transitions will get you in the ballpark. Remember that light softness is relative and the farther back you pull a light source from your subject the harder it becomes. By first identifying light fall off and then shadow transitions, you will be able to narrow down the exact modifier on the key light.Identify The Fill Light
Once the key light has been set in place, there is a tendency for a single light source to cast various shadows across the subject and scene, particularly with smaller and harder light sources. The role of the fill light is to modify the shadow density in those shadow areas.
Identifying fill light can be a little tricky because it is usually quite subtle in nature. Often times it is used to just open up the shadows very slightly in order to balance out any jarring shadows. There can be multiple fill lights all over a scene to help with this balance.
Fill lights, just like seasoning in cooking, are used to taste. It all depends on the mood you are trying to reflect. Something moody and dramatic will generally call for deeper shadows. Fill lights would be kept to a minimum. Whereas something bright and airy might call for a stronger fill to subdue any dramatic shadow.
Fill lights can be global or they can be targeted. A targeted fill light will focus on a concentrated problem area of the image where the shadow density might need to be decreased. Global fill is used in instances where you want the shadow density in the entire image to decrease. Global fill lights usually utilize giant modifiers, scrims, or bounced flash off a large surface area.
Understand how to see light and work in any lighting scenario with Nigel Barker. Learn more.
Identify Extras
When the key and fill lights do the heavy lifting, there are typically extra lights and elements used to add further dimension to an image. These extras can help further refine shadow density, help add separation, or bring back some contrast and drama. Understanding what each of these extra elements does will help you identify them and utilize them to your benefit.
Background Lights
The use of background lights can vary. You will often find them used to brighten up the background directly behind the subject which creates a natural vignette that draws the eye towards the subject. This also allows for a bit of separation, especially when shooting low key images. You can also find background lights used to cast a pattern of shadows on the background to give it some extra texture and dimension. Background lights can also be used in high key images to blow out the background and turn it pure white.Hair Lights/Kickers
These lights are pretty easy to spot. They will accent the edges of your subject and skim across hair to brighten it up. These lights also come in soft and hard varieties, which you can identify by watching how the light spills across the edges and if the transition from highlight to shadow is hard or soft. This will tell you whether the modifier was small or large.Flag/Cucalorus
Flags are used to block portions of an image from receiving light or to deepen any shadows in a particular place. A cucalorus is extremely easy to spot since it is quite literally an object that blocks a portion of light and casts a shadow in your image, usually in the form of a pattern, such as a window frame or window blinds. By using this process you can start breaking down the lighting in many portrait and fashion images. It will help guide you in the direction you want to emulate for your own work. Knowing this process will be helpful on set as well because you can quickly review your test shots and modify your lighting as needed to give you the results you want. Reading light will take a bit of practice, but getting into a habit of trying to define light sources in images that inspire you will lead to a better understanding of light in general.Internationally renowned photographer Nigel Barker wants to show you the best methods to connect with your subject and how to bring out the story using lighting and direction. Learn more.