Lessons
Introduction to Aerial Photography
28:41 2Aerial Introduction Q and A
28:51 3FreePreview: Gear & Types of Drones
26:46 4In-Field Basics: Setting up the Drone & Software
41:40 5In-Field Shooting: Advanced Techniques
31:27 6In-Field Shooting: Advanced Controls
34:53 7Retouching Aerial Panos
44:01 8Advanced Post Production Enhancing
40:11Lesson Info
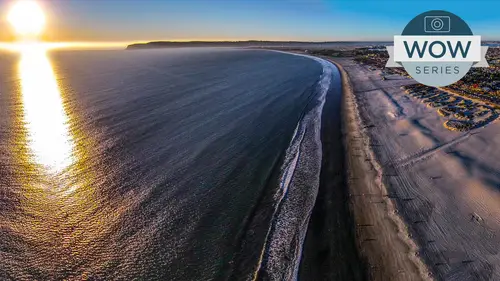
Retouching Aerial Panos
Let's go into. Finally, let's look at some images over here and the project files. And, um, come up here with our, uh, panoramas from yesterday. That's the file. We want the working files. They are. Thank you very much. So these are the shots taken, as you just saw, um, moving around. So that's what I was shooting at the ballpark. You know, each one of these are the DMG files. Here are the files that we took from the lake the other day, and we're gonna open these all up in adobe camera raw. If you are a light room user. Um, you probably know that the engine inside of light room, what's known as the develop module is exactly the same as the engine that's built into adobe camera Raw works exactly the same. The sliders of the same. If I had these three things down in the filmstrip in light room, I would do the exact same thing of optimizing one image, synchronized the settings to all of them, and then open them up in photo shop using photo merge. In this case, I've got them all selected i...
n the bridge, and I'm going to come up here and just do a commander control our little tip. If you are a raw user, rather than using command or control Oh, which will force floater shop to open, which will take 75% of your ram. If you're doing the vast majority of your workflow inside of adobe camera raw as you should, you should only be using photo shop for some advanced feet filtering some heavy duty retouching come. Special effects filtering. Um, there's really no reason for you to be doing 95% of your work in anything other than Adobe Kim Iran or light room Photo shop is for heavy lifting thes. Anyway, you'll get there, dear, we're gonna do is the winner choose a representative Representative Image, in other words, has got the best tonal range for what I'm looking at. This is, I would say, has that as opposed to this, which is more sky and air. So I'm going to simply optimize one image, and then I'm gonna synchronize that fixed all the other images. I'm gonna take advantage of this and the sinking capability. You would never do one image and then another image and start from scratch OK, so with that I can actually move this out of the way so I can see mawr of my image. And this is where I bring in what I call my five step tango for optimizing images. It's the same whether you're working on aerial photography or anything else. I'm first gonna optimize the image, Andi. Then I'm going to start getting into things like sharpening. I won't even get rid of the optical distortion to start off with. I'll leave that for a second, just so we get the idea of optimizing the image. White balancing crop is your first step if need be. In this case, the white balance looks pretty good and cropping is irrelevant because I'm going for a stitch. So I want all my information. Second step is hitting the auto button Auto right here is gonna trade to take a stab at these six options right here. Exposure, contrast. Highlight shadow whites and blacks. So when I hit auto, it's going to try that as best as it can. It's quite an elaborate adjustment. It may or may not do a better job, so here's undo so you can see it did a great job overall in terms of blending of that tonality you go well, it made a little bit bright in the sky. I'm not worried about that because all the information is there the thing to remember about adobe camera raw in light room. Because it is a procedural processor, you can do anything in any order and get the exact same result. The quality is always gonna be the same. Whereas in photo shop, if I did something that lightened the sky, I went then come back and add another adjustment that would say they darken this guy. If I had a my original layer, an adjustment layer that did this sort of lightning, I wouldn't do in another adjustment. And then that's gonna try and dark in that because I would have already thrown away the information with this layer. I would knock out a hole in this layer so it wouldn't light in this guy, But I wouldn't add another adjustment on top. I have to be very cautious in which the order in which I do something not so in a CR in light room. That information is still there in the sky, and I can access it, regardless of the fact that it's made it right right now. So, for example, I'm going to say yes. This is a good starting point for the second step, which is auto. Next step is gonna be exposure. Um, shadow, highlight and clarity. Exposure is your mid tone value for the file. The only thing you're concerned about is your mid tone value. I could look at this and say My mid tone value is kind of This is what I'm concerned with, but I've actually got a lot of middle tone values, shadows and lights. So I'd say the exposure is actually pretty good. You can see that it actually took the exposure up quite a bit, um, exposure. And then I typically do clarity. Clarity is edge contrast. It's an edge popping technique, basically is finding edges and it's gonna lighten and darken either side of it. Sometimes it's known as mid tone contrast. It's not its edge contrast. So if I come over here to clarity, not something that was attempted when I hit auto, you're going to see it has this ability to add a pop to the file. Now by doing that, it's also gonna darken up the shadows because it's contrast. Darken up the shadows in the highlights in those areas. So if I go, I like the pop. But I don't like what it's doing by actually maybe plugging up some shadows are blowing out some highlights. That's why I'll do clarity before I'll do shadow and highlights those of my quarter and 3/ tones up here in my history. Graham. You can see when I roll over my cursor. That's where highlights are being affected. There's whites highlights. Here is my middle tone exposure. There's my shadow. There's my blacks so it actually shows you. As a matter of fact, I can come over here and I can just click in here on these highlights and come over here and just drag my hissed a gram. Okay, so I can pull those highlights back down, or I can take him here and move them down. Same thing with shadows. I could move those shadows up, make those as bright as I'd like. I run out of, um, highlight resuscitation by this slider so I can't make the lights any lighter. So either one Aiken dio a targeted adjustment which we're going to do in a bit when we bring in that sky. Or in this case, I can come over here and bring down my exposure a little bit to bring in some more detail. But you're going to notice in a bit. When I work on this guy, specifically, I'm gonna be able to pull out even more information. So I did exposure for my mid tones clarity for my edges and then highlights and shadows to try and pull out detail by tap the peaky. You can see the incredible amount of information that I'm able to pull out in that shadow area. Okay. And again, you can see that I had to basically under expose it because the sky is so white. That is really high contrast, looking straight into a pure white cloudy sky and basically the sun had already set. I'm looking into dark green shadowed forest. Okay, so I'm asking a lot of it, and it delivers. Cool. Okay, so that is, um Step three exposure. Clarity, Shadow highlight. Next is gonna be whites and blacks, whites and blacks is gonna be the extremes of your eternal range. Looking at my hissed, a gram, I can set this whatever I'd like. A little tip is that if you hold down your option, key on the Mac are all key on the PC. When you move these sliders, whites and blacks again, that's looking over here, and we'll turn on that little thing if I hold down the option. All key. It actually shows me when I start to clip. So if I move this over to the right, you'll notice that it starts showing me wherever I see color. It's being clipped in one or more channels. If its blue color it's on Lee being clipped in the Blue Channel. If it's something like magenta, it's a combination of multiple colors. So if I don't want any clipping, especially in the highlight, I would make sure that I don't go any higher than that. I let go of it that little G I'm not worried about in terms of the clipping, but that is bringing me some highlights. Or I can come over here and, you know, take the whites down, turn off that you can see. I can actually bring down that highlight, but in this case, that's gonna affect the overall image a little bit too much, so I'm not worried about that. I'm gonna leave that up there without any significant clip clipping good to go black. Same thing. Hold down the option. Are all key. Wherever you see pure black, it's being clipped in all three channels. You'll notice here that it's really not being clipped in my original file, The benefit of the raw. I can actually move that. Even though it looks like it's clipping. I take that down again. The I doesn't mind having shadow detail where it can't see. You just don't want to plug up anything that it's significant to your story. So again, what I'm gonna do is pegging that down is somewhere like right there. Whites and blacks step for Step five vibrance and vignette. Vibrance is intelligence saturation, its nonlinear. It looks at what is already unsaturated finds the colors that are already saturated, and it will try and balance those out. Okay, as opposed to saturation, will take whatever saturated and unsaturated, and they all go up in a linear fashion, which means the saturated colors can go up over the cliff of reproduce ability in good taste, screaming to their death. Yes, if you've been with me over the years, it's the exact same joke I've said for 100 years. So vibrance the thing to remember about vibrance in this fact that it's nonlinear one. It's very cautious with oranges, which is where all skin tones lie, no matter what ethnicity person happens to be, so that makes it nonlinear. And also it's a little bit heavy handed with blues, since it knows that we like nice, punchy blue skies. So those things in concert means if I've got a sunset that's got yellow, orange and red with maybe a little bit of blue in the corner, it's going to whack out yellow and red. Leave orange kind of muddy, but make blue super crazy. Not really good for a sunset. So vibrance is good for most things. But remember, sometimes regular saturation a little bit can be better. But I'm gonna come over here to Vibrance, okay? And you can see what it's doing to my trees. Okay, which I overall like, as opposed to if I went over here in saturation where it may just go into neons really quick and you do have to be careful about reproduce ability, depending upon what you're printing, is going to remember things in the yellows and greens. Sometimes I'm sure you've ever had a sunset printed that's in the yellows and you get a printout and it's got a green halo around the sun. It's too far at a gamut. So saturated colors. You do have to be careful. Okay, um Vibrance. The last thing has been yet, and then yet I used to, especially if I pulled out a lot of shadow detail. And the background has also been lightened. In this process. I will use a vignette or edge darkening to draw the eye back to the center of the composition. In this case, we're doing a panorama. So the last thing I want to do is have an inconsistent exposure around the edges that I'm gonna try and blend. So a vignette is not what you would add to its matter of fact. You typically would get rid of been yet if for some reason you weren't getting a consistent exposure, it was darkening a little bit on the edges. Then you would want to compensate for that and add. That's the reason for the vignette Slider actually is to remove of. And yet toe lighten up the edge. So you have a consistent exposure. Okay, so vignette. Great. And here's my peaky. Okay, Peaky is the global before and after its The backslash key in light room is your preview button. If you wanted to see just one panel, we've only worked on one panel. It's this icon down here is per panel preview in adobe camera, raw in light room. It's a little light switch. Each panel has its own little light switch, and that allows you to preview just that panel. Okay, so I've got my global setting, but this isn't really what I want to, um, finalize one. It's still got my fisheye distortion associated with it. That was part of the original file. So I'm gonna come over here to my lens correction options, and I'm gonna enable lens profile correction, and you're gonna notice that that is getting rid of that fish eye effect and kind of straightening things out. Okay, Now, it's heavy handed in a lot of times because that what's in the center of your scene is actually bigger and gets smaller in the distance. It actually can be nice, and that's my subject matter. It looks like it's closer. It has more emphasis enabling. This is kind of flattening out. What waas important per se. It's up to you. You'll notice that it's coming up here, and it's is cutting off some of my file over here on the left hand side. Now there is a way to compensate for that. But first up, you'll notice that enabled his profile correction. It automatically knew that it was a D. G I phantom and the camera, just as if it waas something like the GoPro. It would know that the GoPro waas there and it would automatically find the profile for the GoPro cameras. As I mentioned, Russell Brown from Adobe is the one to thank for making sure that the latest profiles are always gonna be built into adobe camera on light room, if possible. Um, this correction amount here is how you can, you know, continue to exaggerate that even more so Okay, it's starting off 100 based upon that profile. But you can see I can actually bring back if I only want a little bit of that correction. Okay? I don't have to use that 100%. So it depends upon really what you're going for and whether if you do a stitch and doesn't work out, you may want to either use a little bit more or less of the distortion in this situation. I've also want to do a little bit more work to this, and I'm gonna go one over here. I'm still in the lens correction pan. I'm gonna go to color and say remove chromatic aberration from Abbott Chromatic aberration is just a big word to use with clients to shut them up and let them know that you know more than they do and that you're gonna charge them for the chromatic aberrations if they don't shut up. But basically, it's the edge fringing, especially when you're using a wide angle lens as we are here with a fish eye. So it's that gonna be that usually purple or green blue fringing it automatically will do it. It's kind of a free, no cost, no obligation. So turn that on. Just go for it. If it doesn't do as much as it can When we get into the Grand Canyon shot, you're going to notice that I turn this on, and because of the extremes of light bouncing around in there, um, I actually will fine tune the sliders as well. But typically this by itself does a great job. But over here in the manual setting is where we can actually have some fun. If we had a building going on here, we could use our upright features to try and align the edges to get rid of not the lens distortion, but actually the foreshortening or perspective based upon the camera member of the cameras, not looking straight ahead. If it's looking down, it's gonna have a vanishing point. If it looks up, it's gonna have a vanishing point. You're all remember three point perspective from your old drawing days in part school, and what upright will allow you to do is try and get rid of that. So if the building is falling away is you're looking up, it will extend that back up where it becomes useful. Here. It's sometimes when you do this lens correction that actually is going to shorten or squish the file and you'll notice I've actually cropping also a portion of the file as well. So in this case, I could come over here to the aspect and I could actually take care of two things at one time. I can actually pull back in what was being cropped, and I'm actually compensating for this four shortening of the file. So in one fell swoop, I can make it look more natural in the sense of it. Now, it looks not like it's squished. And I'm also bringing back in the edges of the file. So good to know you don't ever have to say, Well, I don't want a crop out, cause that's my overlap, right? That remember that Those edges, maybe what I was using overlap my panel. So that is useful. You can also come up here and use this this scale feature. So I'm gonna do that in scale and you'll notice with this scale, I'm just gonna do it. So it comes right up to the edge here, and, um, I can even turn that on and cropping. But we're gonna go ahead and we'll just do it here and scale. Okay. So just taking it down, make sure that I get to get every portion of that image. So here is my before after before, After, and you'll trust me. It will look good when we're done. The lens been getting I can remove it. Look, right now I'm not seeing any, so I'm not gonna take advantage of that. I can turn that on When we get into the photo merge process, I'm now going to do a targeted adjustment in other words, rather than the global adjustments that took bait place in this basic panel. I'm now going to come up here to these targeted adjustment tools, and we now have three of them. The graduated filter, the adjustment brush and the new radio filter. Awesome. Cool, groovy, Bhichit and sorry. Groovy would be groovy. Probably is a word Bitchin word. Um, and what I'm gonna do is I'm gonna use the graduated filter to do a little bit of a simulated graduated neutral density filter. I was shooting a typical landscape. I've got my big boy camera out. I've got a very bright sky and a dark foreground. Aiken, balance out that exposures by putting this graduated piece of great class in front of my camera that you guys are probably familiar with. Usually something that I could move down in front of the lens. In this case, I'm just going to take my Grady int as soon as I click on any of those targeted adjustments that automatically gives me all the parameters, actually gives me the parameters that are built into that basic panel. But now they're going to be targeted in a brush, a Grady int or a radio. Very, very cool, Incredibly powerful. One of the main things that makes it infinitely better than photo shop. Where if I wanted to do literally these dozen different adjustments, each one would be a different adjustment layer stacked and masked. In this case, all of these are gonna be done one time. If I click the pluses or minuses, it will reset all the other parameters. So I'm just gonna click on a minus for the exposure down. What I want to do is dark in that sky, draw my attention into my skyline of the trees. I'm gonna click and drag down, and you can see and I'm gonna get a little carried away here that I've actually got a lot of information. It's not white by any means that actually has the full tonal range still in there, I could increase that clarity. If I want to get a little bit of definition in those clouds, I can increase that contrast again. I'm going to get greedy here. But now you can see I can add bring back in the personality of the subtleties of this overcast sky by doing this little adjustment here. Okay, so that information is there. I could even increase the saturation a little, a little bit. I can use a temperature intent slider, which isn't real temperature intent, but I you know, they call it that It's actually not degree not measured in degrees Kelvin. So it's not really white balance, but it can do the job. You can even add a tent if I wanted to, if I really wanted to get, you know, crazy. But that is giving me my, um well, the personality of the sky. If I roll over the anchor points here, you can see what the mask is. I'm looking like I can even do something that's never been possible before. Let's say I come down into my environment, but I'm starting to dark in the top of the trees. Would it be neat if the graduated filter now had a brush for adding and removing from that and that brush could actually be used as a minus with auto mask and actually come over here and let's look at that mask and come over here and actually erase where it is darkening my skyline. Of course, you can't do that. But if you could, it would be really neat. And it would look just like this, Okay. It would be groovy is what it would be Okay, if you hold down the option, are all key. It switches from painting to erasing. So now I'm adding, Okay, we're just gonna be a little bit hard with that Grady in because it's not going to be based on that, Grady and its full power. So we'll say that that is good enough, right? There really wasn't a problem. To be honest, I'd like the fact that it was, uh, going up before and you'll notice once I've done a mask on that, it's not going to want toe. Let me We change that side. So I'm gonna not gonna use that mask and have that set, and I'm gonna hit the delete key. Hit the delete key and it's going toe. Get rid of that. No one's not. I don't want you to erase it. Get out of that mode mode, okay? It still keeps the same parameters of what I had before, so I'm simply going to come over here and I'm actually going to stop before I get a horizon line because to be honest and I can reposition it, I like that light, that contrast of the sky as it comes down, which is really what happens here in Seattle. It does get light at the rising line is really what I'm going for. With that I can say new, and I'm gonna come over here and click down in the water because again, I want to come up here and you'll notice one thing that I am doing in this scenario is, um I am making sure that both of these Grady INTs are straight up and straight down, and then I've got a pretty straight panorama because this Grady it I'm going to sink with my other shots and they have to line up on the edge. So normally you wouldn't do this sort of Pano scenario um, with a Grady in Just because your likelihood that there's a little bit of a misalignment in terms that horizon line these greedy ants are gonna match. But these ones actually looked quite good in terms of the overall scenario of each one of these that kept a very nice consistency with the phantom stabilization. The last thing that I'm going to do here, Teoh, finish this off is come over back to my detail tab. And because I, you know, again, I'm pulling out this much detail from the shadow. I'm going to get noise. I told you that most of my detail is gonna be in the highlights. So in the shadows here, I'm asking a lot of it. I can take my color noise reduction up quite a bit and get rid of the Christmas tree lights as they're called and even take that luminant up and really get rid of a lot of that inherent luminosity noise. Okay, I especially wanted to come up here and, um, not be affecting areas of large flat color. And with that, I'm going to go up, come up to sharpening. And even though I may get a little bit aggressive with sharpening on this file. Increase the radius of it's a little bit soft. If something is already nice sharp with a nice piece of glass below, a pixel radius is going to give you good sharpening without India artifacts. If the edges somewhat soft because of the glass of the nature of the fact I'm in a bloody moving helicopter, I can take it above a pixel, and that's gonna bring in that sharpening. Make it appear sharper. But the detail is where it's going to get kind of crunchy, and this is where I can hold down the option and all key again to get a preview, and you'll notice that this is where it's going to be sharpening all the noise in the file. So I'm gonna be very cautious about detail, even in a landscape. Same thing with radius. If I hold down my option are all key. You can see that sphere of influence as I move that radius, and I'm gonna take it just above a pixel. But the masking is what's great and with something that's not even built into photo shops. Hold that down, and as I move that it's going to say Do not sharpen these large areas of flat color. In other words, don't sharpen the noise that's in the lake, and that's where I'm seeing noise. I'm not seeing any noise in the trees because there's too much detail already. So that is great to be able to limit the sharpening, too, just areas of inherent contrast. Okay, so here is in command in control. Zero is fit to screen. There's are sharpening, which you really can't see. P my overall done it to one image, went they I typically like to do. Is that like coming over here? And, um, making a snapshot if you're not using snapshot snapshots have been into a dope, have been built into dough. Became a wrong light room forever. They're awesome. Free freebies built into the file take up almost no memory, and they store every single thing that you've done to the file. So if I like this version of it, I can come over here and I'm just going to say to I'm gonna Compared to the one that I did last night, which is less correction, you'll notice that there is lex less correction on it, terms of vertical, and also I was a little bit less aggressive with that contrast. This is my original file, so I always show before, after and usually and I like this one. I like the little bit extra contrast. Okay, so I've got that. So snapshots are great. They stay with the file forever, especially if it's a DMG tiff or J Peg those air open file formats. It can store that. If not, if it's ah, Canon or Nikon Raw file, it'll write a sidecar file, but they're free that no costs that nondestructive. Why not? If I did something here that would say consistent all shots now, this was because this is a little bit dark, the noise reduction and some other things. And because of the moody lighting and the colorful trees, this isn't typical. But if let's say that I every time that I open up something for my phantom on my typical landscape, I do this sharpening to it. I do this basic tango. I do these sorts of things to it, and I get rid of the distortion to a certain amount. Whatever you do remember, you can make a preset over here based upon whatever you're currently working on. And this is huge for something where you have a consistent camera, consistent lands, consistent way of shooting for you to come up here and say, Would you please save? Let's see, We'll just say that those basic settings okay overall worked for May. I did that, um, that lens profile we did that sharpening. Let's say that all the those were consistent on not such an aggressive images. This one, um, chromatic aberration. Um, I'm not because I do, Panos. I'm not gonna put in a then yet. So I'm going to say that that is a starting point. And we're going to say I'll call this, You know, we'll call this D J. I evening one and say OK, and now I've got that is a preset. And the great thing about that is I can apply this even Enbridge before I open up my images. Forget 1000 images. I can actually ope select him Enbridge, right, click and say, develop settings and all these will show up so I can apply all my settings. Get 90% of the way through my work flow on everything I ever shoot with this camera simply by making a preset. If I want to, I can even come up here and go into the camera. Raw defaults. Not into that one in here to my camera preferences. And I can come up here and say Apply, uh, make default specific to camel serial number. Make default specific to camera. I s O setting. Um And, um, let's see so I can change the default. So I'm gonna come over here and I'm gonna say so hard. Um, save new Kamerad defaults save new camera defaults. Okay, that now that means that everything that I've got there is now a default. Now, you come up here into preferences and you say, make those default specific to this camera only, and only when it has this I s O setting, which has that aggressive noise reduction on it. Okay, so that's pretty darn cool. Every single time that I opened up a d g I with these eso settings that will automatically do that. If I didn't have such an aggressive setting, I could turn off that I s o and just have it make it so It's this specific phantom always gets my default settings. That's huge terms of your workflow. If there's anything that you walk away from today and this works for your big boy and big girl cameras to there's something you constantly shoot, you will come up here and, um, make it your default. If you always use this sharpening if you always do this X If you always do whatever you can do it and set it to a specific camera. Okay, last not least, we've got these images here. We're going to come up, select all three images were going to say, Synchronize up here in the upper right hand corner click, and I'm going to say everything. I haven't anything specific in terms of crop. So I'm going to say everything which will include my local adjustments will be that great. And so I say, okay. And now everything that I did to one is being used across all of them. I'm gonna say, done. I'm not gonna open these up because I'm gonna take advantage of the option here in bridge, just like I would in light room to come up here and go tools, photo shop, photo merge. Okay, that is the panel stitching option built into Photoshopped. There is no panel stitching built in the light room, so you would do the same thing. Three images done in your film strip right click on them and say photo merge within Photoshopped. It always says that because this is a fish. I hear you can try auto, if you'd like, typically with any kind of fisheye image a cylindrical where it's going toe work with each individual image will give you a better setting. We could try both ways, but we'll start off with cylindrical blend images together. There is no significant been yet And the geometric distortion we took care of using that profile. So I just go. Okay. Questions. Will this choose on its work? Yeah, we have him over here, Jack. Um, so when you are flying in the air, what are some of the things that you look for before capturing shots? Light tone, composition, contrast story, emotion, money? No, to be serious, I'm gonna It's interesting question and this goes back to some global thoughts on photography. I look at not typically you think of photography is the story of light. I think photography is the story of contrast because all art fits into the thought of contrast. Photography happens to use light to use it. Do its contrast whether you're doing a painting, a drawing or photograph. The contrast between positive and negative light and dark, bright and dull, saturated and not big small, um, emotion laden negative space. That is how you tell a story with a piece of art, regardless of what the medium is. So when I look at something like the canyon shot here, the story is the contrast of the lit areas, whether the cliff for the water to the stranding cheddar area that is light and that is beautiful light. But what I'm looking at is the composition of different shapes and this little macro shot here. It's the contrast of the diagonals with the warm colors and cool colors. It's not like per se, even though light is a significant part of it. I'm looking at the contrast of the composition, whether it's line, form, color, tone or light. So that's what I'm gonna look at, and I'm gonna look for things that have that distinction of one element playing off another, just like in, um, movies and written books that instead of contrast its conflict, right? It's good versus bad. It's, you know, dramatic versus arrestable, period. It's conflict is contrast in a dramatic setting so that without that, what we have, we have vanilla, which can be good. That can be its own story because the lack of contrast in other words, shooting through a fog. You know, uh uh, for escape in the fog is beautiful. That contrast there is actually the lack of contrast, which makes it this beautiful, moody shot. So Okay, um, here is our panel. Awesome. Cool. Groovy. If we take a look at what it did, you can actually see the seam. No, you can't see the seam because it did a really, really good job. We come over here and turn this on and off. You can see that photo shop with these little chunky ways of combining images actually does an amazing job of, um, stitching together these elements because right exactly where that one pixel line is, it's matching exposure, white balance, everything that it can. OK, it doesn't amazing job. What we're gonna do here last but not least, I'm gonna come over here and take advantage of my crop tool. Okay. Actually, you know what? Let's say that. You know what? Because I like you guys so much and you've been laughing at my jokes. Um, I like that. Except that I've got this on these edges, and I really don't want to have to crop those out. Okay, so there's two things that we can do here, Um, one. I'm just gonna hit and do that crop, and I'm not gonna delete those crop pixels. So, um, there's two things that I can do. First off, I don't need these separate layers. There's no benefit to having those I can do Command e and bring those down. It's not like you're gonna paint out of those mass. Sometimes if there's a moving car, you could use them. But because that hard edges where it messes the color and white balancing all that stuff, you remove the edge and you're going to start seeing the difference in color and tone. Um, but there's a couple things I can do in this file, and I'm gonna duplicate that layer Commander Control J. And right now, what I'm gonna do is one way how to fix that problem. And that is do a commander controlled tea for free transform. And what that's going to bring up is the box where you normally would scale. And I could say, Well, I could scale that up, but that's the same issue. I'm getting rid of the edges of the file, but I'm not going to do that. Actually, I'm a It looks like I may want to rotate a little bit. So while I'm here, I'll rotate it. Why not? But I'm gonna go up to this little icon right here. Image warp image warp is awesome. Cool, groovy pitching. And it's gonna bring up and put this photograph inside of a envelope based upon these blind based curves on here. Which means I can simply come over here and lengthen these different elements. And you could say, Well, dude, you're distorting it. It actually does an amazing job of distorting it, and it really does a great job of doing so without any, you know, significant parameter. Now it's up to you how far you take it and whether you can get rid of an entire fix on it. And you can actually click right within the scene if I want to you know, emphasize that I can actually do all sorts of fun stuff. Image war been around for 100 years. It's a great way how to do it. This is hit the return key. So here is our before after before, after no retouching, no anything involved. Image war. Great. Tell your friends, okay. The other way to do it. And I'm gonna duplicate this file as well. Is using content aware fill content aware Fill is awesome. Cool. Groovy. Uh, I'm actually I'm gonna write an action for this because I like you guys. Like I said so much, we're gonna come up here and actually, I've already got a creative life, so we got creative live here. Look, I've already got a content aware fill edge extension from another class I've taught here. It's like I've been here before, and, um, but we could recreate it. Actually, I'll just do it and I'll show you the action afterward, because it's gonna be exactly what I'm gonna dio is I want to load in these holes as a selection. And the easy way to do that is if you command click on the Mac or Control click on the PC on any layer, It automatically loads it as a selection with a type A mask, a layer. There's transparency on it. It loads it. So command, click on a layer thumbnail or mask. Thumbnail lows It as a selection. Cool. So, goi, this name, we should start speaking Japanese equivalent of bitchin and Japanese koi. OK, I digress. So I have now selected my image. But I want to select those holes because I want to actually ask photo shop to fill it for me. So I'm going to go under the select menu since I have a selection and inverse it Now I've got the holes so far, so good. I can't fill them right now because they are just the whole and it won't know what to fill it with. So I need toe expand that selection just enough to get some information for Photoshopped work with. So I'm again going to go select modify and expand. I'm gonna put in between 20 and 40 pixels is certainly typically enough. So I've got that. So now if I come up here and fill I've told it, I want you to fill these holes and I want you to fill the holes based upon this information I'm giving you, which is this overlap? And to do that, I'm going to go edit Phil or shift delete and I'm gonna say content aware. And I say, OK, and I go, uh uh uh uh Duh duh duh duh duh. And you may have to do it a couple times, but it is. If we back up in time, you can see what it did. And let's come over here to our corners. Okay, pretty good. I may have to manually, you have the patch tool and the healing brush. That one didn't do as good of a job again. You can do that same sort of thing here. I'm gonna come over here and do with the just the regular lasso shift. Delete brings up your field dialog box and you can try it again. So you confined to knees you want you have other retouching tools, but that is content aware fill. And that action basically does that same thing. If we walk back through that and De selected, that action is basically you hit record and there is your set selection. Inverse expand by 40 fails set selection, which is de select. And so that's the sort of thing where you should be writing actions so you never, ever have to do that again. Manually. There you go. OK, so that is our panorama. If we want. We've now got our final image. So there is content aware fill. I actually like the, um, image warp image better than the content aware Fill one. I don't have any fake edges. They're all riel and two I confined. Tune that distortion to make it feel exactly like I want. I have this final image. Now, if I want to do a final tweaking, I can now take advantage of the fact that camera raw is now built inside a photo shop, not only in the bridge to optimize your images. And this is after our break where we're going to be using it to tweak video because that's one of the reasons why us photographers don't do more. Video is cause we can do this stuff to are still images that look awesome. But our video looks and right, cause that and video is a gray, overcast, muddy day. If we could do this to video now, we're talking, and that's what we're gonna do after the break. But we'll do a camera raw, and I could come up here and continue to fine tune. You can see that it still has those edges in here. I could do work a little bit. Mawr. Okay, you can see that it's no longer has the parameters for the image, because now it's been cooked into pixel based, you know, images. So I can work a little bit on my noise reduction. I confined to knit. Now, if I wanted to, I could actually add a post crop than yet. Okay. In here. This is going to darken that edge to draw my eye into the center of the composition. Okay. And I could continue to find tune that image. Okay, So there is that one panorama. There we go. And if we go back to our bridge and the images were we tweak the undue images, but you guys remember it cause you got great memory, remember? This is what we started with. Okay?
Class Materials
bonus material with purchase
bonus material with enrollment
Ratings and Reviews
Antonio Cuellar
It's really nice