Gear: Camera, Flash, and Triggers
Lesson 2 from: Introduction to Outdoor Flash PhotographyMike Hagen
Gear: Camera, Flash, and Triggers
Lesson 2 from: Introduction to Outdoor Flash PhotographyMike Hagen
Lessons
Class Introduction
02:51 2Gear: Camera, Flash, and Triggers
27:05 3Gear: Modifiers
11:03 4Camera and Flash Settings
20:12 5Building Exposure For Outdoor Photography
22:12 6Shooting in Direct Sun
23:32 7Shooting on an Overcast Day
18:28 8On-Camera Flash
15:23Lesson Info
Gear: Camera, Flash, and Triggers
So we're gonna start talking about setup and gear. And I've got a bunch of demo stuff to show you this morning. And I'm gonna move through this fairly quickly. I'm not gonna spend a lot of time on each of the items. I'm just gonna basically call them out, talk about a trigger, give you a little bit of information on those triggers. But we ran this other class at Creative Lives called Using Your First Flash, where I go into a lot more of the nitty-gritty detail, so I would also point you to that class if you want more information on this technology. Well, let's talk about some terms first, some terminology, 'cause I'm gonna be throwing out a lot of terms today, so let's define some flash photography terms. First thing is user-defined light. When you're doing flash photography, you're the user. You're defining what that light is, what it looks like, how it behaves. So things like, are you shooting direct hard flash? Are you using a softbox or an umbrella? You know, what's the position of...
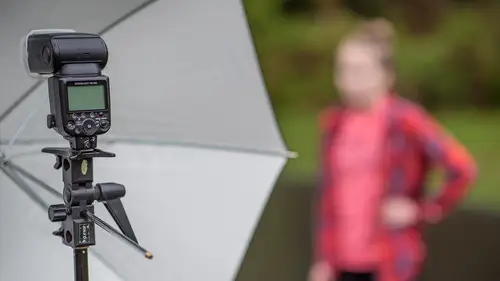
the light? You're defining it. Versus an ambient light photographer or a natural light photographer, you're kinda working with what's there, right? You're working with the clouds, you're working with the sun, you know, nature is defining the light. So flash photography, you're in control. For this class, we're talking about strobes, so flashes. Another terms for that is speed lights. So you're gonna hear me saying those three things together. Strobes, flashes, speed lights. And then, you know, this type of lighting is an instantaneous pulse of light. Pow. The light comes out of the flash and it's done. Compare that to an ambient type of light where it's continuous lighting, right? So the sun is continuous lighting. The lights in the studio right now, this is all continuous lighting. So we have to find a way to manage the continuous light with the pulse of light from the flash. Ambient light, it exists already. You know, it's in the environment. Even at night on a cloudy, moonless night, there's still a lot of times ambient light. It may be very faint and very dim, but you still are working with ambient light. And then of course during the daylight, there's a lot of natural light. You see here in Washington, we get a lot of clouds, so you learn how to work with that real quick. Down south, Arizona, Texas, you get a lot of sun. So depending on where you live, you may have to work with different types of natural light. And then interior lighting. I know most of you shoot inside. I mean, we just do that. You shoot maybe a portrait of your kid in the kitchen, in the dining room, something like that. Well, you have to deal with the lights that are inside, the incandescents or the LEDs or the fluorescents. And then flash photography, we're learning how to combine those. We're combining the ambient with the flash. Especially in the outdoors. In fact, I call it balancing. And that's what we're about today, is I'm gonna teach all about balancing the light, building your exposure. You're gonna hear that term from me probably 15, 20 times today. Building the exposure. You build with, starting with the foundation is with the ambient light, and then you add your flash to that. So you gotta think through how much ambient do I want in this photo? How much flash do I want in the photo? So there's never one answer. Sometimes you want the ambient light to be dim and sometimes you want the ambient light to be bright. So what are our variables? The four common variables for this, for outdoor flash photography, are shutter speed, aperture, ISO, and then of course flash power. And, you know, there's a million other things on our cameras these days. There's white balance and, you know, there's a bunch of other things that we have to think through. But really, those are the four main things. How fast is your shutter speed, you know, how small or big is your aperture, how high or low is your ISO, and then how much oomph are you pumping outta that flash? So let's start talking about some gear. This is a... I'm a gearhead. I love gear. I love talking about gear. I don't like paying for gear, but once I have it, I feel good about it, so... But the truth is that you don't need a lot of gear to do really well. In fact, today, all the photos I took for the class today were taken with one single flash. So I just wanna show you that you don't have to go out and buy 10 flashes. You know, there's some other great Creative Live instructors who shoot with a lot of flashes. And I wanna show you today, just starting out, start with one, okay? So let's talk about flashes. I'm gonna walk over here to my gear table. And I'll just show a couple of kinda the high end and the low end of flashes, all right? In this hand, I have a $29 flash that I got from Amazon. The name of the company is Aperlite. I have no idea if they're even still in business. But it was 29 bucks. And the cool thing about this flash is that it's just as powerful, in other words, it puts out as much light as this flash. This is the SB-910. This flash is not $29. (laughs) You know, this one's, like, I don't even know. Well, is this one still current in the Nikon lineup? Well, the current one in the Nikon lineup's the SB-5000, and that's, like, $500-ish, 500 bucks. So if all you need is a certain amount of power, well, $29 is gonna get you here. So what, you know, what am I getting by spending $500 on a flash? Well, you're getting full connectivity. You're getting trig-, the ability to trigger this thing wirelessly in the Nikon system, okay? You're getting full system compatibility. So this flash speaks with the camera. The camera speaks to the flash. No wires involved. And I don't need to buy any other type of triggers, which is cool. So I own a bunch of the Nikon flashes, and I think they're great. But starting out, you might just consider buying a $29 flash and then finding some way to trigger it. Now, this flash I can trigger with just a pulse of light. It's called a slave. I can set this up to S1. There's a little thing there. It's called S1. And almost any other flash that you would buy from Amazon or Ebay in that price range has a slave mode. What that means is it's just gonna pull, it's just gonna fire when it sees a pulse of light. So nothing too fancy. This one, though, this one I can control from my camera. I can say, hey, flash, go a little brighter. Hey, flash, go a little darker. And I don't have to go approach the flash. I can stay back in my shooting position and not have to go to each of my flashes. So you can see there's advantages to spending more money, and of course there's advantages to spending less money. But I do wanna point this out. Every photo I took for today's class in all the pre-shoots that you guys are gonna see here in a little bit, I could've done with this flash just fine, the $29 flash, okay? So some other things to think about, power. Think about how much power the flash has. You know, in terms of guide numbers, you want, like, a guide number of around 100. That's a good data point to have in your head. That's a decent amount of power. Anything low guide numbers, like, in the 40s and 30s, they're not gonna have enough power to do this outdoor flash photography. A low guide number like a 20 or is gonna be fine for macro, but not for portraiture, especially when you wanna fill up an umbrella full of light and try to overpower the sun. So there's flashes. Oh, and then the last bullet item that I wanna talk about is this high speed sync. Is this flash able to do what's called high speed sync? I'm gonna teach you what high speed sync is all about today. The $29 flash will not do high speed sync, whereas this flash does do the high speed sync, so... And we'll get to more of that as the day wears on. All right, how about camera bodies? Well, cameras are important, and camera bodies are not important, you know? The same thing with the flash. You can do great work with the $29 flash, and you can do great work with a $400 camera. You just have to make sure everything works well together. My encouragement to you as you're looking for cameras is to get a camera that has a relatively high shutter sync speed. Shutter sync speed. Make sure that shutter sync speed is at least a 250th of a second, 1/250th, okay? Some of the lower end cameras only sync to, like, 1/200th of a second, or maybe, like, 1/180th of a second. Those little bumps in shutter speed improvement help a lot when you're doing outdoor flash. And we're gonna talk about shutter speed sync later today. I've got a full tutorial on that. So the highest sync speed, that's important. Can the camera do rear curtain sync? Rear curtain. And I'll show you this later today. We're doing some outdoor sports and action photography. I've got people moving, and you want some motion blur. You know, you want the blur to be behind the movement of the action and then fire the flash at the end of the blur. That's how you get this really cool trailing effect. You can't do that with what's called front curtain sync. So make sure that your camera body has the ability to do rear curtain sync. Does your camera have the ability to do TTL flash control, through the lens metering? Hopefully yes. Most cameras do these days. And then does the camera support wireless flash control? Canon does, Nikon does. Sony, you can, there's some wireless flash controls for Sony. Some of the Fuji systems allow it. So just, you know, if you're into doing this wireless flash stuff, try to get these four bullet items met with whatever camera you're purchasing. All right, next, lenses. I like f/2.8. A lot of people like f/2.8 lenses. But the deal with f/2.8 lenses is they're somewhat expensive, right? So if you get, like, a 24 to 70 f/2.8, that's gonna be a $2000 purchase. Somewhere in that range. If you get the 70 to 200 f/2.8, that's, like, a $2400 to $3000 purchase. So lenses can be expensive, and I wanna point out that you don't need to buy super expensive lenses to do great outdoor flash photography. On purpose for this class, I'm using a kit lens. So I've got my Nikon. I'm a Nikon shooter, so all my stuff is Nikon, but Canon has these, as well. Like, the 18 to, you know, the 18 to 55, the 18 to 105, the 18 to 200s, those types of lenses will work just fine, and that's what I'll be using for today is this 18 to 105 lens. So what's the advantage of going to f/2.8? Narrow depth of field. When you do portraiture a lot of times, you want that background to be blurry and soft, and f/2.8 basically allows you to do that. Whereas this lens, the range on this lens is f/3.5 to f/5.6, and you don't necessarily get that nice boca, that nice blurry background. But for portraits, if you keep the background far away, like you'll see in a lot of the examples that I show today, as long as that background is, like, 50 feet away or 100 feet away, eh, shooting at f/5.6 is just fine. So what's my main point on lenses? Buy f/2.8 if you need it, but you can get by starting out with a kit lens, and you can do great work. As I always tell people, it's not always about the camera or the lens. It's, the most important thing is right here. And that's why you guys are all here today. You're here to learn. And once you get this nailed down, then the gear really does start to matter. All right, let's talk about triggering the flashes. Oh my goodness. We're living in the golden age of flash triggers. Never in my career... I've been a professional photographer for about 20 years now, and never in my career have I seen this many options available to us to trigger flashes. So there's OEM, and what I mean by OEM is original equipment manufacturers. So Canon and Nikon. They actually sell devices that are Nikon branded and Canon branded that allow you to trigger things wirelessly. So the Nikon wireless system, the Canon wireless system, they're excellent and they work really, really well. I highly recommend them. But they ain't cheap. They're fairly expensive. So you need to think about, when I'm doing outdoor flash photography, do I wanna be wireless or wired. Well, if you're wired, you're gonna be using something like this, okay? This is a TTL cable, through the lens metering cable. And all that really means is it's dedicated. It tells the flash everything it needs to know. And that basically goes on the flash like this, and then it mounts on the camera like that. So the positive here is that it's a rock solid data communication. You're never gonna, like, drop the flash out. Every single time it's gonna fire and it's gonna do what it's supposed to and it won't fail. What's the downside? (grunts) You know, you can't get very far away. So then you start daisy chaining these cables together. And I do that. I have a number of these cables, and you can daisy chain them. But here's another thing, and more importantly, you're gonna pull over your equipment. You're gonna knock it over. I have done this so many times when I've cabled up. 'Cause you move, you just move over, and you're not even thinking about it, and ah, the whole thing falls over, and you break your softbox or you break your flash. So I like cabled when things are fixed and I sandbag everything down and I'm kind of in the studio, but I think outdoor flash photography, wireless is the way to go. So you've got the OEM. Oops. You've got the Nikon and the Canon. Every new generation has a little bit different way. The new Nikon system uses radio trigger. Canon's use radio trigger. And I think radio trigger is a much more reliable way to go than the traditional optical trigger. So Nikon has an optical trigger system, and that's, just to talk a little bit of techie stuff here, that's the previous, like, SB-900, the SB-700, the SB-800. Those older flashes were only optical trigger, and those required line of sight. In other words, you had to have a direct line of sight to the flash and the camera, and even then I got about, maybe, like, a 90% success rate on a good day. That means 10% of my flashes, or 10% of my photos didn't work properly. So I really like the radio. It's very reliable. There's other brands. We were talking this morning about Pocket Wizards. Pocket Wizards are radio triggered. They're excellent. And Pocket Wizards now has a TTL-controlled system. Very good, very reliable. It works with the Canon, it works with the Nikon, and I'm sure it works with the Fujis and Sonys, as well. I highly recommend them. But as you guys know, as we've already talked, even the Pocket Wizards aren't cheap. You know, just for the little radio trigger, they're hundreds of dollars. All right, so what's some other, I've got two other options for you that will actually save you a ton of money, okay? First are these. I bought these off of Amazon, and it's... Yanyu, Yon-, Yongnuo? Yongnuo, there we go, Yongnuo. This is a radio trigger. It's not TTL. And I can't control the remote flash from this, but it will trigger it with a radio signal. And I've tested it out hundreds of feet away. It works just fine. And this only cost me about $ for this little setup. So if you have multiple flashes, you'll need one of these little transceivers for every flash and then one for the camera. So it's $40 for two, so they work out to be about 20 bucks apiece. A very inexpensive way to go. And it's reliable. I've been using it for a while. Really happy with them. Then this thing, this is the least expensive way to go. This is just an optical slave, this little, we used to call them beans. There's all kinds of terms for these in the industry. This just will trigger your big flash when it sees a pulse of light. So it's a dumb trigger. We've also called these slaves in the past. They just have no, like, no ability to control. They just receive a pulse of light, causes the flash to fire. Like, 10 bucks, 12 bucks? So it's a very inexpensive way to go. But it is line of sight, okay? It has to see the originating flash. So there's just some high-level discussion on triggers. For today in this class, I'll be using the Nikon system. But I just wanna make this point again that today's class isn't about Nikon. Today's class, whatever camera system you've got, Canon, Sony, Fuji, Nikon, whatever, today's class is gonna work for you. So I'm not gonna really go into the details of the Nikon stuff. A question has come in from Anoop about, are there any electronic shutter cameras where there is no limitation on shutter speed when used with a flash? Yeah, and so, that's a great question, and I don't have a really great answer on that. The new... I haven't spent any time right now with doing flash photography with electronic shutter cameras. So what he's talking about is basically a DSLR has two shutter curtains. One shutter curtain opens, it then takes the picture, and then the other shutter curtain closes behind it, and then they both reset. And your flash basically has to fire when those two curtains are out of the way. 'Cause if the flash fires while another curtain's coming up behind it, you know, you only get, like, half the scene exposed by flash. Well, an electronic shutter has no curtain, so technically you can fire a flash at any shutter speed and it's all gonna be exposed. So I hate to say it, but I don't have a really great answer. And I'll say that's forthcoming. We're thinking about doing some other classes on that topic specifically. Perfect. And, let's see. One more, and this is a short of specific question, but we can talk in general. For Carrie D., who said, can you tell us again, can the Nikon SB-910 trigger that $29 flash? Can they be used together at the same time? Yeah, good, great question, Carrie D. And the answer is yes. I use all of my flashes, my inexpensive Ebay and Amazon flashes and my expensive Nikon flashes, I use them together all the time. The key is, and the difficulty is understanding what technology is gonna trigger what flash. And once you get that kinda, what I'll call that minimum requirement set, then all flashes have to meet that minimum requirement. So what I'll do is that inexpensive flash, that $29 flash, I set that one for slave mode. You know, S1, I'll call it. That's, I remember that's the menu thing called S1. Okay, so now it's gonna fire when it sees a single pulse of light. Okay, that means my SB-910 now has to either fire off a single pulse of light or it has to receive a single pulse of light if it's a remote flash. That make sense? So everything has to kinda be all slave one mode. And Nikon allows that to happen. Alternatively, I could put a different type of radio trigger, like those Yongnuos, I could put that on the bottom of that $29 flash and then that on the bottom of my Nikon, and then now they will all fire based on that system. So you just have to make sure all the flashes are using the same communication technology. Super question. Batteries are the linchpin of your flash system. Don't skimp on buying cheap batteries, okay? The worst thing, and I've done a ton of location photography in my career. The worst thing is going on set and you take five or six shots as setup shots and then your batteries die. And your subject is now on set, and they're paying you money for this, and you're like, oh yeah, hold on. You know, go over and change the batteries. And then you go out and you get another five or 10, 20 shots out of them, and then they fail. So buy nice, good batteries. I recommend buying nickel metal hydrides, and whatever the current top brand is, I buy those. I like Eneloops, E-N-E-L-O-O-P. You can buy those at kind of the big box stores. You guys all know those big box stores. I also use a company called... I've just lost the name of the company where I bought them. But these are called Imedion, I-M-E-D-I-O-N, Imedion. They're very good. I've been using these for a couple years. And then I buy a nice battery charger, a microprocessor-controlled battery charger, 'cause I want my batteries to be in top performance. These are the engines to your flash, so make sure your engines are tuned up and charged by always keeping them topped off. Don't skimp on your batteries. Let's talk about equipment. Flash stands. A big thing, or a big part of your outdoor flash photography involves the light stands. Light stands are really important and not important at all. I mean, they, you know, no one is ever gonna go look at your light stand and go, oh, you've got a XYZ light stand, no. The most important thing is functionality. So I'm gonna, I'm just gonna walk over here, and I'll pull this one out, this one first. So I, this was, like, one of the first light stands I ever bought. It's a Manfroto, Manfrotto. Very good. I paid, like, 30 bucks for it or something. Like, ooh, it's a low-cost, inexpensive light stand. It's super lightweight. It folds down. But look how tall it is. Look how high it is, okay? So I'm six feet tall. This light stand only goes to the top of my head. Now, if I put an umbrella on here, I can't get the umbrella any higher than six feet high, and that's a problem, because if I want to create a certain look or if I want it to be, like, a rim light behind the subject, I can't get any higher than this. So six foot light stands are okay if the person is sitting down on a stool, but it's not okay for outdoor flash photography. You're gonna be on uneven ground. You know, your subject's gonna be standing down here and you're gonna be up there, and you're like, I need more height. So if you're gonna buy one light stand, don't get a six footer, okay? Rather, get something like this. And this is an eight, this is probably eight or nine footer. I recommend eight to nine foot light stands as your starting point. So if I lift this up... Oh, right now this is at six feet, by the way. If I lift this up... Oops, sorry, crew. I just unplugged the video feed. (laughs) We'll fix it in a little bit. But now you can see I've got some flexibility for, especially for really tall people. I can put this behind the subject, I can get the rim light. So, what is that, eight feet ish, maybe? So get a nice tall light stand. And it's gonna weigh more. It's gonna... And it's gonna cost a little bit more. But in the long run, you'll be very happy you've purchased the higher quality light stand. Heavier duty. And then I've got some other light stands here in the back. I won't pull those out. But those are really tall. Those are, like, 18 to 20 foot. And they're just, I think they're too much for the beginning photographer. If you're doing a lot of pro work, then yeah, get the 20 foot tall light stand. But, you know, to use those big light stands, you need big sandbags. You need maybe a crew to help you set them up. So start with the eight footer. You'll be happy. So next, let's talk about the umbrella brackets. How do these things all connect together? Well, this is a light stand umbrella bracket. Very inexpensive. You can get these for probably $10 to $ at any camera stores. I like the metal ones. So the metal ones cost more. Why? Well, I like the metal ones because they're more durable and they can take a heavier weight. The, how this works... Let's see. I'll pull this one out. This one makes sense to pull out. There we go. That work for the cameras? So we've got the light stand. This thing just basically goes right there on top. There's a brass stud, okay? And then right there on top, I connect whatever lighting source I need. So I've connected, in this case, a softbox. Or if I need to put an umbrella in there, the umbrella goes right into this shaft. Very simple. So if your light stand, let's just say your, a nice light stand's gonna be $60, $70. These umbrella brackets, a metal one is gonna cost you $20, $25. So for about $100, you have a really durable, great outdoor flash photography stand. Speed light, speed ring. This is called a speed ring here. That's a good term to learn. Every different manufacturer, like ProPhoto in this case, they have a different style of speed ring. This is the ring. Why is it a speed ring? Well, they came up with the term I think just to indicate that it's speedy, you know? (laughs) Fast, I don't know. But this, like, the ProPhoto, one of the reasons I love the ProPhoto is 'cause I can rotate it around, get different orientations. And then your flash basically mounts right here and shines right into the equipment. So speed light, speed ring. If you're shooting an umbrella, you don't need a speed ring. All you need is this little bracket, okay? All righty. Multiple flashes. Sometimes we need multiple flashes, especially with outdoor flash photography. In that case, I have this little thing. This is a little metal bracket. You can find it on Amazon, Ebay, your favorite camera store, they all sell these. And this basically allows me to mount two flashes on there, and instead of this brass stud, the one on here goes in... (clucks tongue) And now I can mount two flashes into whatever equipment I'm using, into my umbrella, into my softbox, whatever. Sometimes you need more than two, more than one flash, and this is an easy way to do it. Total cost of this setup was $15. So it's not very expensive.
Class Materials
Bonus Materials with Purchase
Ratings and Reviews
Brandon Couch
This is the second class I've taken with Mike and it was amazing! So easy to understand even when you get into the "tech" side of how flashes work but especially when using them outside and how easy it is. I would totally recommend this class to anyone wanting to take amazing images outside with one flash. He even makes bare bulb flash look awesome. Such a great course!
SunSoBright
Mike Hagen has become one of favorite instructors. His instruction and question answers are clear and concise and he has a real world approach. He has a friendly and approachable personality. Best of all during this course he works by himself which makes you feel you too can accomplish the shoot on your own. Mike demonstrates a practical approach with affordable equipment as he is aware many photographers starting off do not have a huge budget. In his other course on using your first flash he also had several gear set suggestions based on budget which was so thoughtful and helpful. I hope Mike does some more advanced courses as well and I will keep watch for his name on the course schedule. A definite thumbs up for photographers starting off using flash.
Laura K.
I have watched a couple of Mike Hagen's classes, and hope Creative Live will bring him back to teach more. He is a fantastic, thorough, easy-to-understand instructor. He doesn't assume viewers already know certain things. He is humble and diligent and truly wants students to understand and learn the things he is teaching. He breaks things down and explains things better than most, and he doesn't hold back on details. Mike also provides helpful handouts/written materials to supplement his videos. I really like his classes and teaching style, and hope to be seeing more from him in the future.