Lessons
Class Introduction
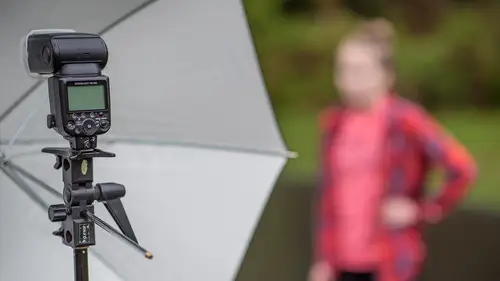
02:51 2Gear: Camera, Flash, and Triggers
27:05 3Gear: Modifiers
11:03 4Camera and Flash Settings
20:12 5Building Exposure For Outdoor Photography
22:12 6Shooting in Direct Sun
23:32 7Shooting on an Overcast Day
18:28 8On-Camera Flash
15:23Lesson Info
On-Camera Flash
The idea here is there is a myth out there, and you'll hear it from all the professionals. You can't do great flash photos with on-camera flash. And I'm gonna show you this really great image when we go into this video. The first shot I take is just like deer in headlights. It does look horrible. But just because that example is bad doesn't mean you can't produce great images with on-camera flash. So let's watch the video and then we'll answer some questions when we come out of the video. There's a myth out there that you can't do great photography with on-camera flash. And there's a lot of truth to that because you can do better photography with off camera flash, but I want to show you how to get great results outside with on-camera flash, okay? So, let me start out, first of all, talking about the camera settings and the flash settings, and then we'll start taking some photos and I'll show you some good approaches and some poor approaches. All right so, we'll start out here with the ...
camera. Now, the camera settings, actually. The camera settings are almost exactly the same as with off camera flash. You know, I'm still gonna build that exposure. I'm still trying to figure out, do I want to the ambient light to be dark? Do I want the ambient light to be bright? And so, I'm looking at my info screen here, or my shutter speed and aperture settings. I'm at ISO 100, I'm currently at F5, and I'm at a 125th of a second. And you can see on my exposure line, it's a little bit over exposed, just ever so slightly. But that's okay, it's a good starting point. The next is the flash. Now, the flash settings are going to be different than when you're doing off camera flash. I'm setting the flash to the word on, not remote. On, meaning it's just like a dedicated TTL flash or a dedicated manual flash. To change the settings, I can push the Mode button and change between, let's say like TTL mode or let's say manual mode. Just to make things relatively easy today, I'm gonna work in manual mode, in fact, I like working in manual flash mode. It gives me a lot more stability and control. And it helps me understand when I'm taking a photo. "Oh, that was too bright." Oh easy, I can lower the the power down from the say 16th power down to a 32nd power. Or "Oh, it's to dark." I can bring it up. Sometimes TTL is a little bit dicey in the outside, I use TTL sometimes when I have to move quickly, but I use manual mode anytime I'm doing, let's say, portraiture, where the person is standing there, and I've got time on my side. So I'm in manual mode, and on this flash I push here, and now I can rotate my dial and change the power up or down. I don't know where this exposure is going to fall, so I'm just gonna start out at some number. Let's say, 8th power. Let's just see how this works. So to recap, I'm at F5, I'm at 125th of a second, ISO 100 and my flash is in manual output, at 1/8th power. Now, we're going take a picture here, and what I want to show you is the wrong way to do on-camera flash photography. See, what we've got is, we've got as we got the flash, and we've got nothing in the front of the flash, no diffusion, this is just straight on, direct flash. I'm gonna take a picture of Remy here, welcome to the set, Remy. This is gonna be a terrible photograph. So, here we go one, two, three. I'm looking at this image, and it is probably one of the worst flash photos I've ever taken in my life. You know, there's no shape to the light, there's no modeling, there is no nice shadow on this side, and bright on that side, it's just straight on direct flash. Now, that said I can reduce the power a little bit, and maybe get a little bit of a better luck. So I'm gonna do that. I'm at 1/8th power, I'm gonna reduce that down to, let's go down to 1/32nd power, so that's two stops down from where we were at before. And here we go, one, two, three. Nice smile. Love it. So better light, it's a nicer look, it's still a little hot. The flash is still a little bright, so I'll go down even farther. 64th power, one more stop below. Here we go, one, two, three. Nice smile buddy, thank you, Remy. Alright, cool. So now we're getting a slightly better look to the flash photo, but it's not great. And the truth is, I don't really wanna spend a whole lot more time messing with this because I'm a professional photographer and professionals don't hurt their subjects like this, we just don't do that. So how can we get better? How can we get better light? Well, built-in to your flash, most flashes have a diffusion panel like this, and really the purpose of that diffusion panel is to make the flash go wider angle. So let's say if you were shooting with like a 20 millimeter lens, or I don't wanna say a fisheye, better a really wide angle lens, this is going to diffuse the light wider to cover more of the scene. So this is not really a great tool for quality lighting but just to show how it works, I will take one shot. Here we go. Alright, one, two, three. Great. Alright, a little softer, little kinder, little gentler, but still not great. Let's move to the next, the next concept. And that is using some type of diffusion panel or diffusion dome. One of my favorite tools are these, it's called the FlashBender made by a company called Rogue, and basically what it does is it just makes the surface of light bigger, larger, and softer. These attach here, I'll just put these on my connector here, so I can use both my hands. They attach with the Velcro and a snap, really easy to use. There we go, so what we're gonna do is we're gonna basically bend it forward like this, and we're gonna take the picture, and when we take the picture, we have to get kind of close to the subject. When you do this, it really reduces the amount of power, or the volume of light going to the subject. So I'm gonna have to get fairly close to make this work. Everything else is basically stay the same for this first shot here, are you ready Remy? Alright, here we go, one, two three. Alright, so now I look at this shot and it's a much a softer look, but hardly any power from the flash made it to Remy, so I'm gonna increase the power. Because if you look at how this thing works, it sends light up and then that light goes forward. It's just a bigger surface area, so it's absorbing a lot of the energy. So here I'm gonna go to, let's go to 16th power, alright, same shot again, here we go, one, two, three. You have a nice smile. Thank you. Yeah, excellent. So I'm looking at that image. Good. About a 16th power is where I need to be. So, this is not a really compelling image though, there isn't a lot of modeling are shaping of the light, but it is softer, and so if you're a run-and-gun type of photographer, if you're doing, let's say, portraits where kids are running around the field, or you've got some type of action going on, this may be all you can do. Because it's hard, you know, it's hard to use a reflector, it's hard to use a light stand when you trying to be mobile. So this is a really great option for when you have to be mobile. I would say this, I'm gonna go down here and pick up this other product. Look at the size difference between the products. You know this is a diffusion dome here, and this is the FlashBender. So the larger the surface area that you're shooting through, the better your images will be. So always think bigger rather than smaller. This is easy, this little diffusion dome is easy, because it's so small and portable. But the quality of light isn't going to be that great. So, try larger. So we were just shooting on-camera flash, using some type of diffuser on top of the flash, and that's great for run-and-gun photography, when you have to be mobile. But what if you have a little bit more time, and you wanna shoot a little bit more of a traditional type of portrait? In that case what you wanna do, is you wanna point your flash towards something like a reflector, so that it looks like the light comes from a different source. And that's the key to shooting great outdoor portraiture with your flash. You want the light to be coming from a different angle, so we can get some shaping and some modeling on the subject. So that's what I'm gonna do here. I'm going to basically point the flash, right here into the reflector, the reflectors is then going to bounce the flash onto our subject Remy. Now, what do I have here? Basically I have a light stand, I've got a reflector bracket right here on top, that's just holding it in place, I'm using a standard clamp, a little metal clamp here on the bottom to keep the wind from blowing it around, and then I've got a sandbag down below. Sandbags are really important, especially if it's little bit windy. You just don't want everything fall, you don't want things falling over. Alright I'm gonna build that exposure again, I'm looking at the, I'm looking at my exposure here, I'm looking through the camera, and just show people home what we're seeing, I'm at F5, I'm at 125th of a second, and I'm at ISO 100. I'm gonna take one picture before I shoot with the flash just to see what that image looks like. So I turn my flash off, and I'll take that picture now. Alright, Remy, one, two, three. Great. Alright, cool. And I purposely, when I took this shot, I purposely underexposed it ever so slightly because I want the flash to kind of a build the exposure so that he's, he brightens up from the flash. Okay, so now I'll turn the flash on, and I'm currently at 1/16 power with the flash. I don't know what that's gonna look like in the final image. so right now it's just a guess, so we'll see how they goes. Ah, Remy, I'm gonna have you move that way just a little bit, perfect. Cool, and now what I need to do is I need to basically play pool or billiards with the light. I just want to make sure the light's gonna go here, it's gonna reflect on to him there, so you just don't want the flash basically to be in a shooting straight into this 'cause then it just, it doesn't reflect towards the subject. So I'm gonna angle it forward just a little bit. Alright, you ready? Alright here you go, one, two, three. And we'll take a look. Cool, I'm gonna zoom in a little bit here, so I can look into his eyes. I like looking in the eyes to see if we got a nice catch light, a nice reflection in his eyes. And we do. What I'm noticing though, and this is a real particular point that I wanna make, is if we zoom in really close in this photo, you'll see two catch lights. There's a big catch light, this coming from this. And that's the good catch light, but then there's also little tiny catch light, almost like a little pin prick in his eye. And that's coming from this flash. This flash is actually angled forward just enough that it's hitting him. So if you don't want that second, kinda little tiny pinprick, we can flag the flash, you can flag it with your hand like this, or you can use some gaff tape and some paper and flag it that way. For this next photo though, I'm just gonna flag it with my hand to prevent that little pin prick of light coming forward. Alright, so we'll take that again. Here we go, one, two, three. Nice. Cool and now I'm gonna look real closely, perfect. Basically we have one catch light in his eye. Makes me real happy. Alright, I'm gonna have you turn little bit, turn this shoulder towards me, cool and, this is basically a torso shot. It's just the head shot. I'm gonna have you come forward a little bit closer, and the reason I'm turning him this way is because I want a little bit more of his eye catching the light from the reflector. Alright, I'm gonna flag that again, in one, two, three. Haha! Makes me happy. It's a good looking photo. Perfect. We got a nice catch lights in his eyes, the flash isn't, the flash isn't too bright, I'm real pleased with that image. I'm gonna take one more though, 'cause my framing wasn't that great. I need to gain another couple inches. Take this shot, one more time. One, two, three. Fantastic, thank you. So, that was great. You can see very inexpensive way to produce good looking shots in the field. Not even using an umbrella, or a soft box. Just doing on-camera flash. But the key is always make it look like the flash was from another source. So bouncing into the reflector, using some type of diffusion surface like I have here, anything along those lines will make the photos just look that much better. If you're going to the expense to, you know, be a portrait artist then I don't recommend using these devices for your higher end portraiture outdoors. They just don't have enough surface area. And I know from talking to some of you, that you use these, and these were great for events. They work great for being mobile, that but not the perfect solution for outdoor portraiture. So bounce, diffuse, don't shoot straight undiffused flash from the hot shoe, otherwise the result is a frowny face photo. Sorry for my little emoji, but yeah, so here's the worst flash photo on planet Earth, everyone out there out there in Internet land is going yes I have done that shot. I've made that shot myself. It's a great smile, but very poor execution on the photographer. So finding a way to reduce the intensity of light by diffusing it, this is using my Rogue FlashBender, that image right there, that's literally this thing that I have in my hands. I love this, it's about, it's about 10 inches square and the truth is if I could, if Rogue made one of these that was like two foot square, I'd use that one. Bigger is better. Then the next is, pointed at the reflector. So this one turned out really well. I like this shot, but this one as you saw, had the double catch lights in the eyes, and that bothered me. Some people are like, "Yeah, I don't really care." Other people are like "I don't want "the double catch lights." So I fixed that with flagging it, this is the one where flag with my hand. Really great look over all, you know the background, we got a great spark on his face, fills in the shadows underneath his black sweat shirt, and then we zoom into the eyes and we just have basically one catch light there in his eyes. And I'm real pleased with that look. So, simple, inexpensive, easy, and great look.
Class Materials
Bonus Materials with Purchase
Ratings and Reviews
Brandon Couch
This is the second class I've taken with Mike and it was amazing! So easy to understand even when you get into the "tech" side of how flashes work but especially when using them outside and how easy it is. I would totally recommend this class to anyone wanting to take amazing images outside with one flash. He even makes bare bulb flash look awesome. Such a great course!
SunSoBright
Mike Hagen has become one of favorite instructors. His instruction and question answers are clear and concise and he has a real world approach. He has a friendly and approachable personality. Best of all during this course he works by himself which makes you feel you too can accomplish the shoot on your own. Mike demonstrates a practical approach with affordable equipment as he is aware many photographers starting off do not have a huge budget. In his other course on using your first flash he also had several gear set suggestions based on budget which was so thoughtful and helpful. I hope Mike does some more advanced courses as well and I will keep watch for his name on the course schedule. A definite thumbs up for photographers starting off using flash.
Laura K.
I have watched a couple of Mike Hagen's classes, and hope Creative Live will bring him back to teach more. He is a fantastic, thorough, easy-to-understand instructor. He doesn't assume viewers already know certain things. He is humble and diligent and truly wants students to understand and learn the things he is teaching. He breaks things down and explains things better than most, and he doesn't hold back on details. Mike also provides helpful handouts/written materials to supplement his videos. I really like his classes and teaching style, and hope to be seeing more from him in the future.