Lessons
Class Introduction
06:20 2Photo Basics
05:31 3Basic Controls: Top Of Camera
04:45 4Basic Controls: Auto Modes-
09:24 5Basic Controls: Manual Modes
23:47 6Basic Controls: Back Of Camera
20:29 7Basic Controls: Flash Modes
14:05 8Basic Controls: Live View
13:10Basic Controls: Left And Right Of Camera
06:21 10Basic Controls: Bottom & Front of Camera
03:03 11Nikon D3400 Lens Options
07:25 12Menu Functions Overview
02:51 13Playback Menu
05:02 14Shooting Menu
21:46 15Setup Menu
23:52 16Setup Menu: Connect to Smart Device
17:01 17Camera Operation Overview
09:19Lesson Info
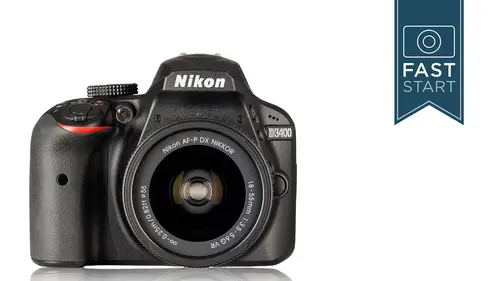
Basic Controls: Flash Modes
We have a variety of different flash modes. So, if the flash is going to fire, we have some different modes that we can use. And, it depends on what mode we're in. So, if you are in some of the more auto modes, you don't have as many choices. You'll have auto flash, where it fires if necessary, you have a red-eye reduction which helps reduce red eyes, and then you have a flash off mode which allows you to electronically turn the flash off. Normally, I would just put the camera as far as in the dial mode in the flash off mode. In some of the more semi-automatic modes, program Shutter Priority and Aperture Priority will see some other options. Fill Flash forces the flash to fire even if its bright outside, because you want to fill in the shadows with additional light. We have the red-eye reduction, we have a new slow sync, which allows us to shoot at slower shutter speeds, which can give us some interesting effects. And then there's a special one called rear-curtain, which is great for s...
ubjects that are moving very quickly through the frame. It determines when the flash is going to fire, and so some nice little modes for people getting a little bit more into manual flash photography. And in the full manual mode, we're going to have some more of these same modes. Fill Flash, Red-eye Reduction, and Rear-curtain. And so, these vary a little bit depending on what exposure mode you are in. But, you can come here by pressing the eye button, navigating to the flash modes and you'll see whatever is available to you at that time. Next up is the ISO, and this is the sensitivity setting on our sensor. Back in the days of film, we had different speed films that were sensitive, had different levels of sensitivity to light. And now we have sensors that have adjustments where we can go and adjust how sensitive it is to light. Now, the base sensitivity setting on this camera, as it is on many cameras, is ISO 100, and that's where you're going to get the best, cleanest results. And so, I wanted to do a little test, and we'll take a look at an enlargement of what ISO 100 looks like. This is very clean and detailed. And as we shoot with higher and higher ISOs, you'll see as those numbers get higher it gets noisier, or it kind of looks grainy and blotchy. It doesn't look as clean. And so, with any camera that has a range of ISOs, there's kind of two different, there's three different numbers that are important. One is, what's the lowest number that you can shoot at. That's 100. The next number is where do you start seeing kind of a notable different in image quality? For me on this camera, it starts to take a real turn for the worse at around ISO 3200. So, everything up to 1600 looks pretty good. Now, 100 is better than 200, and 200 is better than 400 and so on. But, up to 1600 you're doing pretty good as far as image quality. And then the second, third number that you want to keep track of is where does it really fall over the edge, where it's like "ugh." This starts looking really bad. And for me, 12800 it takes a real bad turn for the worse there. And so, you should feel pretty comfortable up to 1600, and then if you have to go up to 6400, that's okay, and you really want to try to avoid those last two. They're a little bit on the blotchy side as far as I'm concerned. And so, that's the sensitivity of the sensor. You want to try to keep it at 100, and you'll raise it up beyond that if you are needing faster shutter speeds. That's the reason why you would raise it from 100 to 200. Next up on the bottom row we have our focusing mode, and we're getting into kind of a new thing here we haven't talked about so far and this is the way that the camera focuses. And there are some different modes that you can use. And so it depends a little bit on which mode you are in on the exposure mode as to what's available to you. In the more manual modes, you're going to have more options. AF-S stands for single-servo auto focus. This is perfect for subjects that are stationary, and not moving around too much. They're not moving closer or further away from you. The camera will focus on that subject and stop. You can then recompose by moving the camera a little bit to the side, leaving your finger halfway down on the shutter release. For subjects that are moving rapidly towards you or away from you, you want to use the AF-C mode, which is continuous-servo auto focus. And what this is going to do, it's going to track subjects. It's going to keep adjusting and looking for focus. And so, AF-S it looks for focus, and once it figures out it stops moving. In continuous, it's constantly adjusting on it. And so when I do sports photography, I want to have the camera in the AF-C mode. Now, there is an AF-A mode, which is here, which automatically goes back and forth between the two, making the decision for you. And, this is one area where I don't think the camera does a very good job. It does not do well with a subject that is stationary, but then starts moving again. And so, I think it's pretty easy for the photographers to decide, "Is that subject moving or not, or am I shooting action and sports or not?" And so, I would recommend AF-S most of the time. When you get into action photography, you can go over into AF-C and in general I would avoid the AF-A mode on it. And of course, MF stands for manual focus. You can go into the menu system and turn off the auto focus system of the camera if you want to manually focus, which may be necessary with certain types of lenses. But, in some cases you might want to use it in some types of photography like macro photography. And so that is the focus mode on the camera. Also, dealing with focus, but in a different manner, is the AF-area mode. This is where you are going to focus. And you will see that there are different options depending on which of the previous modes you are in. And so, I recommend AF-S most of the time, and if you have it there now, you're only going to see two options. If you put it into AF-C, you're going to see four options. Continuous focusing is a little more sophisticated, and they give you a few more options. Alright, so AF-S gives us two modes. First mode is single-point focus. And this is what I recommend for people who are wanting to do kind of serious photography and they want to be very precise about what they're focusing on. Available in the continuous focusing mode is dynamic-area, which is a single point with additional help from its nearby neighbors. So, it looks up, down, left and right for additional information if that subject is moving erratically from side to side. The 3D-tracking point will use all 11 focusing points, and use additional three dimensional information to try to figure out how that subject is moving and how to track it. And so, this can be very good for an erratic subject. Maybe there's a child playing, riding a tricycle around in circles. The 3D tracking mode should do a pretty good job on that. The dynamic may do a good job on that as well. So, you'll need to kind of play around with those two if you have do a lot of action photography. And then, auto-area simply activates all the focusing points and it uses whatever ones are closest to you. So, this could be good for general photography, but for people who are a little bit more specific and focused in what they're doing, they want to have more control literally over that focusing system. So, let me show you on the camera here a little bit on what we're doing. So, doesn't really matter what exposure mode we're in. I'm just going to let it sit in Aperture Priority. I'm going to hit the eye button here, I'm going to navigate down and I'm going to change this out of AF-A, and I'm going to change it over to AF-C so that I can look at all the different options. I'm going to come over to the AF area-mode, and I'm going to hit the OK button. And I can choose the different modes in here. Now, the one that I shoot with, and I shoot a wide variety of stuff, most of the time is single point. And I'm going to hit the OK button here. And so, I can see that it is selected in there now. So, when I press down on the shutter release, over here on the left, you'll see my focusing points. And as I press left, and down, and right, I can navigate to any of these 11 points. And you will see the same thing when you look in the viewfinder yourself. And so, if you hold the camera up to your eye, you can just move this off to the left or right if you want to focus on something that is not in the middle of the frame. And so that is something that I would get used to using, I think it's a very good system for taking more control of your camera. It allows you to be very precise about what you're focusing on. Now, something to know, some background information about the focusing system being used in this camera, is that the top and bottom most focusing brackets are vertical line focusing, which means they focus very good on vertical lines, but they don't do so well on horizontal lines. The ones off to the left and to the right are horizontal line focusing, and so they're really looking for horizontal lines in which to focus. The one in the middle is a little bit special because it's a dual type, it's a cross type focusing, so it's looking for horizontal and vertical lines. And what this means is that your center focusing point is the most sensitive to different types of contrast. And one of the most common problems on a camera like this, is that it doesn't want to focus. And that's simply because the focusing brackets are not pointed exactly where they need to be. And so, you want to look for lines, areas that have light and dark area, areas that have textures, you want contrast in those bracket areas. If you have that, the camera will be easily able to focus even under very low light conditions. And so, it can be one of the more tricky areas of photography, but these are very important control areas to master on this camera here. Next up is our metering system, and this is how it reads light coming in through the lens. We're not going to get too far into this, but let's just take a quick look here. We have three different options. Matrix, center-weighted, and spot metering. I highly recommend matrix most of the time. It does a good general job, and it's going to figure out small little details about bright lights or shadowed areas and things like that. There is a traditional center-weighted, which is what cameras used 20, 30 years ago. And we also have a spot metering if you want to be very precise about metering a very, very small area. But, in general, I can tell you that matrix metering does an excellent job and it's the way most people who have Nikon cameras leave their cameras set virtually 100% of the time. Next up is set picture control. And what this is is it allows you to control the exact colors and tonalities of the images that you shot with. For those of you that have had the privilege of shooting with film, you know there's different types of film. There was film from Kodak and Fuji and Conica and other companies, and they all had a different look because they had slightly different colors and contrast to them. And you can jump in and change these yourself. Obviously, the biggest notable difference is in the monochrome, which is a black and white version. But, all of these have slightly different adjustments. Vivid might be used on a landscape where you want very vivid colors, but a portrait mode has a little bit more subtler colors so that we're not taking the colors of our skin and saturating them too much. It typically doesn't look so good. We also have a flat one if you want to kind of control it later on, you get very very neutral colors straight in the camera. I think for most users you can just leave this on standard, and you're going to get pretty solid results straight out of the camera. But, if you want to tweak it, you can come in and tweak it right here. Next up is flash compensation. Now, the camera, when it fires the flash will normally fire with as much power as it thinks it needs. And this is known as TTL Flash, it stands for Through The Lense Flash. That isn't always the right amount of power. Sometimes, especially for portrait photography, it's a little bit too much. So, it's often a good idea to power down the flash so that it's not quite as powerful. I think of this as a little bit like spice in my food. I like a little bit of spice, but I don't want too much spice so that it overpowers it. So in this case, if you want to kind of taper back on that flash, TTL flash can get fooled by other elements that are too light or too dark in the photograph. You can tailor that back one, two, or three stops as an example. If you do a lot of people photography, I recommend just leaving the TTL flash at a minus one setting, so that it's not too much flash, it's kind of powered back a little bit. Exposure compensation is something that we talked about earlier, there is a button on the top of the camera. So, just as a reminder when we're shooting in shutter priority, aperture priority, program modes, the camera wants to collect it at zero. But, if we want to shoot some photos at minus one, or plus two we can do that. So, that's going to be used only with Aperture, Shutter Priority and Program. You don't do it in manual, and it's not available to you when you're in the more automatic mode. So, that is the eye button. That is a shortcut to some of the most important features, and we are going to see virtually all of these features again when we go through the menu system. There's a number of features that are in two or even three places on this particular camera. So, important shortcut button to know and master.
Class Materials
Bonus Materials with Purchase
Ratings and Reviews
Tuan Hoang
John Greengo is a great instructor. He is indeed an expert. 1) Great voice ( clear tone) 2) Extremely friendly look ( must be a humble person) 3) Is indeed an expert ( know what he's talking about) 4) Have a passion teaching the secrets ( some instructors tend to hold back the information but not John) 5) And many more...
Andrea
Great course to help an amateur get familiar with this camera. As a first time DSLR owner, and new to photography in general, there are settings and abilities of this camera that I find to be intimidating at times because they are over my head as a newbie. John explained settings and buttons in a way that cleared up some confusion left from reading the camera manual. I highly recommend this class to every owner of a D3400! John is a great instructor and I look forward to watching more videos of his.
Jan
I just purchased my first DSLR which is a Nikon D3500. There are few changes from the 3400 and this class has helped me tremendously with the transition from point and shoot and phone cameras. I am planning two once in a lifetime trips coming up and along with John's other courses on here I hope to be ready to capture some great memories. Would highly recommend his classes as he is a great teacher. I have tried other courses online and this and his Beginning 3 hour course so far have been the most helpful. Look forward to diving into his Fundamentals class.
Student Work
Related Classes
Camera Guides