Lesson Info
11. Directing and Posing Headshots
Summary (Generated from Transcript)
In this lesson, Lindsay Adler discusses the importance of directing and posing headshots in portrait photography. She emphasizes the need for a strong connection and expression from the subject, rather than just focusing on the pose. She provides five key tips for building rapport with the subject and creating a comfortable environment. Additionally, she gives advice on exuding confidence as the photographer, paying sincere compliments, using the subject's name, discovering their passions, and using positive language during the shoot. Lindsay also discusses the importance of relaxed posture and demonstrates how camera angle can affect the appearance of the subject's neck. She explains how to direct subjects using hand gestures and mirroring techniques, and gives tips for avoiding common posing mistakes, such as covering the jawline with the hand or obscuring the eyes with the nose. Finally, she discusses the importance of directing the eyes and gives examples of how to position the hands in a flattering way.
Q&A:
What is the most important element of a headshot?
The most important element of a headshot is the connection and expression of the subject with the camera.
What are Lindsay Adler's five key tips for directing and posing headshots?
The five key tips for directing and posing headshots are: exuding confidence, paying sincere compliments, using the subject's name, discovering their passions, and using positive language.
How can camera angle affect the appearance of the subject's neck?
Shooting from a low angle can make the subject's neck look longer, while shooting from a high angle can make the neck look shorter.
How does Lindsay Adler direct her subjects without physically touching them?
Lindsay uses hand gestures and mirroring techniques to direct her subjects without physically touching them.
What should photographers watch out for in terms of posture and hand positioning in headshots?
Photographers should encourage relaxed posture and elongated necks in headshots. They should also be mindful of hand positioning, ensuring that the hands are soft, relaxed, and not covering the jawline. The pinky side of the hand is generally preferred.
What is the importance of directing the eyes in headshots?
Directing the eyes in headshots is crucial to ensure that the subject's gaze is natural and not strained. It can also affect the overall composition and appearance of the photo. The lesson focuses on how to direct and pose hands in beauty and headshot photography. The instructor provides techniques for directing hand placement and positioning to create elegant and natural poses, both for female and male subjects. The importance of posture, neck position, and avoiding distracting elements in the frame is also emphasized.
Q&A:
How does the instructor direct a subject to pose their hand next to their face?
The instructor asks the subject to trace their hand loosely around the side of their hair to their jaw, then turn their hand into their face with the chin down and the thumb tucked.
What is the purpose of tracing the index finger around the side of the face?
Tracing the finger helps to create space between the jaw and the hand, show the pinky side of the finger, and create an elegant pose without the distraction of the thumb.
What direction does the instructor give to fix the issue of too much palm showing?
The instructor directs the subject to turn their hand towards their face.
What are some considerations when photographing men's hands in headshots?
It is important to ensure that the hands are not overly large and distracting in the frame. The instructor advises avoiding a straight-on pose towards the camera and being mindful of a subject leaning too much on their chin.
How does the instructor guide a male subject to improve their posture?
The instructor asks the subject to pull up through the top of their head, lean forward with their chest instead of bending forward, and pull their shoulders down.
How does the instructor suggest posing a hand near a male subject's face?
The instructor recommends having the subject lean back on an apple box to make the pose more comfortable and believable. The hand can be positioned slightly to the side, avoiding being directly in front of the camera.
What does the instructor mention about a subject wearing a wristwatch?
If a subject is wearing a wristwatch, especially if it holds sentimental value, the instructor suggests bringing the hand up to the other side to showcase the watch.
Lessons
Gear & Getting Started
1Introduction and Overview
1:53:24 2Cameras
55:41 3Lens & Focus
1:01:58 4Cropping & Composition
35:28 5Group / Accessories
45:29Lighting Essentials
6Intro to Studio Lighting
1:13:03Modifiers
41:08 8Natural Light Essentials
21:01 9Speedlights
37:28 10Training Your Eye - Light
28:08Posing & Directing
11Directing and Posing Headshots
46:50 12Posing Couples
21:18 13Posing Individuals Full Length
25:35 14Posing Groups
22:10 15Posing: Training Your Eye
15:34Subject Matter Essentials - Bringing It All Together
16Headshots: 3 Go To Set Ups for Men and Women
37:11 17Quick Reference: Photographing Men
29:39 18Quick Reference: Photographing Women and Full Figure
48:15 19Quick Reference: Photographing Couples
36:55 20Quick Reference: Photographing Families and Groups
30:43Lesson Info
Directing and Posing Headshots
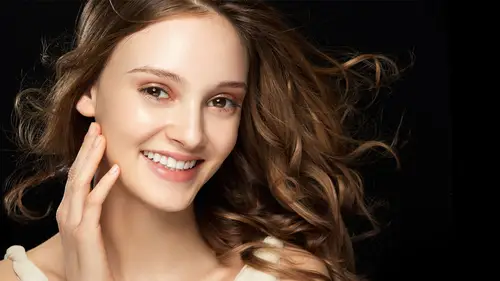
One of the foundations of portrait photography is the headshot, the close-up portrait. And I would like to talk a little bit about what you're looking for in the headshot pose as well as directing your subject, because that is something that is going to come with practice. How do you really get the best out of your subject? And there's some people that specialize just in headshots, that's all that they do. And there is so much of an art to it. And one of the things that I have realized is that if you don't have a great expression in a headshot, a great connection with camera, then it's not a great photo. You're missing the entire point. And so what I try to do is I try not to get all caught up on my pose, and doing something too intense, because even if the pose is perfect, but the expression, the connection is missing, it's not going to be something that the client wants. So how many times have you looked at a shoot where you photograph somebody, and they go through all the photos, an...
d maybe you have all these favorites where you're like, oh, the pose looks great there, the light looks great there, and they don't pick that one? Or they pick the one that's completely out of focus. The reason they picked that one, it might be because they were laughing, and that was the expression that they liked the best. So just keep in mind, it's the connection with your subject, the way that you direct them, the way that they connect and interact with the camera that becomes important to most of the people that you're photographing. Now I would like to give you kinda my five key tips, my five key suggestions for interacting with your subject and building rapport. Your way to start to get more familiar with them, or what you can do to make them feel comfortable on set. And everybody has different personalities. So these are kind of just general things that I have found along the way. And so let's take a look at this list of five tips. And the very first one is to exude confidence. You need to be confident in your photographic skills. You need to be confident that you're going to get a great portrait of them. Because the second that you are insecure, the second that you are unsure, if you look like you don't know what you're doing with your camera, and you don't quite know how to direct them, and you're nervous, they think it's them, and that nervousness, and that energy will transfer over instantly. And you will instantly see them more tense and more insecure. So you need to approach the portrait session even if you're still just learning, even if you're still learning your gear, you need to approach it with confidence, and that is going to make your shoot go significantly better. Tip number two is to pay sincere compliments. You don't want to just compliment someone just to pat them on the back and think of something random, but we're photographers and we see beauty everywhere. Especially as portrait photographers, we're learning to appreciate the beauty in our subjects. So when you look at that person, what is the feature or the element about them that you find most beautiful, or that you find alluring, or that you find sets them apart, and pay a sincere compliment. Because right away you're showing them that you appreciate the beauty that they have, you can see it. And so if you're telling them I see your beauty, it's in, oh, wow, so if they can see that beauty, maybe they're going to be able to capture it. And it comes back to that same confidence in the shoot. Okay, for my third tip, make sure you learn your subject's name, and say it repeatedly. And this sounds kind of silly, but let's say that you're photographing a wedding, and you're photographing the mother of the bride, and you don't know her name, and you're just like, kinda hey, you. It doesn't build that same connection and rapport with your subject. And so there's a book where one of the sayings in this book, How to Win Friends and Influence People, which I recommend that you read, one of the sayings is that, "The sweetest sound "in the world to a person is the sound of their own name." And so when you keep saying their name over and over again, it's like, oh, wow, I'm important. They care about me. They know who I am. I'm the center of attention. So learn your subject's name, and continue to say it over and over again. But number four is to discover this individual's passions. Besides just saying their name to say yes, I'm paying attention to you, but figure out what someone loves. What are they passionate about? What are their hobbies in life? Everybody has something that really fulfills them, just something that they would love to do in their free time. Maybe someone's a veterinarian, maybe someone has children, maybe they have a hobby they love. Of course, for photographers, it's pretty easy to know one of our passions. Or maybe it's music that they're passionate about. If you're trying to break the ice, if you're trying to get your subject comfortable with you, figure out what their passions are. Because you'll notice that someone that's not talking, that's clamming up, that's just not really sure, when you get them talking about what they're passionate about, they're excited, they let loose, they relax, and it changes the complete atmosphere of the entire shoot. So figure out what their passions are, start a conversation. And it's a great way to form a connection with this person. And now for number five. Number five is to make sure that you never use negative terms. Just make sure that throughout the shoot if you see something you don't like, the lighting, or the pose, or something, don't say, oh, I don't know about. As soon as you wrinkle your face, as soon as you show that there's something not working, well, you're photographing them, and instantly they feel like they're the problem, and they feel insecure, and it is very vulnerable to be in front of the camera. So what I choose to do, and you'll see me if you watch my behind the scenes of me shooting portraits, if you see me photographing even in these segments, no matter what I say, it's always in the form of positives. And I'll even say, good, okay, that's great, but let's change the arm, instead of saying, good, I don't, mm, the arm doesn't look good. Let's do something different. I'm always keeping it upbeat and positive, so the environment is always that they're doing a good job, and the changes we make are helping them do even better. So always keep it positive. Alright. And this is not in those top five things, but everyone just needs to relax on the set. Find a way to get everyone to relax, you need to relax because your stressed out energy, whatever energy you have around being nervous transfers right over to them. And as soon as they're not relaxed for any reason, maybe they don't feel like they look good, or maybe they haven't been in front of the camera in a while, it will transfer over into their expression, to their face, and to their body language without you even realizing it. It might be the tense jaw that when they bite down, it flares out the side of their face making their face look wider. Or it might be the slightly raised eyebrow that increase the amount of wrinkles in the forehead. Or it might be the slightly raised shoulders, if they're nervous, that makes them look heavier. Even just a little bit of tension can drastically change the look and feel of that headshot. So everybody needs to just relax. And so I gave you all those recommendations of how you can start to connect with your subject, and then get everyone to relax. And that's one of the reasons I like to joke around and have music on, figure out what the person's passionate about, 'cause then they kinda just start to get a little bit more comfortable with my studio, with the shoot that we're doing. Alright, so a couple tips, though, just the things, the checklist of what to look for. As I'm shooting, I do this. Okay, I look and make sure that their jaw is relaxed. I tell people to shrug their shoulders. If their hand is next to their face, I tell them to wiggle their fingers and set it back down. All of these things people hold tension in, shoulders, hands, jawline, lips. Some people when they're nervous or stressed or angry, they purse their lips together. So I'll have people breathe in and then breathe out, and I'll say, "Just feel that feeling "at the end of the breath." So, (breathes deeply). That's more of relaxed lip than tense. And a lot of people when they smile and they're nervous, they wrinkle their forehead. And so I will say, "Okay, great, but just relax "your forehead a little bit, just shake it out." And that helps to translate in our photo. So I have that little checklist of things that I'm looking for, the shoulders, and the hands, and the jawline, and the forehead, and all of that can help make a more relaxed photo. Before I actually start taking some photos of her, I want you to take a look at the slide that I have up right now. And I have three photos side by side that are all identical except for one thing. I'm using the same lens choice. I'm using the same exposure. It's the same pose. All of it's the same. The only thing that changes is my camera angle. Camera angle makes a really big difference in headshots. And even when I'm directing, and when I'm going to be kinda telling her what I want from her, it's all gonna make a difference based on where my camera is. So the picture on the left, she has a very, very long neck. And the reason her neck is so long is that I'm shooting below eye level. I'm shooting up at her. And this is going to make her neck look much longer. However, you'll notice that I don't quite have a really intense connection with her eyes, and maybe I'm starting to shoot a little bit up her nose. See how her nostrils look a little bit bigger on that left photo than the rest? The next photo over, I'm shooting at just above eye level, or just a tiny bit above eye level. And everything else looks pretty much in proportion, but you will notice her neck looks a little bit shorter. And then on that third photo, I'm shooting above eye level. Her neck looks shorter. Notice her nostrils looks smaller as well, but also her eyes look a little bit bigger. So what is the right camera angle to shoot at? And well, it kinda depends. It really does depend. Because if I want a photo where someone looks large and in charge in the photo, I want them to look dominant, maybe I do wanna shoot from a little bit lower camera angle. Or when I shoot beauty, I am often shooting from a lower camera angle to give myself a very long neck. Now let me just show you real quick as I come over to her what I'm talking about for height in camera angle. And I'm going to need an apple box, please. Alright, so typically when I shoot a portrait, I try to shoot somewhere right around eye level. (camera shutter clicks) And by the way, I'm shooting right now with a Canon 70 to 200 2.8. You put it right here, that'll be great. And so right around eye level, I can kind of have a connection with my subject. If I want her neck to look larger, or longer, not larger, longer, (laughs) if I get close and shoot low, I am definitely shooting up her nose. I mean, I'm definitely at this point, I see her nostrils, her shoulders are going to look wider, so I don't wanna be close and look up. What I wanna do is I wanna back up, get down, and zoom in if I want her to have a long neck. So although I might do a headshot from about here, if I'm going to make her neck longer by getting at a lower angle, I'm gonna back up. So I'm gonna back up to maybe here for her neck to look longer, 'cause then perspective-wise, I'm not shooting straight up her nose. And how I think of it is I think of it like a tree. If I stand at the base of the tree, and I'm looking, and the bottom is going to be very large, and then as I look up, I'm looking way up at the top of the tree. But if I back up a little bit, that top of the tree, I don't have to crane my neck up. In other words, I don't have to look straight up at her if I still want a long neck. So I start at eye level. If I want a long, elegant neck, I might back up, get down, and zoom in. Or very commonly for portraits, people will shoot a little bit higher than eye level. And the reason is whatever is closest to the camera is largest. So if you have your subject lean forward just a little bit to bring their eyes closer to the camera, and you're at a little bit higher angle, all of a sudden the eyes are going to look larger, and all of a sudden there's just a little bit more of a connection with the subject. Often when I'm outside and I'm photographing a subject for a headshot, I'll have them sit down, and I'll shoot with a wide aperture lens, and 85 1.8, an 85 1.4, 1.2, and I'll have them lean forward and look up at me. And I'm at that higher angle, the eyes are going to look so large, and with my narrow depth of field, the eyes are in focus and everything else melts away. And through my years of photographing high school senior portraits, they always pick that shot. Always, because there was such a connection with the camera. So perhaps shooting at a little bit higher angle looks great. The reason that I'm sometimes wary of it in the studio, is I'm just gonna get a little bit higher on an apple box, and I'm going to photograph slightly down at her. Okay. (camera shutter clicks) When I do so, her neck gets shorter. And so as I compare these side by side, they all just have a little bit different look. I think she's most connected with the camera when I'm shooting from a slightly higher camera angle. But the higher up I go, it's gonna start compressing her, and giving her no neck. So in other words, it's all kind of a balance. So the first element I want you to think about is that camera angle, the height of the camera. But let's go on to another thing. Talk about directing our subject. I wanna show you real quick how I give instructions. And I am very careful, I never touch my subjects. I don't, there's no reason to. I can use hand gestures and mirroring in order to get them to give me the poses that I'm looking for. If for some reason, there's a hair out of place on the shoulder, or something that I wanna move, and I don't think she can tell, or if she moves it's going to ruin the pose, I go like this, I say, "There's a hair that I'd like to fix. "Do you mind if I fix it?" Nope. Great, and then I come in and fix the hair. Because otherwise, it's just you're instantly invading someone's personal space. So that's my recommendation to you. I try not to, I try to do most of my directing just by using my hand gestures instead of actually moving people. And sometimes I think it comes across a little brash if, okay, I'm gonna break my rule just to show you this, if I'm like, no, no, no, I want your shoulders here. It's all of sudden it's kind of aggressive if I'm physically moving her. I don't need to do that. So here's how I communicate with my subjects. Alright, so I'm gonna have you face straight on to me. Perfect. Now what I would like you to do is I want you to turn your head to your right. Okay, so for turning, I act as though I'm grabbing the chin, and I am turning it. We turn your head to your left. So I'm grabbing the chin and it's on a swivel. Notice something that I really, really try hard and practice is when I am saying turn your head to your right, well, it's left for me, but it's her right. You have to practice that, because a lot of times things get lost in translation if you just say, now, turn your head to the right, and you meant the other one. And so I try to give two forms of direction, grabbing onto the chin, and then saying what direction she should be turning. Okay, so here's the next one. So that is fake grabbing onto the chin, left and right. Okay, the next one would be tilting, tilting the head. I want you to tilt your head this direction. And so here's another form of communication. I'm acting like I'm grabbing her head and tilting it, but I'm also mirroring. So you'll see the same thing with me. Great, now can you tilt your head the other direction? Perfect, now straight back onto me, great. And I can put all of that together as well. Can you turn your head a little bit to the left, great, but then tilt it back towards the light, perfect. Chin down just a little, great, and then eyes up. And so I'm mirroring her, but I'm also giving her these directions. Hey, you're good at this. (laughs) And then the next thing. So that would be the chin, the tilt, and then also the shoulders. I act like I'm grabbing onto the shoulders. So I say, I just want you to turn your shoulders a little bit to your right, perfect, that's great. And now I want you to just lean forward a little bit with your chest. Perfect, now chin down. And then I want you to tilt it back towards me, great. Chin down a little bit. You're seeing all of those little movements that I do. And so it's like I have strings attached to her, but it works great. And I haven't practiced this with her, I'm just directing her, and it seems to work quite well. So those are the main forms of communication I recommend. And for full-length shots, you can do something similar for the hips, or you can do the same thing with mirroring with the feet. Could you go ahead and can step this leg forward, and yeah, perfect. Okay, now lean your chest forward towards me. So this is kind of how I'm communicating. So directing and figuring out how you can not physically touch your subjects, but still mold them in your hands, that's going to be something you really wanna practice with portrait photography. One of the first things, one of the foundations to having a great headshot is not only to have your subject relax, have them feel comfortable in the environment, but also posture. Posture is so incredibly important. Because if someone is slouching, it is going to make them look heavier. It's also going to make them look schlumpier, you lose the confidence in the photo. And so what I would say over and over again to my subjects is that I want them to pull up through the top of their head and elongate. That's the exact terminology I use. Pull up through the top of your head and elongate. Because often if I tell someone to sit up straight, they raise their shoulders up, and so then that kind of defeats the point, 'cause all of a sudden they look stressed again. So posture is incredibly important, and I'd like to show you a couple slides that demonstrate this from a shoot that I've done in the past. You wanna make sure that your subject never slouches. So in this first photo, I just told her to go sit on the bench. I said, "Go sit on that stool. "Be comfortable." And she is way too relaxed. Her shoulders have a very defined curve to them. And also, her neck looks extremely short. And you can see the curve in her back from the side view. So in the next shot I asked her to sit up straight. I said, "Oh, can you just sit up straight for a second?" And oh, one other thing to note before I switch onto that next slide, do you see all the wrinkles in her shirt from the side view? Now if someone's a little bit heavier, or a little bit fuller, those wrinkles also represent your skin, or your stomach. Everything gathers and you have more rolls. When you elongate and pull up through the top of your head, if you do that right now wherever you're sitting, elongate, pull up through the top of your head, do you see how that actually sucks in your stomach, actually tightens everything up? So not only is it good for posture and lowering your shoulders and all of that, but it tightens up the mid-section, which of course, looks better in photos. So let's go from slouching to when I said, "Sit up straight." When she sit up straight, her shoulders were too tense. And now they look a little too square. Her neck got a bit longer, but again, it still shows a lot of tenseness. And I said before, everyone needs to relax. So in this last example, what I told her to do is, "Pull up through the top of your head, great. "Elongate for me. "Now pull your shoulders down a little bit and just relax." And this is what I was able to get. If you compare the first photo with this photo right here, her neck is several times longer. She looks much more confident. And look at her stomach there, no more wrinkles in the shirt. It's a much straighter line in her spine, and tighter in her stomach. So even just improving the posture completely can change a headshot and a portrait. So let's look at these next three images as well. Here's a direction that I tend to give often. I say, start with the, "Can you pull up through the top "of your head and elongate? "Great. "Now what I want you to do is lean forward." And the reason that I say this is when I tell people, when I used to say bend forward, bending forward they would slouch, and they'd hunch their shoulders over. Whereas, when I tell them to lean forward, lean forward with your chest. It's more of a, they kind of lean from their back instead of a bending. And so if you look at these photos, the photo on the far right is going to be much more flattering in a headshot. And one of the reasons I often tell my subject to pull up through the top of their head, elongate, great, now lean forward, is because as they lean forward, it brings their eyes closer to the camera. And now there's going to be a little bit more connection. The eyes will look a little bit larger. So I'm giving these instructions, but I'm very careful to use very specific words in order to achieve it. Not sit up straight and bend forward. Pull up through the top of your head, great, elongate, and lean forward. Also this is not just for sitting poses. This could also be for laying on the ground, for standing, for anything. Even just in these two shots that you can see here, I told her, "I want you to pull up through the top of your head." And she looks much more slender, and looks a lot more confident in the second image. Alright, so let's take a look at a couple other things. I'm going to give her those instructions as well, so you can sit. So I want you to sit really relaxed and comfortable. Okay, so what I'm gonna see is, can you pull your hair back real quick just behind your shoulders for a second? So I'm gonna see slouched shoulders and also a bit more of a curved neck. So now what I would like you to do is can you pull up through the top of your head, elongate, great. (camera shutter clicks) And she just became significantly taller. Her neck got much longer. But the problem is is when she did that, because she was bending forward before when she was slouching, now her eyes are a little bit further from me. She looks a little bit more distant as I compare these two shots. So now what I want you to do is lean forward with your chest just a bit, great. It's bringing the eyes closer to the camera, so she doesn't look as distant from me. So the very last part of this is sometimes what happens is I tell people to elongate, pull up through the top of their head, and they end up pulling their chin back. And you don't really have a chin to demo this. Oh, wow, wow, there's a few. No, I'm just kidding. (laughs) So what you wanna do is you want someone to sit up straight, but not too straight, 'cause what they'll do is they'll pull their chin in and give themselves a double chin. So I'm always nonstop saying, "Chin out and down." Because what that does is the chin out part stretches out this skin so that it's not gathering. But if they just stick their chin out, all of a sudden I'm shooting back up the nose. And now it looks stressed, and I'm looking at the bottom of their jaw, and if they have skin here, I'm actually drawing more attention to it just if they stick their chin out. And a lot of people have a really bad habit just because they've been a little bit self-conscious about a double chin, so they do this all the time, and it's actually causing more problem. So at the end, it's always chin out and down. Because this stretches out that skin, but makes sure that the eyes connect back with the camera and it redefines the jawline. When the chin is up, the jawline disappears. You're looking at the bottom of the jaw. That down, now the jaw comes back into place. So I'm gonna show you how I would direct my subject. So look slouching. Do your normal, that's your comfortable stance. Okay. And you are super skinny, so this is not a problem, but notice how her shirt gathers. Okay, everything kinda gathers here. Now what I'm gonna do is, can you do me a favor? Can you pull up through the top of your head, great. Elongate, perfect. Relax your shoulders a little bit. Now what I want you to do is lean forward with your chest. Chin out a bit and down. Great. And that would be my instructions. Can you put your chin back to neutral position? And so if you watch, chin out and down, can you do it for me? Her jawline gets more defined. You start to be able to see it more, and it makes a huge difference. So I'm just gonna take a couple of those photos, so you can see them side by side. And then we're gonna go back over to the presentation, so you can see some other photos that I've taken to illustrate this. Alright, so what I want you to do, be slouchy first, comfortable. Comfortable, okay? (camera shutter clicking) Okay, now pull up through the top of your head, great. Lean forward a bit, chin out and down. Perfect. (camera shutter clicks) Great. Beautiful, looks much better, much more flattering. (camera shutter clicks) Great, and then I want you to do one more thing. I'm gonna have you turn to the side just a little bit to your right, great. And now just kinda sit back like you know, okay, great. And now I want you to stick your jaw out. Perfect, and down a little. So it just gives her a little more definition to her jaw. When she leans back, it's just a little bit softer. Which is one other point I wanna mention is posing stools are posing stools for a reason. They don't have backs. When you sit someone in a chair, just maybe you don't have a posing stool, which is fine, what they tend to do is they tend to sit in the back of the chair. So they lean back. And when they lean back, they pull their chin back, and all of a sudden they have a double chin. So I will always have someone, if it's a chair, they're seldom leaning back in it. I'm having them sit on the edge of the chair and lean forward to stretch out that skin. So just be aware that if you're using a chair, people shouldn't be leaning back on it, 'cause it not only shortens their neck. Watch, ready? My neck is significantly longer when I lean forward. When I sit back in the chair, my neck shrinks, and I get a double chin. So this is why I'm very wary of that. And I will direct my subject if I am using a chair. So let me pop over to my presentation, and we're going to take a quick look at those slides, so that you can see the jawline. So in this first one, I have a gentleman that I was photographing. And he was just sitting there chin neutral. I didn't do the pull your chin back as far as possible, create as many chins as possible kinda thing. And so he was just sitting neutral. And he's a handsome man, he has a jawline naturally. But then I asked him to stick his chin out. And look how much tighter that jawline becomes, how much more rigid. Because if you look at the jawline, it is now a straight line. It's not soft. But of course, he looks like he's sticking his chin out a little bit too far. So then I asked him to stick his chin down. And so now that jawline is defined. You can notice it a lot more, and it is going to be more flattering in this portrait. So even if somebody doesn't have a double chin, even if you're not worried about that, it'll still make it different. It defines the jawline. So let's talk about a few other things for posing headshots. Some of these are gonna be little pet peeve things that I have, or things that I see over and over again. In general as a society, or in art, we tend to prefer longer necks. Doesn't mean that we always have to have a long neck on a subject, but a longer neck tends to make people look a little bit more slender, and also a little less stressed. And so I'm always watching for that. I'm watching for poses that are like shoulders up all the time. Although, apparently, that looks like it was in in fashion, it does not translate to a portrait. A lot of shoulders up and hunched over does not look good, so I stay away from that. And something else that I do, let's take a look at these images right here. I have my subject facing straight on towards camera, and I ask her to turn her chin to her right. And when she does, that's no problem at all, but what you notice is that her neckline on that side becomes very, very short. And I think that when I turned her from straight on to the right, I look a lot more at her chest. She looks a little bit broader, because I've narrowed her head. Her head looks a little bit smaller, her neck looks shorter, and her shoulders look really wide. So instead of keeping her shoulders straight on towards camera, I follow her shoulders to her nose line. So all I ask her to do is, "Okay, and can you follow "your shoulders to where you're looking?" And I turn her to the side. And when I do so, you'll see how much longer her neck is. So it's this. It's going to be looking straight on camera, turning the chin to the side, and then wherever the nose line is looking, that's where the shoulders can follow to. And when you lean your subject forward a little bit further, all of that contributes to a longer neck. Straight on towards camera, if they just turn their chin to the side, neck gets short, shoulders look broad, head looks small. So it's following the shoulders to the nose line that the shoulders get narrower, the neck looks longer. It doesn't mean that you need to do this in every portrait, but it's something that you might appreciate doing. So I'm gonna try that real quick with my beautiful subject here. Okay. Alright. What I want you to do is I want you to look to your right. Perfect. And now I want you to follow your shoulders to your nose line, just turn your shoulders that way. Great. And now lean forward just a little bit. And chin out and down, perfect. (camera shutter clicks) Great, that's looks wonderful. I definitely believe in training your eye to start to see the things that you're looking for in a headshot. And so I've talked about we like a little bit longer neck. So we like to see the neck. That brings me to a thought as well is if somebody has longer hair, you don't usually want the hair completely covering the neck and jawline, because you're losing two things that we think are beautiful. There's not really exactly a rule, but you wanna maybe leave a little bit of space. Or the side of the face that's closer to the camera, maybe you wanna pull the hair off just a little bit so you can still see the jawline. And this comes into poses as well. Let's look at the example I have here. For a while, the kinda shoulder up towards camera was in, and it still can look really nice, but the issue with the photo that I'm seeing right here is that I've hidden her jawline and her neck. She has no neck, she has no jawline. But if I just rotate her a little bit to her right, now I can see the neck and the jawline on the other side. And so she'll still have that kinda coy chin-to-shoulder look, but I haven't completely hidden her beautiful features. So that is something that I would watch out for as well. Running through a couple other things that I don't like in headshots. I do not like, and maybe I'm just weird and have a pet peeve, but sometimes I see people trying to do really creative poses, and all I see is armpit. If you're going to have an arm raised in a shot, at least make sure the armpit is a little bit further away from the camera, so it's not drawing as much attention, or that there is a sleeve on. I don't know, but armpits aren't nice-looking, (laughs) so I would try to stay away from that. And in the shots that I have here on my screen, it was really funny because I made a comment that I was going to take this photo to show that armpits aren't pretty. She goes, "Actually, I recently did an ad for deodorant." So she actually doesn't have that bad armpits. But any armpits aren't really awesome. Anyway. (chuckles) The next thing that I wanted to talk about was eyeline when you're doing headshots. What you wanna watch out for, and I talked about eyeline previously for compositional purposes, you want to make sure that your eyeline isn't, your eyes aren't looking into the edge of the frame, so they don't look cut off. Typically, for headshots, I put the eyeline at 1/3, the top 1/3 of the frame. If I'm framing up with the rule of thirds, I don't have the eyeline in the middle or lower. But I'm talking about the eyes themselves when I'm directing. If the eyes are not towards camera, sometimes I might say, "Oh, could you do me a favor, "and could you look off to the right?" I wanna be very careful that the eyes don't look too strained, and that I'm not seeing pure whites of the eyes. And where I see this most often is when people are photographing profile shots, or kinda 3/4 shots. If the person is, turn your whole body to the right a little bit. Great. And then turn back towards me just a tiny bit. Alright, so this is kind of a 3/4 shot. What I'll see is that the photographer forgets to direct the eyes. You always wanna direct the eyes. Straight at camera, right up at the light. I want you to look right here to this corner. Be very specific, because it's going to give completely different looks. If I tell her to look up at the light, she might look way high, because the light's kind of close. And now I see a lot of whites underneath her eyes, and that can look kind of creepy. So I'm very specific about where I want the eyes. But the big one I see often is when somebody's turned to look to the side. Can you look to the right of that window, the right-hand side of that window? I see this, and this is not so awesome. (camera shutter clicks) All I see are whites of her eyes, and I barely see any pupils. And so even if she's looking where her nose is pointed, it's too much for me. So what I'll do is, okay, keep your head where it is, but can you look your eyes right... And I'll just move my finger around, so she can follow the eyes, until I'm seeing the right amount of pupil. I want it to look natural like if she's looking that direction, she should still be looking that direction, but not straining, and not all of the white. So let's just say right here, perfect. Now let me take that same photo. (camera shutter clicks) Great, and now look back to where you were looking before with your eyes. Ooh, yeah. Definitely not as good. And now as I'm taking this photo, I notice another, it's a common rule, it doesn't have to be something you follow, but it's kinda hard to explain unless we just show it. One of the rules that you wanna watch out for is that the nose doesn't cross the cheek line. So I'm gonna take a series of photos, so you can see what I mean. It's when you're shooting in profile that just the tip of her nose sticks out over the cheek, and it becomes a distracting element. Generally, you wanna shoot profile, or with the nose inside of that cheek line. So I'll show you the good shots, the good versions of this, and the bad. So this is good. I'm gonna slowly have you turn your head. So right there's perfect. Keep goin'. Okay, chin a little more. Good, keep goin', little more. Good, a little bit, oh, oh, and right there. That's gonna be not ideal. Keep going a little more. And so what I'm seeing is her nose is kind of sticking out. Right there. Now this is back to okay. Because now I'm looking at profile. And I just see her back eyelashes. And if you look at old paintings, and old cameos, and things like that, when you see somebody in profile, they would show the profile, and then just a little bit of the back eyelashes. So either shoot it in profile, or try to keep the tip of the nose in the cheek line, because otherwise, it just becomes a distracting element. And all the while, if you're turning your subject's face to the side, watch out for their eyes straining, so you don't see too many whites of their eyes. So the perfect shot that I would get would be something like, keep going a little bit more. Great, chin back to me. Okay, the nose is in the cheek line, perfect. And look your eyes right there. And so that would be ideal, not, turn your head to the right just a tiny bit. Good, and eyes far to the right. Whereas, that would not be good. So take a look at those before afters. One of them, she looks strained, and also there's attention to her nose. And the other, her eyes look full, and it's much more flattering to her face. In a later segment, when I focus specifically on headshots alone, I'm going to give you a checklist of some of the elements that you should be looking at as you're about to click the shutter, as you're looking back at your image on the back of the camera, things that help your photo, and things that take away from your photo. And one of those things, very importantly, are hands. If you have hands in your photos, they can really make or break it. It can show strength, or it can show softness and elegance, or it can completely just show discomfort and be a huge distracting element. So I wanna take a look at a couple slides, so you can see what hands are good and what are bad, so you can be watching for them as you're directing your subjects. And then I'll give you a couple tips on what I do to direct my subjects to have nicer-looking hands. And also, believe it or not, I mention to my portrait clients to make sure that their hands or their manicures look nice, and to have nice, clean hands. I'll kinda joke about it, be like, oh, by the way, make sure that your hands look good. Because otherwise, I can't use them if they look really bad, unless I'm going for a character portrait with texture. So let's look. For women, I usually want softer, elegant, and relaxed hands. And typically for men, I want the hands to be a little bit firmer, and I want them to be occupied, doing something. 'Cause if you don't direct guys' hands, they just look lost. So let's take a look for women first. Alright, so here's some dos and don'ts. Don't push the hand up against the face. People, a lot of times, just rest up against the face when they're putting the hand there, and then it squishes their cheeks, and that doesn't look good. And so you just want the fingers barely touching if you're going to have the hand beside the face, not actually a lot of pressure. So the next dos and don'ts, make sure that the hand isn't completely covering the jawline. Because one of the things we think are beautiful are jawlines. So maybe pull the hand back just a little bit, or leave a little bit of negative space, but it shouldn't be completely obscuring a person's jaw, especially if that's the jawline towards the camera. Because if you can't see the back jaw, and you completely cover the front, now there's not really any defining shape or features to their face. So if you are having the hand covering the jaw in the front, perhaps consider putting the back arm up to the side of the face, and that way, it's not going to be obscuring the jaw. But if you do choose to do that, you wanna watch out for photographing palms. Palms are light-colored, and they're quite large, and they really grab a lot of attention. So if you're posing somebody like this, that's all you're going to see. In fact, what you're aiming to see when you're posing hands, almost exclusively, is the pinky side of the hand. The pinky side of the hand is most elegant, it has the nicest curve, and it is the narrowest. So that is what you're aiming for. So as you're posing a subject, you don't usually turn the hand around so that the thumb is facing the camera. Thumbs don't photograph as well. I find that they're often distracting, and I don't know, they're short and nubby, and they don't look as elegant. So you usually aim for the pinky side of the hand. It's really funny, I actually had a photographer comment on a photo of mine that they knew when they saw it that it was my photo because I hid the thumbs. I don't know, I don't like thumbs. And they knew that that's a thing of mine that I think thumbs look weird. Things that you don't want to do is you don't wanna have sharp angles in your hand. You don't wanna really have your wrist at a right angle resting on. Instead, if you're going to have maybe your hand underneath the chin, it would be a soft angle. You don't really wanna have too much tension in the wrist. And you don't wanna have the hands look too placed, because if they look posed, very strike a pose, okay, it looks forced. So if I do that, if a subject looks and their fingers look a little bit too posed, I ask them to wiggle their fingers, just wiggle, stretch it out, and then place it back down. I just try to get them to have softer fingers. I hear some people say spider fingers to little kids. Okay, spider fingers, and put it back down. Whatever works for that effect. For women, you don't usually wanna have a balled or tensed hand. Again, you usually want slightly elongated fingers and seeing the pinky side of the hand. And know that there's not just one way to pose a hand. You can get creative, you can try a lot of different things, but in general, you want the hands to be soft, you want them to be relaxed, you want to see the pinky side, you don't want it smooshed up against the face, and you don't want it covering the jawline. And it sounds like there's a lot of don'ts there, but there really are endless possibilities. And I look at a lot of beauty ads if I'm trying to look for inspiration in how to pose hands. Because a lot of times, they need to use them elegantly as well. Let's talk about how I would direct her to pose a hand, for example. And we haven't practiced this before, so let's see how it goes. If I wanted her to place her hand next to her face, can you place your hand next to your face just put it there? Okay. So she places her hand next to the face with no direction. It's covering her jaw, now it's most of her face, and it's not going to work. So what I do to direct people is I usually say, okay, can you do me a favor? Can you take your pointer finger, and kinda just trace your hand real loose around the side of your hair down to your jaw, great, and now turn your hand into your face. Perfect, chin down. Great. And then tuck your thumb, hide it. Perfect. Okay, so now what I have is her hand has space between her jaw and her hand. I see the pinky side of her finger. Her fingers are relaxed. It looks elegant, I don't have distracting thumb. It's just going to be a nice pose for her hand. So that's my technique. That's how I like to do it. Trace your index finger around the side of your face. Great. And then if I'm seeing too much palm, like I was originally with her, turn your hand in toward your face. And that is usually the direction to fix it. Alright, so you were an excellent subject. Let me take a shot of that, and then I'm going to bring our male subject out. Okay, so real soft, turn your hand in. Great, and tuck your thumb. Good, and turn your chin down a little, yeah, good. And hand down a little lower, great. And now I see a little bit too much palm, so turn your hand towards, perfect. Then fingers a little lower. Great, perfect, thank you. These rules for posing hands are a little bit different, but they still generally apply when photographing men. Especially for headshots, if you're going to pose the hands, make sure that they're not overly large and distracting in the frame. Because if you just have a guy's fist in front of his face, well, it could look quite large and be a very distracting element that's not really working, or it can look a little bit too posed if it's straight on towards camera. Or if a guy's getting really comfortable, he might lean too much on that chin. So I'm just gonna give him a couple of directions for posing his posture, some of the things that we've talked about as well as placing his hands. So let's just look at a couple changes I would make there as well. Alright, so let me just take, get real comfortable in the way you were before. Good. So in a photo like this, where he kinda leans forward, he's in comfortable dude pose, 'cause I always tell guys, just get comfortable, and then when they do it, they're like, bleh, like they're just a big blog. And I look at this, and it's fine, but he really loses his neck, more or less. Because his shoulders are forward, he's leaning forward and is kind of hunched up a little bit. So what I'm gonna ask you to do, can you just pull up through the top of your head just a little bit. And now you can still lean forward, but lean forward with your chest, don't bend forward. Now he has a neck. Now it looks significantly better. He looks more confident. And so let's take (camera shutter clicks) an example of that. Oh, my goodness. Significantly better. It's really night and day. Alright, now let's see if I want to place a hand. Could you put your hand up near your face? And now, by the way, so that he doesn't have to slouch and be uncomfortable or awkwardly just pose his hand, he actually has his foot on a full apple box. So use apple boxes all the time for this just so it'll be a little bit easier. 'Cause sometimes guys, if they're posing with their hand near their face and it's just there, it doesn't pose naturally. But if it's believable, if they could believe yeah, I'd lean forward onto the hand, it kinda works together for the entire pose. So I'm gonna have you lean back on that. Great, perfect. And pull your shoulders down just a little bit. Great, and now you can lean forward a little more. Alright, so if I pose with him right here with his hand in front of his face, (camera shutter clicks) now he looks fine overall with this hand, because I can see the pinky side of the hand, it's not a super fist like he's gonna punch me or anything, but it is sticking out right in front of the camera, so it's a little bit distracting. So a lot of times I kinda have guys pull that hand back and to the side just a little bit. Good, perfect. (camera shutter clicking) Good posture, pull up through the top of your head a little. Good. (camera shutter clicks) Chin out and down. And down a little more with your chin, great. (camera shutter clicking) And now when a guy's wearing a wristwatch as well, if it's a nice watch that they're proud of, I might bring the hand up to the other side so that you can show that off, especially if it's a family heirloom. So I'm going through all of these things, and I'm saying okay, let's pose the eyes at the 1/3, the top 1/3 of the eyeline. Make sure that his shoulders are pulled down, that he's confident, that I can see his neck. If I'm going to pose the hand, let's make sure it's not distracting, that it's not getting too much attention, but that perhaps it's off to the side just a little bit. So this is kind of running through the things I'm looking at when I'm first directing and posing a headshot.
Class Materials
Bonus Materials with Purchase
Ratings and Reviews
Berus
One of my favorite courses thus far on Creative Live, and definitely well worth the purchase price. Lindsay effectively demystifies many of the critical stumbling blocks to achieving a practical understanding of many critical elements of portrait photography. I would rate this course as being perfect for the advanced photographer - a couple of the concepts might be beyond that of a casual/intermediate photographer, but even they would probably gain a great deal from this course. Her discussion on equipment, in particular was superbly done, and allows one to move forward in beginning to make the right choices to achieve whatever effect one is after in terms of capturing the subject. Finally, the great thing about this course, and the thing which makes it such a great value, is the overall scope of what is being taught. Lindsay covers almost everything imaginable, and does it all in a manner which is enjoyable, and makes the time fly by. There were many, many times during the various days of this course during which Lindsay would share some particularly great tip or technique, and I would think "Insert bookmark here." I don't dole out praise easily (actually left a fairly scathing review on another course here recently) but this course has won me over. Highly, HIGHLY recommended. I'm definitely going to check out her other courses as well.
a Creativelive Student
This is Lindsay's best course to date and believe me, she has given us some good ones already on Creative Live. She hit this one out of the park! She was very well prepared and organized. I could tell that Lindsay put a lot of work into preparation for the class because she just kept giving us great information non stop. There was no down time or wasted moments. All future instructors on Creative Live should be encouraged to watch this course just to see what good instruction looks like. Lindsay has evolved over the past few years and just keeps getting better as time passes. Thank you Lindsay and thank you Creative Live for a job well done! Craig Banton
Penny
This class is one of the best investments I have made in my photography business. Lindsay is an excellent teacher. She is a seasoned, yet humble, professional. Unlike some other instructors I have seen on creative live, there isn’t a lot of fluff in her teaching. She sticks to the topics, gets all the information in, but still manages to engage and relate to the audience with real life examples of her own experiences in photography. I have been a professional photographer for several years, but have mostly stuck to natural light. This course gave me the confidence to tackle more advanced lighting setups and expand my capabilities as a photographer. I really appreciate that she doesn’t bash flat lighting, like other lighting videos I have tried to watch. Most portrait clients do not want photographs with dramatic lighting, they want to look their best, and I’m glad that she acknowledges this. This class gives you the information you need to create whatever photos you want to create.
Student Work
Related Classes
Portrait Photography