Creating A Painted Background In Photoshop
Lesson 4 from: Create Mixed Media PortraitsKhara Plicanic
Creating A Painted Background In Photoshop
Lesson 4 from: Create Mixed Media PortraitsKhara Plicanic
Lesson Info
4. Creating A Painted Background In Photoshop
Lessons
Class Introduction
02:34 2Working With Brushes And Pattern Overlay in Photoshop
23:12 3Using Pattern Overlay And Pattern Fill In Photoshop
19:14 4Creating A Painted Background In Photoshop
15:33 5Using Smart Objects And Warp Tool In Photoshop
06:40 6Creative Ballons Using Shape Tool And Pattern Overlay
15:53Lesson Info
Creating A Painted Background In Photoshop
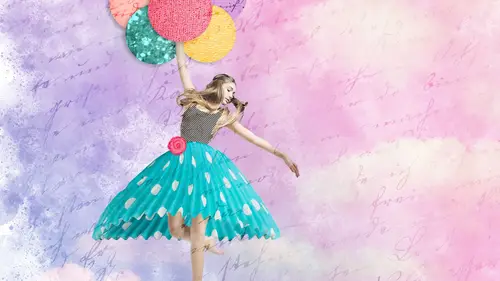
this next one is a bit more of Ah, I don't want to say it's a doozy because it's totally doable, but it's a lot more involved, so we're going to create this. This is the one with the dancer and the balloons in the sky. And, um, there's a lot of fun of fun to be had with this one. So it's It's a composite of a lot of different images all at once. So I'm going to select the sky. I'm holding down Commander Control to select the dancer, the cupcake, the flower, this handwriting. You know why I have two of those? But for some reason, there's two in here. Ah, we only need one, so I'll select both of those. So that is that. Five images, and then we'll bring those into photo shop. I'm just working with bridge. Of course, if you don't don't want to use bridge, you can just go to file open. Or you can use your brother your file browser. I like bridge because it's just Ah, it's another adobe thing and it please so nicely with photo shop. But if you have never used bridge, I recommend it. You can ...
find it by going file. Browse Enbridge from photo shop file browsing bridge will bring up bridge. And so you see me using it a lot because it's handy. Okay, so we have these images, but yet we're going to create a blank document also. So we've got our five images open that we're gonna take bits and pieces from, and we're gonna put them all into a new document that we're gonna create right now. So we'll come up to file new and, uh, you might have it as a preset here, but you can also just come over to this area and we're gonna have eight for the with eight inches by 10 inches, a resolution of 300 pixels per inch and RGB color, we can name it here if we went to well, call it mixed media and then hit create. So here's our blank canvas and oh, now I get to show you one of my favorite Kyle brush of several of my favorite Kyle brushes. So we're going to create the background first on. We're going to do that by making a battery messy paint layer. So we want to keep our background separate It's always a good idea to be working in new blank layers when you add new elements to your artwork. So at the bottom of the layers panel, we'll click to add that new blank layer. And the color really doesn't matter here. But for something pretty young camera, I guess I'll choose the purple and going to go back to our paintbrush. So be for brush. And instead of our grass brush, we're gonna go back to one of Kyle's brushes. So I'm gonna scroll back up here, close my defaults, go to Kyle's, and the one I'm looking for is located in a collection called Where Is It? It's called Spatter. Brush is here it is. So I'll open up spatter brush is and it's the second brush here. It's called Beautiful Mess. So I'm going to double click to select that on gonna make press the right bracket key next to the letter p to make my brush kind of big. Yeah. Whoa, that's too big on. I'm just gonna paint a big, messy mess and really the messier kind of the better If you, um, I want to clean up any of these edges like maybe maybe I decide I got too close to the edge here. One of the cool things about the later versions of photo shop is I don't have to get my eraser like if I just pressed E and got my eraser and I tried to erase this. I mean, that looks terrible, right? Because we have this cool, spattered edge, and now I'm erasing it with just a hard edge round eraser. So one of the cool things you can dio with brushes now is with my brush tool still active. I can just come up here and change the blend mode from multiply to clear, and then it keeps all the same settings, but it acts like an eraser now, but it's still the brush, so I can still get the spattering edges. And I just love that feature, So I want to make sure folks at home know all about it. Okay, so, again, that was just using the brush tool. But instead of one of these other blend modes in this case, multiply, we just changed it to clear. And then it acts like you're clearing your painting using your same brush. Okay, so now we have this cool kind of background texture. So let's find our picture with the balloons. Where did I put that one? Ah, not this. Oh, sorry. The sky Here it is. So I'm gonna grab the sky image. And because it's kind of tricky to jockey back and forth between all these open tabs, we're gonna copy and paste it. So the first thing I want to do is select all the pixels in the sky image. So I'm gonna do that by pressing commander control a put marching ants around everything and then I'll copy it by pressing commander Control, See, and then to clean up our workspace. Let's close this document by pressing Commander Control W. And now we can navigate back to our mixed media portrait. So if you don't see it in the tabs up here, you can go to the window menu and clear down at the bottom. You'll see all your open files, and you can select the one you're looking for. Now we're ready to pay someone a press, commander control V and I paste it in this sky image. And if I switched to my move tool by pressing the I can drag it around. I see that it's it's fitting pretty well, but I can reposition it anywhere in the image that I want. So I've sort of grown fonder of putting it like here, so all the way over towards the left side. But you do what you like, and I'm gonna show you how these two things are gonna work together right now. Right now, we just have the sky on top of our cool spatter layer. But if we want to, we can take that sky image and we can create what's called a clipping group and clip it so that it only shows up on that Messi layer wherever we have the messy layer. So it makes the sky look messy, basically. So the way that we do that is we position the messy layer here, layer one and then the skies on top, and we just hold down, alter or option on our keyboard. And when I hover my cursor in between those two layers, I get this funky icon, and when I click, it takes the sky lair and basically wraps it around this messy layer. So the analogy that I always use when I demo This is if you remember preschool or you have kids who are incredible. They might do those art projects where they take a paper plate, scribble a bunch of glue on it and then dump glitter on top. It's very messy, but the glitter only sticks wherever there's glue. And so that's how this works. So this layer up here is kind of like the glitter, and it just sticks to the layer down here wherever, wherever it is. So this is the glue layer, and we can move them independently of each other so I can grab the glue layer down here. And with my move tool, I could move it around, or I could grab the sky layer and move it around within the messy glue later. So there's a lot of different ways you can adjust this, but I'm gonna go with something about leg. That one more nice thing we're going to do to create some more texture and color in this piece is we're gonna add another Grady int adjustment layer. So from the bottom of the layers panel, we're going to click. And just like we did in our last example, we're gonna add a Grady int. But this time we're not gonna worry about what are colors are we're going to choose a different pre existing ingredient. So we're gonna click this drop down right here. And these were some presets. And whatever you see here, don't panic If it looks different than mine were gonna click this gear. And what you want to choose is E think it's pastels. We'll just click, OK, we don't need to save anything. That's right. So pastels is the group we wanted to choose from, and I'm gonna go with this yellow to pink to purple. Radiant. Okay, so I've got that selected down here, we choose the style of greedy in. So Grady's come in all kinds of different flavors. I'm gonna stick with Lynn here, but I kind of wanted to be at a diagonal. So right now it's at a 90 degree angle, which means we have purple running horizontally across the top and then pink and then yellow down here. What I want to do is kind of rotate the whole thing. So if I grab this little line and just spin it to the left a little bit, I can kind of make So my ingredients are diagonal, which I think just is kind of fun. So we'll keep that and everything else, I think looks good. So we'll click. OK, and let's take this Grady in. We only want it to show up again where this messy layer is. So just like we clipped the sky to that Messi layer we're going to clip the Grady int also. So we're gonna hold down all or option, and again we'll see that funky little cursor and then click. And now the Grady it shows up there as well. And if we change the blend mode up here where it says normal will change that too soft light maybe, you know, just kidding. To lighten, I think is nice. What else might be good color? Oh, that's a different effect, I think. Going to stick with lighten. So now we're seeing the texture and the sort of shape of our messy spat earlier down here, but we're still also seeing the clouds so we can tell that this is a sky. But then, rather than just a blue sky, we've now put some new color on it. Um, and if we want to alter this at any time, we can just double click. Like maybe I want to drag the scale down so I can get more of that yellow in there, Possibly so you can play with it. But any time you want to edit any of easy just double click. Okay, so that is how we create that background. Um, we'll add one more texture piece, and then our background will be done. The other image we're gonna work on is the handwriting image. So I'm gonna go up to a window and clear down at the bottom, gonna find my writing file. So I've got this one here and just like we did with the glitter, it's nice if you want to be able to mix colors and later it's nice to de saturate the patterns. So let's get rid of the color in this. There's not a lot, but it'll just help. Will press command or control shift? You two de saturate that and again, we're gonna put a selection around this commander, control A to select it, and then we're gonna define that of the pattern. So edit defined pattern and we'll call this one writing. Okay? and then we can close this out. Don't save, Okay? Eso Let's go back to our mixed media portrait. And yet, again, we're gonna add some a pattern here, so down at the bottom will click to add a new adjustment layer and shoes pattern. And it should select this just cause It's the most recent thing and we'll say, OK, now this pattern is taking place over the whole image. So it would be nice if instead of showing this pattern everywhere, we could just hide all of it, and then we'll reveal it where we want it to show up. So we need to edit the mask for this layer, so I'm going to click to target the mask right here. Remember that layer masks work by hiding or showing parts of layer, so because those layer mask is white right now, it's showing the whole pattern over the whole layer. So we want to change that. So we want to convert this to just be filled with black, so there's a couple different ways we can do that. Um, one easy one might be to choose image adjustments, invert, and that will reverse the masks. So now it's filled with black. So now it's hiding. So we put this pattern on here, and we don't see it yet, but we can reveal it using our paintbrush. So well, press B to grab the paintbrush and come back up into the paintbrush options up here. And we could paint with a spatter brush. Or we could try a different one. Maybe like, um, big basic will try that spatter brush, and we want to have white selected here. So we're gonna be painting with white spattering e big basic brush, something to make my brush a little bigger. And I think we have to change this blend mode for multiply to normal. There we go, and I'm going to reduce the opacity to down to like 25% and just kind of randomly brushed this in. So it's kind of a messy effect, but I think it adds a nice touch so we can change the blend mode from normal to maybe overlay to soften it a little more. So here's what we have created. If we, um, option click, you can see the mask itself. So any place that's black is not letting the textures show through and any place that's white. We're seeing some of that handwriting, and I got here by just option or all clicking on this mask. So that's why we see it in some places and not in others. So the more we paint with white, the more that will show through. So I'm gonna keep it kind of subtle. We changed our blend mode to normal, and we reduce the opacity so it would kind of make it faded on a little bit messy looking.
Class Materials
Bonus Materials with Purchase
Ratings and Reviews
Student Work
Related Classes
Portrait Photography