Lessons
Class Introduction
02:54 2Home Studio Space Considerations
15:19 3Recommended Gear
19:06 4Low Budget DIY Studio
06:45 5Camera Settings For Low Light
08:55 6Live Shoot: Low Ceiling
28:28 7Backdrop Considerations for DIY
12:00 8Build a DIY Backdrop Stand
12:42DIY Portrait Lighting
17:30 10Live Shoot; DIY Portraits
28:34 11Build a DIY Light Tent
20:17 12LiveShoot: DIY Product Photography Part 1
18:30 13Live Shoot: DIY Product Photography Part 2
13:45 14Live Shoot: DIY Home Business Photography
04:39 15Build a DIY Macro Lighting Tub
12:09 16Live Shoot: DIY Lighting Tub
10:46 17Live Shoot: Natural Lighting With Modifiers Part 1
21:12 18Live Shoot: Natural Lighting With Modifiers Part 2
09:21 19Build DIY Gobos
04:48 20Live Shoot: the Ultimate in DIY
21:11Lesson Info
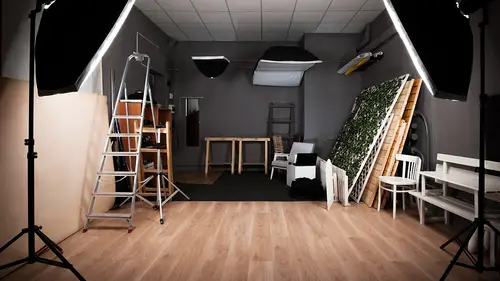
Home Studio Space Considerations
Okay, so what is DIY? Well, DIY stands for do-it-yourself, obviously. And so do-it-yourself means that you're building this equipment with your own ingenuity and using stuff you're gonna buy from your local hardware store. Now most the stuff I'm gonna show today I actually built by using cardboard, gaffer tape or duct tape, foam core, and aluminum foil, that type of stuff and the cool thing is I'm able to actually product really professional photos with the equipment. For a cost comparison, a softbox like this one I have here, I've got some lighting equipment and that type of, I've got some light bulbs in it, but the total cost of the softbox was maybe 20 bucks whereas if you buy a softbox, say a Profoto, you're into it multiple hundreds of dollars. Now the disadvantage of do-it-yourself is, it's not really durable. You can't really take it on location, you can't take it across the world. You need to stay in one general location. But that said, as long as you've got a dedicated space f...
or your photography, you can set this stuff up and you can leave it there, and as long as you're not moving it around a whole lot, it's gonna be durable enough to get you through that first build of your portfolio. So do-it-yourself is fun, but at some point in your photography and at some point in your career, you're gonna realize, you know what? I probably should upgrade around this time to a real softbox, or I should probably upgrade to an umbrella. What types of things will I talk about today? Well, I've got some reflectors. This reflector I built out of foam core and some foil and later on in the second segment, I'm gonna actually show you how I built it and how I put it together. This is a cardboard box. I've got a little industrial light in there and I'll open that up and show you everything in side of it today. Over here, I've got some LED lights and these I purchased form the local discount superstore, Costco. So there's a discount light and it's just an LED. It's on, off. And then back here, I've got some more of that as well. So do-it-yourself is great fun and for those of you who like to think and like to work with your hands, it sure is a joy to do. Well, let's transition, let's transition into space considerations 'cause the title of this class is Do-It-Yourself Home Studio. The idea here is that you're not actually renting a studio, the idea is you've got some space at home and you wanna repurpose that and make it into a working space. Okay, so what do we need to think about? In my mind, there's basically four different areas that you might consider for a do-it-yourself home studio, the first one being the garage, the second one being a bedroom, an unused bedroom or a study. Maybe you have a kid who's gone off to college or you just got an extra room in the house that you wanna repurpose. The third space would be a kitchen. You know, kitchen counters. And then the fourth space could be a living room or a bonus room on the house. So let's talk through each of those spaces, starting with maybe a bedroom. All right, so here's what we've got over here. I just want to explain what all this is. This, we actually made to replicate a small bedroom. So the size of this is about 10 feet by 11 feet, and then the ceiling height is very low. I actually thought that maybe this could represent maybe a basement also, a room in the basement where the ceilings are fairly low. If you live in a city, a lot of times, the basements are fairly low. So can we actually do something professional with a low ceiling in a dark area? And I'm gonna show you that yes, we can. Well, as I'm thinking through portrait photography primarily, I know that I need some space to get the camera away from the background and the camera away from the subject, so I wanna show this to you. Now this space is 10 feet, maybe 11 feet long. We got a wall here. This is a brick wall and I thought this would be a great thing to represent someone's basement or extra room in the house, you know, not very tech-y looking. Now as a photographer, I have to stand over here against this wall. Okay, so I'm here and 10 feet away or 11 feet away from me is the wall, but that doesn't leave a whole lot of space for my subject, so a lot of times in smaller spaces, your subject actually has to be sitting on a stool like this, kind of up against the back wall. So what does that mean for you when you're doing portrait photography? Well, it means that you're gonna have to deal with shadows. See, when you have more space, when you have a longer room, you can move the subject away from the background and therefore, the shadow falls on the floor out of camera range and that's pretty cool. So my encouragement to you is if you have a room in the house that you're thinking of dedicating, try to find the longer room. This width isn't as important as the length. Let's say that you want to take a photo, a full-length photo of your model. So you wanna do this full-length photo. Okay, so the model's gonna stand up and in a 10 foot room, you're gonna be about six feet away from the model, maybe seven feet away. Well, what does that mean for your lens? It means you're gonna have to have a really wide angle lens and it's just gonna look a little bit funky. There's gonna be a little bit of distortion. Anyone who's done photography for a while knows that wide-angle lenses produces a lot of distortion and a lot of times, the head gets a little bit weird, oblong, and large. So in a small space like this, you're typically shooting just torso or head shots. So small rooms mean you're gonna do more torso and head shot type work. Longer rooms means that you can get into full-length portraiture and maybe even two or three models or two or three of your friends. You can photograph groups of people. In a space like this, it's gonna be really hard to photograph two, three, four people. So that's one thing to think about with the room size that you choose. Okay, so how about ceiling height? Okay, so that's an issue as well. We purposely made the ceiling here fairly low. I'm six feet tall and here you can see the ceiling's a little bit less than a foot above me. So this ceiling is less than seven feet. That can be good and it can be bad. It can be good because you can actually use that ceiling to bounce off of, to reflect off of, and that's great. It can be bad because you don't have a lot of room for your model to move around. So let's say you want to do a pose where the model's hands are above her head. Well, it's gonna be hard to do in this space. It's also hard to do action-type movements. Let's say you've got a daughter who's a ballerina and you want to have her jump into the air. Oh, bump. She may hit her head here on the ceiling. So height is an issue. Again, the lower the height the ceiling is, the more you're gonna be focused on just kinda torso and head shots. A room this size though will work great for tabletop photography. Anyone here who's doing things like jewelry photography or you're photographing things for businesses that are gonna be used on the website, great. Small rooms like this work just fantastic. Another thing to think about with the room size is the color of the walls. So we're lucky here at the CreativeLive studio that the walls are all white. That's fantastic. If I had my option in my own house, first thing that I would do for my home studio is to paint the walls white. This includes the garage, it includes the basement, whatever. Any space I'm using, white helps you quite a bit because then, you can actually use the wall as a big reflector surface. That's cool. I can take these lights, shine 'em at the wall, and now I've got basically a seven-foot-high reflector and I don't have to buy another thing at Home Depot. So think about white walls, white ceiling if you can, and then also, for your home studio space, think about the floor. Your floor color matters. So if your house was built in and you have green shag carpeting or orange shag carpeting, we did. We had green in my old house. I remember it vividly. Change the carpet or at least put some white reflector foam core on the ground just to make a floor so it doesn't impact the colors of the scene. Okay, let's talk about the garage. Garage spaces are fantastic for do-it-yourself home studios. I love my garage. Actually, in my house, my garage has really high ceilings. Just because of the way my house is situated, I think the the ceiling's probably 12 feet high. It's great 'cause then I can put background stands, light stands as high as I need to. Also, the garage is longer. Most car garages are typically 20 feet long, maybe ish, somewhere in that range. So that means you've got some space. You can think about the logistics of this. If you want the model to be maybe six feet away from the background, that's six feet of your 20 foot garage and then you have to be maybe another 10 to 15 away from the model, that means you're back up against the garage door, right? So garages are fantastic for this thing. Some downsides to the garage use. Well, it's cold, especially if you live in a climate where you have a real winter. So if you're bringing a model into your house or into your garage to do photography, you need to think about some things like heat, you need to think about blankets to keep 'em warm. Garages aren't always the most comfortable places to work, but they do provide, I think, the most flexibility. Another space you might consider, the kitchen. I love working in the kitchen. The kitchen's great because a lot of kitchens have windows, windows that you look out or windows on the side for where the dining room is or maybe the nook is, and using windows is actually very helpful in your do-it-yourself photography because that's another light source that you don't have to pay for. So I love kitchens. I love using countertops, the granite countertops, all of that. And there's typically a lot more space to move around. You can put lights on this side of the center island or that side of the center island. So food photographers, of course, it makes sense for you to work in the kitchen if that's logical, but I also do sometimes portraiture there. Like, I'll put a backdrop behind the model and then I'll use that nice window light from the windows and then I'll use some reflectors to fill in the shadows. So kitchens are a great space to work. Now the last space that I would mention are maybe a living room or a bonus room. The problem with that is you have to take all your stuff down because people actually use it. The same thing in the kitchen. You gotta use the kitchen, so you gotta take all your lighting equipment out and when you're doing this do-it-yourself stuff, none of this is very durable, so you may actually, over time, end up degrading your equipment by moving it in and out, but living rooms are great. Living rooms have a lot of space. You've got couches, you've got chairs, and you've got a lot more space typically. So the long and short of it is this. What do I recommend for a home studio space? At a minimum, I think you need 12 feet, a room that's like, 12-by-12. You can get away with smaller, but when you do that, it gets very difficult to work. So 12 feet by 12 feet. Ceiling height, it would be nice to have eight foot ceilings or even higher, and then if you can, having a space that's more like 20 feet long, 10 feet wide by 20 feet long. You can get a lot of work done there. A 20-by-20 space, well, most people don't have that in their house, but if you do, that would make a great photo studio. So there are some space considerations, you know, where do you do this at your house. Hopefully that gives you some ideas. How do you feel about a cream color versus, and some other light colors? Does that have any impact or is white the way to go? Yeah, anything that's not neutral. Okay, so what is neutral? I'm gonna go a little bit tech-y on ya. Neutral is equal parts RGB, or equal parts red, green, and blue. So what are the things that are equal parts RGB? That's white, that's gray, and that's black, so anything that's neutral, I'm cool with, but here's the thing, Kenna. If you're using tan, or tope, or light pink, or any of that, there's a color cast associated with it. I mean, even tan. Tan is not neutral and so that's gonna warm the picture up a little bit. My daughter's room, actually my son's room, he's got blue walls. So people say, "Oh, why don't we just have blue walls?" Well, because you're gonna get a cool color when you reflect off the walls. So I would recommend not. If you've got a room that's light tan, paint it, paint it. And one more question. And by the way, thank you to those people in the chat rooms. I asked them what their biggest challenges are with building a home studio or things, the reason they might not be yet, so those answers are coming in, which is awesome. Great. But another question that had come in from Kirby is would you ever use sort of a diagonal space as you were talking about those space limitations within the 12 feet so that you can use a little bit Okay. Longer lens, or does that make a problem Good. With a background corner? Yeah, good job. Great question Kirby. The answer to your question is yeah, you can go diagonal, but if you're gonna use a backdrop, so let's say, I'm just gonna grab a backdrop example here. Just gonna grab this core. Actually, not foam core, but just paper. So let's pretend that this is gonna be a backdrop. So that's gonna go back here in the corner and you can see already, the backdrop is three, two, three feet away from the corner, so I'm still limited in how much space I have. But yeah Kirby, it's great. You can do the corners. If you do photography in the corners, you've got to deal with the seam in the wall, the vertical line poking out of the person's head and you can deal with that. It's easy to deal with that. You can deal with that in Photoshop. You can actually incorporate it into the photo. As I'm gonna talk today, sometimes in photography you can't eliminate something photographically. Like, for example, the low ceiling in here. When we do a photo shoot in a little bit, I'm gonna have the model actually touch the ceiling, you know, push her hands up against the ceiling because it's part of the scene. And so sometimes when you can't eliminate it, you just find a way to creatively include it. But yeah, Kirby. I shoot diagonal. I do whatever it takes to get the shot, so it's a good idea.
Class Materials
Bonus Materials with Purchase
Ratings and Reviews
Jodz
I was so glad to see Mike! He taught my first DSLR class (Nikon D70 - then Nikon D300). I love his presentation style. It is so clear and he takes care of showing details that get in the way of actually 'doing it'. And I like the way he emphasizes good manners when dealing with a model. Well done Mike!
user-0ee681
I've watched this class a few times when it's been on-air and I realized I really need to just buy it. I find Mike so likable and engaging, and I love how he talks you through the shoot while experimenting. Sometimes the experts show you the perfect way to do it the first time but it leaves you not really able to troubleshoot when you are doing it yourself. I already own a lot of gear that his DIY equipment is emulating, but it's really artistically inspiring to see his creative approaches.
joanna
This course is fantastic! You don't need a lot of money to start a studio or go on location. Mike shows some great easy hacks anyone can use to create a studio and create professional photographs that will earn you the money to then purchase more pro equipment. I got some great ideas I'll be using on my next shoot!