Lessons
Class Introduction
04:00 2Your Mind is the Camera
08:02 3Set the Scene
06:59 4Get Smart with Your Gear
03:20 5Posing Tips and Challenges
04:51 6Shoot Considerations
04:09 7Shoot Setup
13:02 8Shoot: Working With Animals
09:55Shoot: Creating the Look of Motion
08:54 10Shoot: Levitating Objects
11:04 11Starting the Composite: Organizing Your Images
12:37 12Working With Your Sketch to Assemble the Scene
11:23 13Selections and Masking
30:01 14Selections and Masking Continued: Painting Techniques
08:56 15Shadow Overlays
18:35Lesson Info
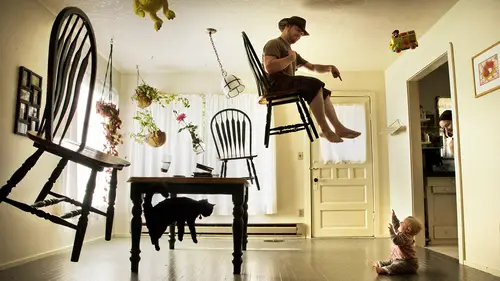
Shoot Setup
a couple things seem to happen. We're going to shoot the doggy first. Uh, so we're gonna have bucks nor coming in just a moment here, and we'll get this all set up here. So typically, you'll notice, uh, I'm shooting, you know, typically go out. Look for for this shot that we're just looking at. I was shooting in a road, so I had a little cone to make sure I wasn't gonna get hit or anything. But I didn't have a, um assistant. Who? Anybody else there with me. So they're shooting at solo, and so Okay, we can shift over to this so I don't usually shoot tethered Raikes. If I having to do it myself, I just either setting interval ometer or a set. Um, you know, the in this case, the time lapse. I do that. So in this case, we're gonna be shooting tethered. We'll be using capture one. So let's see. And I'm new to capture one, but it's awesome. So right now I'm just doing this. All right, So there we go. So what's nice about capture one versus light room again? I don't typically shoot tethered. ...
I'd take all my pictures and then, um, you know, visualized in my mind what's nice is we can actually do this overlay, so I'll show how this works. Have you guys seen this before and this? Okay, Yeah. This is really cool. Um, so with capture one, this is about the only thing I know how to do and capture one. So if you for three questions uh, yeah, don't ask me. No, it's pretty. So has this this live you so typically you'll have this screen, right? It's kind of kind of like light room, but this case, you can hit this little live preview button. Um, and it brings you this this other window. But where that overlay comes from is you can put if we go down to overlay. Uh, we can add an image of some kind, so I just have this reference image here where I just did a basic cries in line on and just some perspective. So I just drew a line straight from where, Where those are. So as long as things are parallel and I assume they made that cement, those meant chunks just completely parallel to each other. When you go to an angle on you extend those lines out, that's gonna be your perspective line. And if you draw those out, it will go to your price and point your vanishing point. So, in a very flat plane, trying to get some sense of distance is really important. So that's the idea with this, uh, when this is clearly how all shoes go There just all this one on. I wish this case it was, but as long as you have some chase time in between. So what's Ah, what's neat? Come back here. We're not done yet. Um, let's see if you have your If you go to this this overlay drop down here, you get Teoh, choose an image. So I have reference one. Uh, I have another. If we go up a level here levitating, I should have reference to so I can just click it and say open. So here's this one where we can see so again, just some sort of, uh, perspective on what we're seeing. And it comes with an opacity slider. So if I want to see the live you, um and right now it's just going to show us. John here. Thank you for being awesome model for this test, you'd hear make sure things were alive. You can set the a passage e so we can get a sense of one where that tree is The depth, the perspective, all those things. So I'm gonna say right about, let's say, 60% so we can see pretty strongly that tree and the rest of it. And then if I go up to the camera itself, this little guy right here will be the where you can look at it live. So with the mere lists that has this this awesome function and console the past he's a little bit too strong in there. But it has this this option where we can look at it live as I dance and do fun things up here. Um, what is a little bit knowing? And I'm sure there's a way to customize it. You can apparently customized just about everything and capture one. Uh, but one thing that I need to dio just change that overlay a little bit lower. Let's try about there, Cat, okay? And I can still shoot from here. Aunt has all the camera settings, right? Everything is good to go So what if it will be getting a lot of ambient light, that shutter speed? But the F stop should be enough that once I set the focus that we should be able to get what we need and focus. So let's do this. So if we look at that sketch, you know the squirrels about here with us branches where that light is, we'll be turning off that light. By the way, I kind of like it on the tree. It adds to the real nature. Now you know we'll have this dog, sort of, uh, looking at the squirrel, which will be a treat. Squirrels are kind of treats, I guess, Uh, and then we'll have the owner. We have, ah, leash, and we'll just try to match it That way. We'll try to match wherever that leashes pointing from that dog, which you might shoot separate just in case to have more. We'll have it pointing from the owner, either doing you know, palm on forehead sort of things or something of that nature over in here. So with that, I think that should be good. So let's get bucks north over, and we'll play with this so welcome, Buck Snort. Um and so he's been into his environment a little bit. Uh, So what we're going to do is have you guys here? So the main thing is, I want to make sure I'm using this the background and great trying to make things vanish as much as possible. So let's put this here. And if you could stand behind that and if bucks nor kin actually to do stew a couple shots with you there before we put the dog on the spot there. Okay, on just 321 Let's make sure everything's working in alive. It is good to test here, and if I go back to this other one here, all right, we can see. We can see what this looks like in the position. Let me change the opacity a little bit less there. Okay. And that shows up pretty strong in there. Okay. All right. So you guys gonna be watching a lot of experimentation live. So you guys I know you already know. Okay, so I got that one. Well, we have We're gonna turn that one off. Okay? Let me get out of the shot here. Okay. And 321 Just tested here. Okay. Sounds like both of them beeps. So they're both firing off there. It's kind of strange going back and forth to look at what was actually shot. Um, so looking at it, uh, one, it needs to be more and focused. We'll play with a focus, but that that position right there, it looks like I'll get the camera a bit closer since the dog was blocks north. Already nervous. I know. Okay, so and the dog itself eso as faras the layout. So what I'm doing in my mind right now, I'm imagining it was a really wide sidewalk was basically to sidewalks links. So if I imagine that this wall doesn't matter doesn't have to be where the actual brick is, Let's say the briquettes for the back. I just need it smooth there, so I don't need to replicate the entire depth. Just where the subject everything is, you know, easily. Selectable. Um, so is part of that. I just need to think of how close that tree waas and the tree was about. I see. Probably about here on I was about a car's with apart when shooting this So one of the things I have to do is make sure that if you want something to be on the right side and your composite shoot it on the right side of your of your actual image, so get your composite really lined up in every way as much as possible. What's working for this right now is if we look at the lines for the sweet there, we can actually see that they more or less matched the perspective of where we're going, Right? It's not exact, but pretty close, right? We're gonna be not using a shot of a person. I'm gonna be drawing ah, shadow in attempting to It'll be fun. Uh, Lissi And so we really just need to match the perspective and all the subjects will notice about waist high. So that really has to do that. Rise in line is more about the camera position. A swell as the angle. Right, But the height really matters. Make sure that you're not just looking at the angle looking up, getting that rise and match, but you're shooting at the same height that you work now. When I shot, of course, you know, because I usually think of everything. No, I didn't measure what the actual height Waas. So there's going to be sort of close enough. That's me. What we're looking at for For this. So in this shot here, let me just do. Ah, a quick focus. Yeah, May just make sure. Okay. Can you hold up bucks north for just one second? Right there. Um, let's do Let's do Holding right there. So cute. Okay, Okay. Bucks. Narcan, go down. Thank you. Um, Okay, so I got that the focus on there. And so now it's just a matter of let's go back. That live view of it. Okay? I can already see that. Sort of. That's looking okay. I can temporarily still my shutter down so we can see it a little bit easier there on. So let's see. Can you hold that the bucks nor the Bucks North? Uh, just a little bit. As if he's going towards Let's pretend. Oh, can we get a treat? Who wants to be a treat giver? The volunteers. Okay, here we go. Around the front. Sorry. I saw her hand slightly before her before years, and there's a treat behind you here. We go. How many trees can bucks not have? Maybe. 00 Bucks North sees a squirrel. OK, there we go. So squirrels gonna be about Let's see. Where am I? Where? You okay? There I am. Okay, so squirrel is gonna be used to do Ah, this is so great. Okay, Live so right about here. So this is give you spots so literally stand right here and then go until yet. You see that? Oh, that's great. It's so cool. Okay, Uhm and another volunteer to hold the leash. Okay, here we go in the front there. Okay, You will be just fine. You're gonna be holding this and what we're gonna be doing very carefully walking this guy here. We're just gonna guesstimating where this leashes, but we want it sort of taught on there. So about that direction, let's take a look at what that's gonna be. And also with this, we want it to match the perspective line as well. So perhaps going further back and we can at least just started here. Let's see, because part of this this image is so flat, right? I was just really flat thing for a composite. And so The only thing that's gonna give it death is the perspective that we bring to it. It's in this case, this leash is kind of important to sort of give that depth indicator, uh, so we need to make sure yet we just have a taught, like, Not again. This dog is flying just a little bit. Yeah, so get perfect, and I can straighten out in post little bit. But that's the idea right there. Yep. Soas faras bucks North. Uh, you could go down for a second, and when you were holding them, Can we get it? Where are you gonna do this? But hold from underneath? And how does how does he do well with that? So yes. Okay, let's see. So we'll have some some challenges with the hands we might have. You do a couple different positions. We're just gonna shoot a whole bunch of it orations like that and see what we get. And then we'll see if we need to do do some more. Okay. All right. Let me just do one test shot here and let me Let's look at it. Let me look at it in post here. All right? Yeah, right. Just kidding. Sorry, Computer. All right, All right, let's take over. Layoff. And so again, the shutter was is very slow so that we're getting that Ambien, which is making it blurry, So I'll bring that back down once. I know we have our position here. Um, so we're getting some motion blur, but I don't think its focus blurs, so All right, so with that, Okay, do you want me lower than him? About where you were? Was was great. Um, so kind of shoulder sort of length. That's me. Toe the line up pretty well. Okay, so it's gonna be a little bit on the dark side, but at least we can still see it a little bit there.
Class Materials
Free Bonus Materials
Ratings and Reviews
Molly B
I agree a bit with Eric Burke's review (which was a thumbs down), however, I feel like this is neither a thumbs up or thumbs down recommendation, more like a 3 to 3.5 star rating. :) That said, I agree that there was so much talking and not doing in the initial portion of the class sections. I feel like when there is a class offered for Compositing, much of the science people want to know is in the editing tips and tricks AND some of the shooting tips and tricks. Photography of the subjects is important to understand, but examples of live shooting should be kept fairly minimal. Aaron Nace still nails the science behind planning and shooting for composites and also rocks in the editing (in my opinion). Brooke Shaden is also a good example on the editing details. I feel like Bret had something different to bring to the table from the class preview with puppet warp and some of the cutting / masking tips... I agree that all the editing portions of this were super rushed and just touched on a lot of last comments of "oh isn't this neat" and no in-depth instruction on how that feature is used. I just felt like he really ran out of time. At the end he talked about re-shooting the dog, perhaps he could have gone in to puppet warp to change the lower legs and tail a bit as an effort to make it look more like his sketch? Bret seems likable, but does continuously talk about side stories and extra noise that seems could be more focused on the topic at hand. :) I still picked up some tips, but this would be more ideal bought on a sale rather than full price. :) I have a lot of photoshop knowledge and own some other composite classes on CL, so I don't feel too lacking, but this would not be for a very beginner of compositing. I wouldn't mind seeing Bret back with a more refined class structure focusing on the magic of puppet warp and other tricks to get the most out of compositing.
s
Had a good time with this course! Bret is a great instructor, you can really tell he enjoys his work and has a lot of fun engaging the audience. I've done some compositing in the past but with a much older version of PS. This course really helped me take advantage of the new features in PS CC and also helped streamline my workflow. It's a course that both experienced and beginner compositors alike can learn from. A big thanks to Bret Malley and CreativeLive for making this course!