Pros & Cons of Small Light Sources
Lesson 6 from: Light Shaping Tools for Professional PhotographersTony Corbell
Pros & Cons of Small Light Sources
Lesson 6 from: Light Shaping Tools for Professional PhotographersTony Corbell
Lessons
Class Introduction
05:22 2Categories of Light Shaping Tools
07:59 3When to Use Different Light
10:50 4Softbox and Octabox Overview
25:55 5Beauty Dish, Reflectors & Collapsible Reflectors Overview
27:55 6Pros & Cons of Small Light Sources
08:10 7Shoot using One Reflector
12:24 8Shooting with Two Standard Reflectors
08:53Shoot Using Grids with Reflectors
14:37 10How to Use Beauty Dishes
28:24 11Pros & Cons of Softboxes
12:30 12Common Uses of Softboxes
21:24 13Subtle Elements of Controlling Softboxes
20:33 14Different Techniques with Softboxes
29:32 15Pros & Cons of Umbrellas
07:25 16How to Control an Umbrella
12:25 17Uses of Umbrellas
08:27 18Different Techniques with Umbrellas
19:55 19Group Shot with Umbrellas
19:37 20Differences Between Collapsible Reflectors
25:36 21Shooting with Black & White Collapsible Reflectors
15:07 22Shooting with Silver & Gold Collapsible Reflectors
13:49 23When to Use the White Translucent Collapsible Reflector
33:18 24How to Use the Large Octa Softbox
20:50 25Shooting with a Large White Deep XL Umbrella
18:59 26Shooting with a Large Silver Deep L Umbrella
07:19 27Shooting with a 4x6 Softbox
17:05 28When to Use Specialty Light Shaping
04:40 29Shooting with a Hard Box
15:29 30Shoot to Incorporate a Fresnel Light
09:32 31Shoot Using Ring Flash
10:23 32Studio Lighting Photo Critique of Student Work
1:05:41Lesson Info
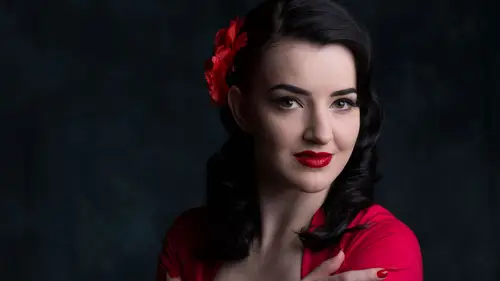
Pros & Cons of Small Light Sources
You know, we're gonna start this hands on portion of this thing talking about different shaping tools obviously, but I thought it might be appropriate to start with the small ones, and then slowly kinda work our way bigger and bigger, and more complex, and all that. It's interesting that I think most lighting tools, when all this first started, when photography first got goin', I don't think a lot of people used big soft light boxes, I think they had windows, I think they used whatever they had, they had flash powder on a very low ISO plate, and they tried to do the best that they could, so everything was lit just enough to give it some kind of an exposure. It wasn't about quality of light source for a long time, it came in much, much later. But I do think that a smaller head, a smaller source, somethin' along these lines, is somethin' that everybody has been using forever, since it started, and the area where Kenna stood in front of this gallery of great cameras of the past, and timer...
s, and darkroom timers, and different things, those aluminum pan lights, almost a painter's light from your hardware store if you will, with a clamp that you could use while you're tryin' to paint your basement, those things can make great light, and they're a great teaching aid because you can show students things that you can do with a light that costs $19, with a 500 watt flood screwed into it, and set your camera on tungsten. So you can get away with a lot of things, but as time has gone on, it's gotten more, and more, and more sophisticated. Size of source is still always gonna be relative to its distance to the subject, we're always gonna have to deal with size relative to distance, and that's gonna be somethin' that we're never gonna be able to get away from. So we have to know that a small source is gonna produce a hard, cutting edge light. It just will, if it's left untamed, or uncontrolled, if you will. So what we'll do is I just wanna walk through a few of these things, and we have Jason standing by over here, and we'll get him over here in a second. But the thing is, the heads that I use, the D1s for ProPhoto that I use most often in the studio have a flush mounted flash tube inside this flat surface. Now before this light, all my lights all had, if you took off the reflector head, you had a revealed dome, usually with a dome cover over the flash tube in the modeling lamp. Most of you do know that there's two different lights inside there, one's a modeling lamp for giving you the ability to see, and replicate what you're gonna shoot, and then the other is the flash tube, which is nothing more than usually a hollow tube, U shaped sometimes, with a filament line going through it, and it's got xenon gas in a vacuum. So when the connection is made, it's a little miniature controlled explosion inside that tube. Basically that's what creates the light, from the capacitors. Well, it's taken me a little bit of time to get used to having this flat surface, because there were a few things that I would do with the bulb, but not that much. So this is actually workin' out pretty good for me. As you see, if I turn this on and just put it on pure close to the background, let me just get the modeling lamp on full bright, and this is full power on the modeling, and you can see, it lights a pretty good size area, and it falls off pretty easily and pretty quickly. So it works out just fine to be a background light, with nothing else attached to it, it works out pretty good. There is one little hidden danger, and that is, if I slowly pivot this just a tiny bit, you can see when you start to see the light edge, like Christina from here, I can see your glasses, and as soon as I get right there, I can see the edge in your glasses. So I know, right there, I've got troubles, 'cause that can then send a flare to my lens. So that can be a real big issue, okay? So we'll just have to prevent that from happening. But again, what's interesting about working with small sources against any kind of a background, the closer my light source to the background, the more rapid the transition from light to dark, the more quickly the falloff. So if you want a gradual burst of light, pull it back here. If you want a quick, rapid, bam burst, then move it closer. So working with this by itself is a pretty cool thing, and we'll do some of that, but then they came out with, and then they've got the regular, smaller heads of the reflectors that come with this. Then they've got this little guy that's called the zoom reflector, and the zoom reflector is interesting in that it's a very, very shiny surface on the inside. This thing's highly, highly polished, and it sends everything out, everything forward, it makes it extremely efficient, probably as efficient, if not more efficient than any other lighting tool there is. What's great about this particular one is the way it's shaped, it is nothing but efficient. On top of it is a big label, on that label it says, the beam angle and the position. It corresponds to these markings on the side of this head, you see these numbers on the side? Those numbers line up with the numbers on this little picture right here and tell me the angle of coverage of my light. If I want 105 degrees of coverage, I set this to position 10. If I want 75 degrees, position seven, 35 degrees, position six, so it's zoomable and adjustable, which makes it a kind of a valuable little tool. And so let me put this on real quick, and when you do this, this is pretty new, so it's a little stiff. There we go. So hey John, are you standin' by? Come on over here for a second, and let me just get you to hold this stand steady. My good friend and partner in crime, whenever I'm in Seattle, John Cornicello. (laughs) John is known worldwide as the guy, when you need a guy in Seattle, he's your guy. So if I come back here, so I've got this loose, and if you can just hold that stand for me, yeah. So right in here you can see, hey let's move this closer, let's do it right there. So you can see the coverage that we have, and I'm in position 10, it's 105 degrees, but as I move it forward, you can see that it's zooming, it's showing less, and less, and less, and as you shoot, and as that burst fires off, it actually shows better than the modeling lamp will show. It's very, very concentrated, and it's very, very direct. It's one of the tools that is used, probably more often, for commercial work, for a different variety of things, behind furniture in an interior for example, things like that where you need a quick burst of energy back there as a separation light often. But I like to have it out here at a pretty far distance out, maybe out here, and then I can lock this in place, and this is just an expansion clamp thing. So let's bring Jason over, let's light up Jason's face with this thing, and we'll take a look and see what we can pull off. Let's put it right over there at about 45.
Class Materials
Bonus Materials with Purchase
Ratings and Reviews
Stefan Legacy
Bought this class on sale for 19$ and it was a great buy considering it was my first class I purchased on CL. Tony is an excellent teacher and demonstrates extensive knowledge on lighting and different uses of modifiers. Overall this is an excellent course for any one who is interested in learning studio lighting, this will give you a great detail of information.
a Creativelive Student
This is my first time watching Tony Corbell teach and work he was great! I am a natural light photographer and this class made me think about picking up some lights and umbrellas! You can tell he absolutely loves what he does. Thank you for sharing your knowledge!
a Creativelive Student
Important information if you want to be a photographer. Great teacher, good pace!!
Student Work
Related Classes
Lighting