Lessons
Lesson Info
Getting Started with Camera Raw
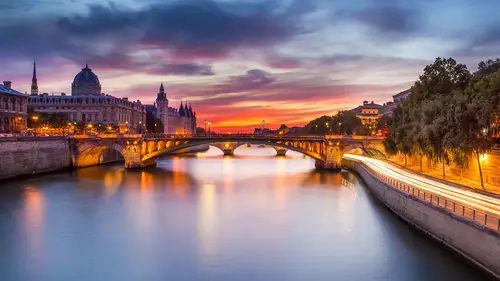
I'm gonna jump into bridge for our first project, which is video downtown Los Angeles. So what usually do when you want to do a GI's? You take three photos, you take one that's a normal exposure. And you that one, which is that's a normal exposure. And then you have one which is under exposed. I usually good due to two f stop so to f stop under exposed and two f stop overexposed. I know a lot of people do like five exposures or nine exposures or want to stop. My formula is two f stop three photos. Why? Because I can. And because I don't find I never had a situation where I'm like Oh, I need more photos. I need, like, five I need No, I've done everything. I've been doing it for 12 years in or with the photos. Now that's who I am and that's my workflow. Now there is a new option that just came out a little over a year ago within camera, where you can do it here in camera and we're gonna use that a lot because I think it does a very natural age, er thus the name of this class, so which is...
really cool. So I'm going to select all three photos I want to right click Open and Camero. Somebody asked me a question earlier, which I thought was like, When do you do bracketed shot? I my rule. These usually is whenever the sun is around if the sun is around. And this song was a little here to the right, But I felt there was a lot of information. Scott, this was one of the most crazy sunset I have seen in Italy and, you know, a row filed by definition, his role. It's not saturated. It's not contrasting. Very happy about that sunset. And, um So what I'm gonna do is I'm gonna click here. I'm going to selling old three photos. So I have selected all my images and I can click here, and I think like merge to HDR. What merchant here is going to do is that it's going to take all this exposure and create a super incredible role file that's gonna get all the information of the and they're exposed photo, the overexpose photo and the normal exposure all for the price of one. And what's amazing is that it's still a row file. So you just have very little options here. A line images, photo tone and Diego So aligning Maggie s make sure it's always on because, you know, you can move from one photo together. You always want make sure there are line. That was It's just not gonna work photo tone. I don't do it because I rather tone it myself and de ghosting, I will say that up in the next video. So marriage save And now camera was gonna create a row file. That's an A G R. And that's something that didn't exist for years. For years, I used to have to, you know, sometime retouch every exposure and then do Major Rdn. Now you can start by doing Eulogio and you re touch, which I think it's a much more natural workflow, especially about the white bounds, because once the white balance is baked in, it's really hard to go a different route. So I'm gonna put up the shadows very surprising. I'm gonna bring down the highlights now on this one, and you got to really watch for that on HDR if you go all the way, especially with that type of sun said you get all the details and sometimes it doesn't just look right. So you're better off sometimes justly, you know, making a bit brighter, more diffuse. It's kind of cool. And I'm gonna make my blood poem by holding the option key. So it's just like retouching a raw file. Acceptance in HD Extended has got more information. And, um, well, actually, the de ghosting option is kind of interesting here. You see, I didn't do any de ghosting option, so it's kind of blending all the different service. I'm gonna redo it at the end with the d goes things I want, you'll see the cars. They're gonna be a bit different. Uh, I'm gonna do my white. I'm gonna hold on the option key in my white. And as you know, when you hold on the option key, I need to do white Anything which is red means it's 100% pure white. And here, when you hold on the option key, anything which is like yellow red, it's one person, pure black. I always go further on the blacks. Then I go on the white, and then I'm gonna boost the exposure and as I boost the exposure, always add a bit of contrast. Contrasts really makes you feel a little darker, so that's kinda cool. And, um so that's my basic thing. I never do clarity as like this because it just gives. Like when you add clarity, it gives again a sort of no natural look at decent rates. The photo. I like to do it locally, which is what I'm going to show you now on. That's my basic settings of the first panel off Camaro. Then, of course, we have to look at they, uh, a different white balance. So I always look at ST White bones, daylight cloudy and shade. Do I want to go for a very warm look or do I want to go for a look that's got blue and warm? I think I'm gonna I'm gonna go for blue and warm. I think I like that and add a bit of magenta because that's my signature. People called me Mr Magenta. And on the way I know you want this. We were and ah so well a next I'm going to go into the details section sharpening, so I'm going to zoom in here at 100%. Just I see what I'm doing. And Ah, and I'm just gonna sharpen these photos. I'm gonna put my limits around and 90. Anything on sharpening something. This. Now, when you bring the shopping and 92 problems, you get nose back in the sky. So that comes to the rescue, the masking your hold on the option key and you go all the way to the right. Anything which is black is not gonna get sharp in. And boom, no shopping. This guy says very smooth. And I'm happy I'm happy, so fit into view. And now I'm ready to do the local adjustment to bring the drama. Is this photo that it deserves? So here, the grated filter. I'm gonna do one way to feel good here. I'm gonna lower the exposure so that I'm always trying to close in my foot from the top. That about him to force the people to look inside. Please look inside. That's what it's saying. And although I don't find the cars to be so so nice, so I'm gonna make this And also, you know, one thing I didn't show you is because off the ghosting effect, which I have not used. If I go 100% and I go, Ah, where the cars are, there's something weird. It's gonna happen. It's look at this. Is this sort of, like, laser thing here? That's pretty bad, right? Yeah. And that comes from the ghosting effect. So that's why all shoes, honestly, the first time I did it, I did this way. And what I did is you know, I do like a magician. Anything that I want people to see, I just make a darker and anytime we want people to see it make it brighter. You know, don't look my hand. I'm doing something here, you know, that's the whole idea. So I'm going to go here fit into view, but we're gonna look the ghosting option sees what I see, what we can do if we can make this better. It's not the end of the world, but it kind of looks weird to have that. So I'm kind of happy with that. But I'm like, Oh, no, I got this issue, and that's really not nice. So I can click here, and I could go back and check by three exposure here which have not been read. Did you see it updated the row foul, but not this one. And of open up in a Camero, I'm gonna go here again, set up toll. And I am gonna go back to the merge to HDR. But this time I'm going to try the d go see option and see what happens. So ghosting is, you know, the cars were moving and so that's why you had this, you know, kind of weird things. So this time I'm gonna go saying I'm gonna go high. I want to go. Ah, high ghosting effect. And you see says short. Really? With the red color. Have to wait for this to go all the way. But if I click here, wait for it, wait for it. Okay. I see. Sure. Relate. Still. So what? It's doing its And because I put it on high, it takes a little more time. But what it's doing its taking basically the under exposed photo, the one where there is less car moving, and it's going to say, OK, I'm going to try to blame the three exposure, but I'm gonna use anything that's moving. Is gonna come from the darker photo, so there are not moving. That's usually went into it. And look at this. The cars are all steel now. Show overlay and you can see in red where they did it And it did it where there was movement. So it's a different look. You know, it's a different look so I can click here on merge and save it. And I can re dual that I did or I can use presets. I can go back to bridge. I can kick your undone for now. And I can take the 1st 1 which that's the one that I did without the ghosting effect. And I really liked what I did here So I can double take on this one, and I can go here in presets, which is the last before last panel. I can click on save settings, and I'm gonna call this. I'm gonna click here safe. I'm called this, uh, hdr one. Because they might be in India's two of the movie does. Well, there'll be a sequel. Okay, I'm going to come down, and I'm gonna go back here and think this one. So this one is the one with the ghosting effect, and I'm going to go here and click on HD A one and the old that I've done on the 1st 1 is gonna be applied here except the local tools because, unfortunately and Adobe, please listen to me. You can save everything but in preset. But the local adjustment meaning Nino grade Ian's radio filters and brushes, which is not the case was like from I don't know why the whole engine. That's the only difference that I've seen between Camero and Adobe Light Room is that the presets don't work with local adjustments. So I stayed, meaning that I have to go here and do my great and here and here. But now I don't have the issue of the cars, you know. Let's look at the cars here. It's rendering. It's a little Let's look at the cars. Come on, render you see another old sharp. It's there are not moving. We don't have the same issue, but we kind of lose the sort of loan exposure effect that I had before, you know? So it's a bargain. It's, you know, you will see in a later project. We might have to go into photo shop and and do something about that and use layers. But I just want to show you the classic Camaro workflow, you know? So I'm gonna make this smaller and and Voila. So, you see, none of the top of the buildings are dark, so I'm gonna go on brush here minus, and I'm going to go, and I'm gonna brush this out, making sure. Oh, sorry. Command Z to undo you. See, I didn't have auto mask on. And so when I don't have a mask on, it starts screaming. Hello. Above. Hello. Not good. So what a mask and no. Hello. It's crazy. It is completely wild. I don't know how they do it, but they do it. And so none of the great And it is only in its not on the top of the buildings.
Class Materials
Bonus Materials
Ratings and Reviews
Dean Salman
This was a good course if you want to know how to improve your photos using post processing features in software. He does show you how to combine a HDR but that is all. Very little how to take the HDR photos and what to look for in the photos when taking them. There was only about 10% HDR. The tips on how to bring a photo to life was good, but I was hoping that the HDR was more covered since that is what it was about. So I recommend it only because of there is good information on post process, not about HDR.
renee Akana
This is not a beginner's class. It's not an automated process where the program spits something out, but it's a great approach to using photoshop to give you a fabulously realistic approach and his personality is A-okay... I enjoyed listening to him and seeing things I didn't think to do when I was working in photoshop hdr. Photomatix, Nik, et al, can spit something out, but in Photoshop, you have more control with the outcome and it will be more realistic.