Lessons
How to Combine Images using Blending Modes in Photoshop
17:44 2Advanced Blending Modes in Photoshop
08:03 3Adding Text in Photoshop
13:34 4Working with Stock Images in Photoshop
04:52 5Accessing the Blur Gallery in Photoshop
02:08 6Learning to use Blend If in Photoshop
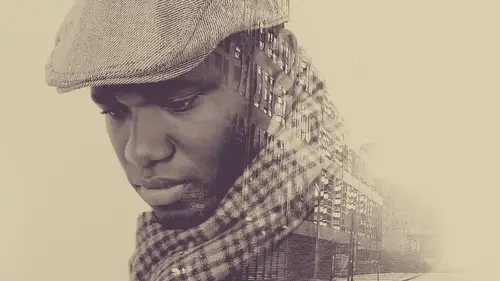
06:59 7Creating a Double Exposure Album Cover in Photoshop
32:34Lesson Info
Advanced Blending Modes in Photoshop
Next example is going to be really, really simple. I've got two different images of, ah, sir, for a girl surfer, and we're going to be combining them together just to create a little bit more of a story you can definitely do any type of any type of photo. I would think that doing something like in the wedding market would be really interesting, like a picture of a bride and then a maybe like a close up of the same bride, whatever using both of them to kind of tell, tell a story. So in this case, we've got two images of a surfer girl, and we're going to be bringing them together, so I've got this image, we're going to just pop right over top here, and then we're going to be changing our blending modes, so this is just going to be a little bit of an example in how to use blending roads, all right? So before we get into it, let's, go ahead and talk about plenty modes what they are, how you use them, getting to know the different blending both because when I was first starting out in photo...
shop, I clicked here, and I'm like, well, that's a lot of stuff, I don't know what it was like a quick one, it wasn't for a like at least a year later that I realized that the blending modes air they're divided into sections. So up at the top you have your normal section, you have normal and dissolve dissolved by the way I rarely use, and it seems like it's the case for most of these sections, so we have the normal section, the darkened section, the lightened section, the overlay section, the difference and then the color section down here in the bottom photo shops done a really good job of grouping these by common use. So for instance, darken and multiply, you're going to be using quite a bit more than linear bird liked in and screen you're going to be using a lot more than linear dodge things like overlay in soft light, I use those a lot like I may be used pin like once or twice in the entire time that I've used photo shop because if they tend to do a little bit, maybe harsher effects or a little bit more specialized, if you want to do like funky graphics and things like that, you know things like subtract exclusion difference and divide those air great. But from normal photo editing, I'd recommend sticking toward the top of each group, so if I had to say, you know that there were there were, you know, let's, say six blending modes that I would use quite often it be darkened multiply lighten and screen overlay in soft light that's the majority of what I use now if you do want to change work with your color you could do that down here as well but I'll tell you most of the time I don't know what I'm gonna pick most of time I have no idea I'm going to use soft light or I'm going to use the linear like most of the time I just flipped through them so I'm gonna show you guys the keyboard shortcut for that because it makes it a lot easier to just be able to flip through all your blending modes really quickly and not have to like decide before you actually do it so first thing you want to do is hit v for your move to and that's actually really important because when you are on your move tool that's going to be basically default and that will select your layer all right so v for the move tool and then I want to hold down the shift key and click the plus in the minus and you can see all my blending roads were just flipping through them so as I go through I'm able to just go through all of my blending bodes and then it's really just up to me to decide what I like the best and we can see now, instead of just a totally normal image, we can see these two images are actually starting to blend together, all right? And we can do this in any way we want weaken, do one layer on top of the other, and I'm going to work on changing the blending modes of each to kind of see how those play together. All right? Well, let's, stick to something like this for now we're going to wind up changing that in just a little bit, and we can decide, you know, if we want to keep our portrait image or the landscape and for this case, I'd actually like to keep our landscape normal, and we're going to be sorry we're going keep the portrait normal and we're gonna be editing the landscape, so I'm gonna go ahead and use the crop toe and change our crop from horizontal down to vertical, we're gonna bring this up just a little bit as well. There we go so we can see just changing our crop gets it's a totally different picture, and this would be, you know, you could have, like, a get a brand name or something like there you could do a lot with combining multiple images let's, try changing this back to normal. Okay and then we're gonna place this layer over top and then I'm gonna change the blending mode of this layer so you're going to see how the blending loads in the order they influence each other so again the for the move tool when I hold the shifty and click on the plus there we go moving through our layer blend modes all right until we find something we like and this is you know this is definitely a cz good a strategy is any I would say a lot of the time this is what I'm doing I'm clicking through and I'm figuring out hey I like that or I don't like that that looks pretty nice actually I kind of like the darker there let's see I'm going to keep going that's on more multiply all right that's kind of nice as well I'm going to try lowering the capacity is well so we're working with blending modes I'm gonna lower the opacity there we go so we can kind of get a little bit different of effect one we're working with our subject alright just switching through them all right there we go that's really cool because we do have like a really nice let's just make this a little bit larger we do have a really nice sunburst effect so it's basically like two images well I think it was a little more what do you think a little more clear smaller right? Yeah, so basically, I'm seeing two images of my subject let's go ahead and take care of this bottom area because it is you can see the edge just kind of like, drops off really quickly, so I'm going to place a layer mask on my layer. Organs are grading tool so g for the grady and tool and I'm gonna paint with a foreground too transparent, radiant and go straight up just like that to let it blend out very smoothly, all right? And then we're basically I wantto just get every got a selection. That's all right? Getting to find our subject. All right, now, where you going to do a couple more things? I just want to warm this up just a little bit because it I think we lost a little bit of a really nice warm there and the solar flare swartley sunflower out on towards goals. Yes. Um, let's, bring this over here. I'm gonna add a little bit of red, which is going to add a little bit of it and we're going to take our blue channel and I'm gonna pull this down a little bit. The opposite of blue is gonna be yellow, so if you ever need yellow, just go to your blue channel and pull that down just a little bit ok, that looks pretty good, and now I can just paint this in. You could use a brush tool, you can use a grating tool with a round, radiant there many different ways. You can do this, but this is just going to help that color blend back in, so it doesn't look so, you know, it doesn't look so washed out there, all right, very, very cool. So now we're free. We can change this anywhere. We want aiken, aiken, move this around. You know, if we decided we wanted this, if we wanted her to be somewhere else, I think I like, you know, having her centered in the other image, but feel free, you can. You can always change these things, and you can change multiple blend modes at the same time. Um, that's, actually, pretty cool. I like that. What do you think? Unanimous everyone's like, yes, that's, amazing.
Class Materials
bonus material with purchase
Ratings and Reviews
D Kelly
Excellent Class. The instructor is down to earth and he feels like just a good bud who just stopped by to teach you PS. It is very fast so working knowledge of PS is a must! I learned some neat tricks and love being able to be creative. I do a lot of photography so it will be fun to start collecting my own images. in which to be more creative with.
JOSEE DECARIE
His classes are very well explained, very interesting and he is dynamic, I love the courses of Aaron Nace.
Edward Ries
The course content is excellent. However it appears that the instructor assumes the online class are already experts. He zips through actions faster that can be easily followed so the how to value is lost. The results are evident but the various steps to get there are lost in the speed with which they are executed. This diminishes the value of the course except for those who are already extremely versed in photo shop actions.