Lesson Info
2. Newborn Shoot: Posing on a Bean Bag, Part 1
Lessons
Lesson Info
Newborn Shoot: Posing on a Bean Bag, Part 1
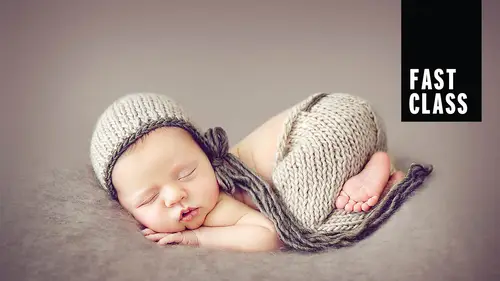
So it's now about 77°F in here, which is really nice and warm. And little Hunter is sound asleep over here. So we're just getting ready. But before I actually take Hunter um from her mom, I'm gonna set my bag up and I'm gonna explain why I do that. Um the way I do it to get a really nice smooth backdrop on my on my beanbag. Um I'm not gonna clamp it up to the backdrop to start with because I'm going to get a beautiful shot of Hunter on her back with a wrap around her. But I'm gonna layer it the way I do in my studio at home. So I have lots of spare blankets here. I would probably use 4-5 blankets to lay in my bag with. And it's just so I'll show you in a minute, let me just quickly throw these on, this is my waterproof Waterproof one, and then I'm just gonna put another one over the top and then we'll choose our backdrop from over here that we're going to use during this Mhm little session with Hunter. So obviously we have limited time, I've pushed down in the middle to make a well, so...
that when I put her on her back in the middle, in that well, she's actually going to have a little bit of support on her. If I was to lay her onto a flat hard surface, she's gonna startle in her arms and legs are gonna go flying out and she's she's gonna become unsettled or awake or something like that. So what we want to do is create a nice round um a little sort of well in the middle for her to go into and it's going to support her arms and legs and keep them in nice and tight because I'm not going to clamp it up now, but because I want to clamp it up when I'm finished with this set up, I'm just gonna see you can see how I go with ways, it actually fits across across the width of my my stand. So just lay it down on the on the backdrop so that it's easy to clamp up when she's on there and I don't have to lift her off. And the reason I put so many um blankets on when I'm layering my bean bag, is that when I put my cloth nappies under to support the baby and to prop the baby up, if I put it under the first layer you can see it and then you have to do a lot of work in Photoshop to fix that to hide it. So what we do is I put it all the way under the bottom layer of my blankets and it creates a left, but you can't see it because it's smoothed over by the amount of blankets that are on top of it. So that's why I put quite a few blankets under there. Yeah, so she's on her back but I'm just gonna gently turn her to her side and I'm keeping my hand on top of her arm and her leg they go so her arms and legs dont come flying out so I'm just gonna carefully pull back the the nappy there's all sticky sides are the worst. She's just pushing against my hand there with her legs. So this is my mobile phone that I'm just gonna pop some white noise on with and this is my little heartbeat monitor that comes out of the back of a teddy bear. Well oh oh well. Mhm. Mhm. Oh yeah. Yeah I'm just turning that away so it's not directly blowing on her. What? Yeah. Yeah. Yeah. Yeah. Yeah. Yeah. Oh. Mhm. It's always nice to have that nappy off so I'm just gonna fold her little legs up and she's kind of done that herself. Yeah Yeah we're gonna bring this arm up and with the rap I'm going to bring it in around her to keep her arms and her legs in place and then I'm just gonna tuck it in underneath her. Yeah. Yeah. Mhm. Oh yeah. So that when we take this off we can just peel it back and move on to the next position. It's holding her in place but it's not wrapped around and around and around her so when we can take it off I'm not going to unsettle her too much. Yeah yeah and what we're gonna do now is just turn her head upwards so her face is is up towards the light. Yes, I want this this bottom hand to stay on the map. So actually if you can see I have my little finger on her hand and I want to keep that hand there. But I'm using my other fingers on her head and I'm gonna turn her head with those fingers keep her hand in place with my little finger, it's a bit tricky but I found that by putting a little bit of pressure on something that you want to stay put and she's having a strange Uh huh. Mhm. Uh huh. And then just a gentle rock back into that position and we've managed while she was moving to turn her face upwards so we can see it, you know, we can't really just gonna hand above it, opening that down in the second. Uh huh. Yeah. Uh Mhm. Yeah. Mhm. Mhm. Yes. Mhm. Yeah. Yeah. I think when a baby puts its hands into a place that it feels comfortable with, I think that's so sweet and so cute, it's so natural. Mhm. So when I'm shooting above a baby, whether it's on the bag or in a prop, I always put my camera strap around my neck because if I was to drop my camera on top of the baby, it's heavy so it's just not worth it and with this particular lens I can put it between my legs and go back to positioning the baby. And it's nice and secure, suspicious. Mhm. Mhm. Yeah, Get it. So I've shot directly above of coming close for a nice close up, which parents love and what I'm gonna do is because this light is hitting her beautifully. I'm gonna come in from the side. So from here I'm going to because she's nice and sleepy and I wanted to sink into that sleep. I'm gonna pig my backdrop up to the bottom and then I'm gonna come and move her into position. Yeah. Oh. Mhm. Mhm. So these little clamps that I'm using, They're actually just from a hardware store and I bought a pack of 10 for $10 and they're so good to hold the blanket on and they came in different sizes. I'm not quite sure where you would get them here, but I'm sure they'd be available somewhere. So I pull it nice and tight across the, across the back. But to get it nice and smooth across here. These legs are perfect for it. If you don't have a backdrop stand and you're in somebody's home, you can use their dining room chairs and and then put other objects around the blanket to pull it nice and smooth. I've even noticed that there's a photographer that's designed a backdrop stand for a beanbag and I mean they're perfect. I'm not sure what they called or who did it, but someone, someone might know. Yeah. So by doing this and paying particular attention to my backdrop stand. I don't have to fit. I don't have to worry in post production about smooth too much smoothing of my blankets. I do smooth them but I don't have to worry too much about it because I've got no visible crinkles or anything in the background. Okay, so every time I do a set up and I use props underneath the blankets, like with my cloth nappies, I move them out, but I always put my hand in under first to support the baby. I don't just yank it out so the baby sort of get startled and then we'll just sort of gradually lower that blanket back into position. So from here I'm going to actually turn her and lay her on her side. So she's facing up. Her little face is facing up towards the light. So with this particular pose, she's got her hands pretty much up in here like this at the moment. I want to bring this bottom hand out to the back of her so that she is on her side and this hand here is at the back that's to prevent her from rolling backwards. If it's under here, she could roll quite easily. But if it's here it's actually going to support her. So I'm just gonna pull this arm out and keep your elbows in nice and close with this pose, I like to keep the elbow and the knee as close together as possible depending on the flexibility of the baby. So I would get the baby into position first before I go lifting and propping the baby up from either end with my props from underneath because once you've got them propped and you try moving them you're going to over extend them. So I'm just gonna gradually because our light source is over here, I'm gonna actually gonna move her bottom half this way, so we're going more towards that angle of light. So underneath her shin bones here at the back room, just gradually sliding my fingers and underneath. Mhm. Getting comfortable. I'm just gonna turn her bottom half around. She's so cute, isn't she? Look at this, is that not because the cutest thing you've ever seen and you can see her toes, you'll be able to see her face, you'll be able to see her hand. I love this image, I mean I love all images, but this is pretty cute. So now to keep her in that she's gonna get herself comfortable, which is fine going to come back around and I'm just going to pull that hand out and I'm going to put a prop in here behind her so that she doesn't roll backwards. So again my hand is underneath first and it's more going in behind to stop her from moving backwards and we'll adjust that again in a minute. But that's just so while I'm positioning her fingers, I'm gonna push the front of the beanbag down. This is why beanbags are so awesome because you can sort of push and mold with pressure. So I'm gonna slide my hand in underneath her head and just pull her hand out gently because it's gone in underneath her. Yeah. Four. Yeah. Yeah. Oh. Mhm. Yeah. Yeah, wow. And by also having that hand underneath it, once it's in here the head goes down, once you bring that hand up under the face, it actually lifts the face and we want to see the face. So now I'm gonna start lifting her from both ends just gradually to where she's comfortable with. Some babies don't like to arch their backs at all, they're more rounded, which would suit the taco pose which is up on the wall. Yeah, I don't know how they got their names. Oh so my hand is going in underneath her head and I'm just going to gently lift her up. Mhm. Yeah. Yeah. So we already have one prop at the back there. Well slide another one in here underneath her bottom. You could use a rap here, A beanie. Anything to give variety to your images. Just going to adjust her back legs again because she's getting herself into position here. So this back knee has come in under, I'm just going to guide it back out towards the back there. So if you can see a foot getting red or purple at all. You want to move that baby just adjust them slightly, Get the circulation going back in that area okay we're pretty much ready to take the photo. It's but I'm just gonna lift her chin there just a little bit so I'm just gonna push push my prop gently up underneath her face. Can you see that? Just lifting her face just a little bit because that's what we want to see. Yeah. Yeah. Mhm. Mhm. Four. Mhm wow. What? Yeah. Well oh yeah yeah she's gradually pulling that hand in back underneath her face there. Oh oh just a gentle little rock to relax her back into the, okay I'm gonna take yourself, yeah so again I'm coming in at this angle so it's nice and flat along here.
Class Materials
Bonus Materials with Purchase
Ratings and Reviews
Student Work
Related Classes
Newborn Photography